
 July 22nd, 2015, 1:43 PM
Last edit by: IB Advertising
See related guides and technical advice from our community experts:
Browse all: Steering and Suspension
- Chevrolet Silverado 1999-2006 GMT800 How to Replace Power Steering Pump
Step by step instructions for do-it-yourself repairs
Browse all: Steering and Suspension

How to change a multifunction turn signal switch in a '95-'98 model
April 27th, 2009, 6:25 PM
#1
Super Moderator
Thread Starter
Join Date: Oct 2007
Location: Dayton PA
Posts: 1,275
Likes: 0
Received 0 Likes
on
0 Posts
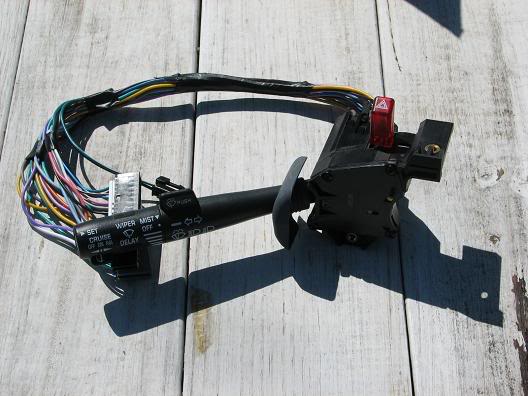
*Disclaimer* This "How To" was created for the sole purpose to help those who need to replace their turn signal multifunction switch (See pic below). This is in no way a replacement for an official repair manual and should not be treated as such. Please read through the entire guide before starting, and if you feel that you can cannot complete the installation properly, then have a professional do it. This installation will take you about 2hrs to complete, so please plan your time accordingly. Thanks
This is the Multifunction Switch you will be replacing.
Tools needed
Nut drivers or Sockets;
4mm
7mm
10mm
A letter "V" Torque driver (this has a star tip)
A wench to disconnect battery (this may vary depending on your battery)
A mechanical pencil ('95 models only)
A small headed standard screw driver
A pair of scissors
Before you start taking things apart, there are a couple of things you will need to do first. One, start the vehicle and turn the steering wheel so that the top of it is 90 degrees left or right from top dead center. Then turn the vehicles off and make sure the steering wheel stays or locks into this position. Two, then apply the Parking brake. Now you can start taking things apart.
1. First you will need to disconnect the negative side of the battery so that there is no power to the vehicle.
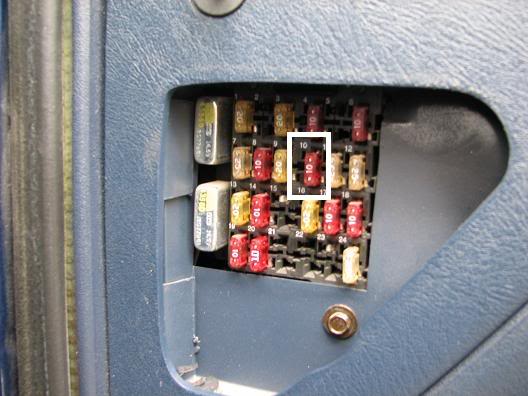
2. Second, pull the airbag fuse. This fuse is located in the drivers side end panel, between the door and the dash. On my '95 it was fuse #10 (2-1), it maybe different in your vehicle, so check the chart on the inside of the fuse cover to make sure you have the right one. After you have pulled the airbag fuse, wait a minimum of 10 minutes before moving to the next step. There are capacitors in the airbag module that will store a charge to allow for airbag deployment in case the battery is destroyed in an accident. Waiting 10 minutes will deplete this charge.
(2-1)
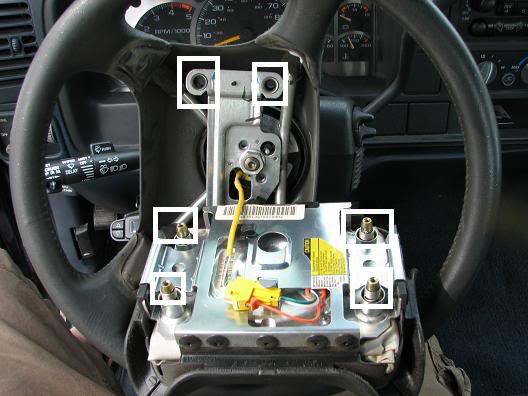
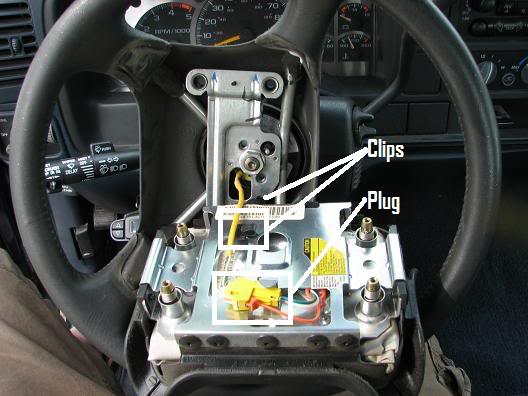
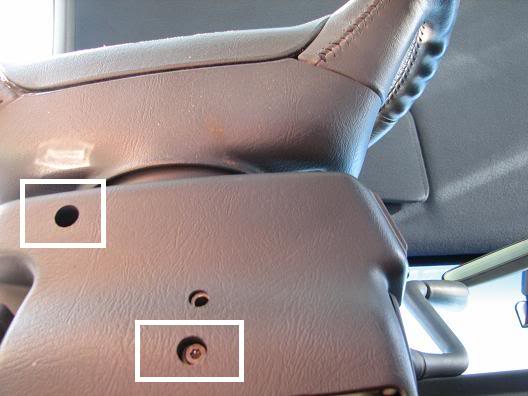
3. Next you will need to remove the airbag from the center of your steering wheel. On a '95 all you will need for this is a mechanical pencil. There are two holes on the right and left back sides of the steering wheel, which you will be able to access because the wheel is turned 90 degrees. Then insert the pencil into each of the these holes and give a slight push to release the airbag (see 3-1). On a '96-'98 model, the same four holes are on the back side of the steering wheel, but you will need to use a small standard screw driver to unclip the four springs (one in each hole) to remove the airbag.Now the airbag should be loose, but before you yank it out, you need to un-clip the wire and unplug the airbag before it can be completely removed (see 3-2).
(3-1)
(3-2)
4. Now remove any accessories the you may have attached to the under-dash cover panel.
(4-1)
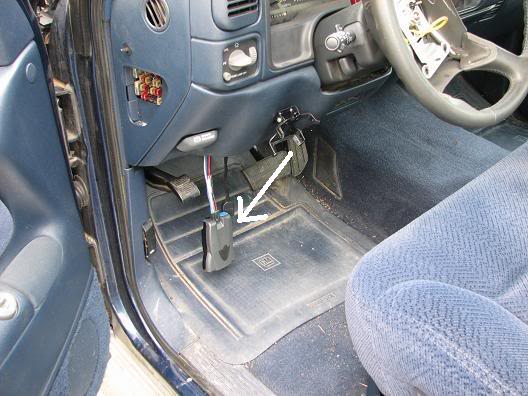
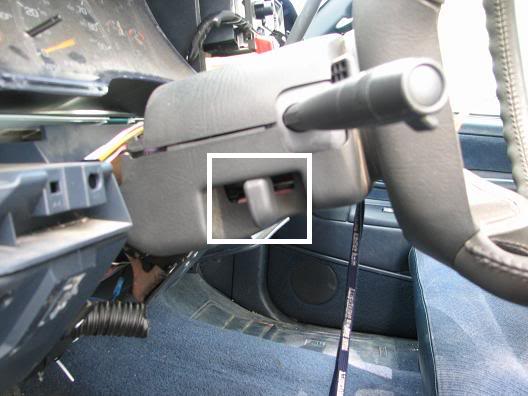
5. Then, remove the parking brake release handle (see 5-1). This is done by pulling the handle out enough that can get the plastic clips to release the "T" handle. Reapply the parking brake if it lets loose while you are preforming this step.
(5-1)
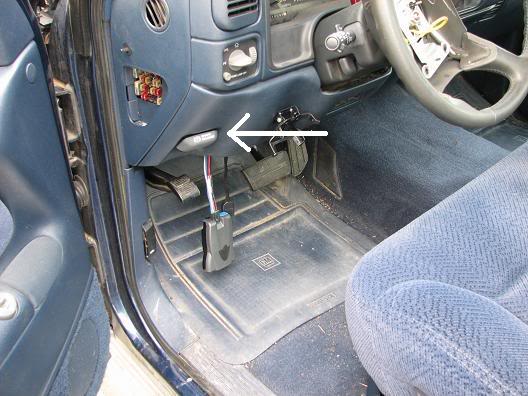
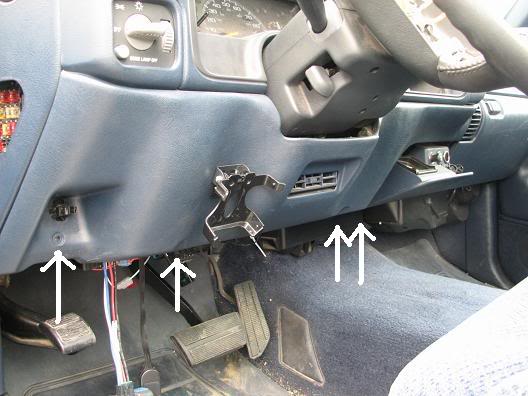
6. There are now four screws along the bottom edge that you will need to remove before you can take the under-dash cover panel off. Use a 7mm nut driver or socket to loosen and remove them (6-1).
(6-1)
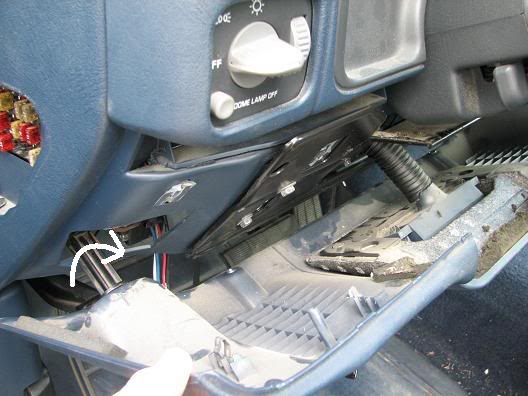
7. You may now begin removing the the cover panel. Start by pulling the cover panel toward you gingerly so you don't snap anything off. Once you get the cover panel off far enough, you will notice that there are two things attached to it: the parking brake cable and an air vent hose under the steering column (7-1). The vent hose can just be pulled off. To remove the parking brake cable, turn the cable base a quarter turn clockwise, and it should come right off (7-2). You can now completely remove the cover panel.
(7-1)
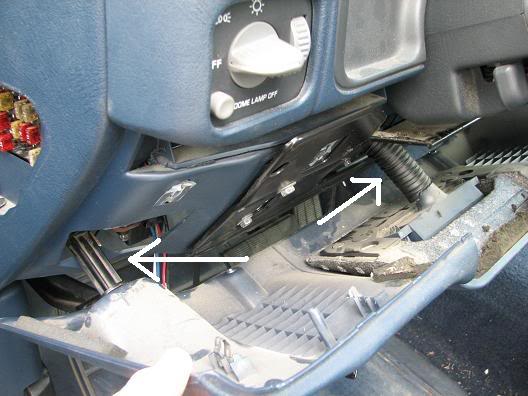
(7-2)
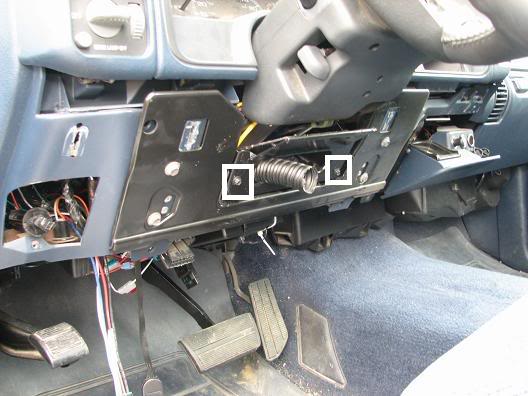
8. Next, you will need to remove the two metal plates that are under the steering column. The bigger of the two has four bolts that you will need to remove. To do this you will need a 10mm socket or wench (8-1). The one in the middle (the smaller of the two) is held in place by two screws and friction. To remove this one you will need a 7mm socket, wench, or nut driver (8-2).
(8-1)
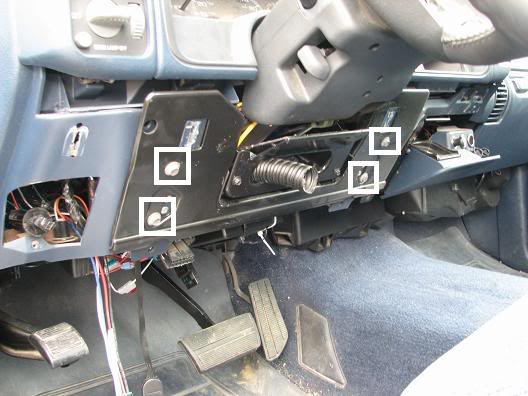
(8-2)
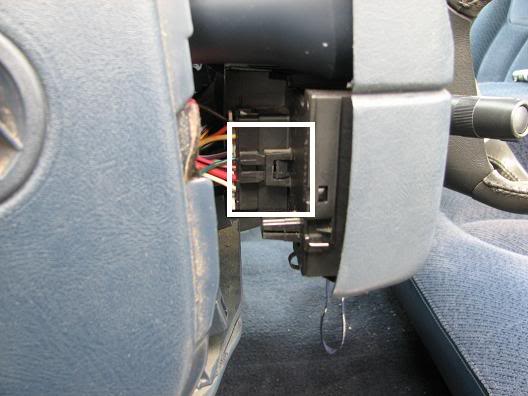
9. Now you will need to remove the upper dash bezel. The easiest way that I found on vehicles with an automatic transmission is to start by turning your ignition to to the run position, step on the brake and then put your shifter into first gear (if you have a manual transmission then you can skip that last instruction). If your vehicle is equipped with tilt steering, then tilt your steering wheel to its lowest setting. Now start pulling the bezel toward you, it should not take much to get it loose but do not force it. When you have the whole bezel loose, you will need to disconnect the head light switch, cargo light switch and any other switches connected to the bezel. The best way I found the remove the head light switch is to use a small standard screw driver and un-clip the wire harness from the switch itself (9-1). Also a good trick for the cargo light switch is to push from the back side of the bezel and pop the whole switch forward, and then you can disconnect the wiring harness from that switch or set of switches. Once the switches are disconnected, lean the top of the bezel toward you and then push down the inner back part of the bezel (the part the sits against the gauge cluster) while you pull. You may have to bend the inner back part a little to get it out of the dash. Be careful not force it and make sure you do not break anything! The most common way to break a hazard light button, is by taking the dash bezel off carelessly. You can put the shifter in park now that you have the bezel out.
(9-1)
(9-2)

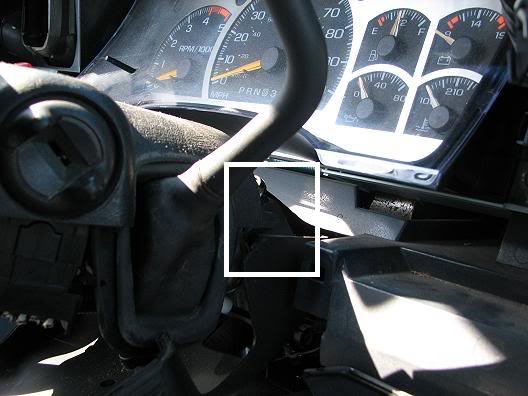
10. Now you will need to remove the lower steering column cover. Start by removing the two torque screws with a letter "V" torque driver on the bottom side of the steering column (10-1). Next, remove the tilt adjustment button, if equipped, by pulling the lever perpendicular to steering column (10-2). Now push the bottom cover away from you to get the cover lip out from underneath the steering wheel, then push down. You will need to unhook the bottom cover from the upper cover, and then you can remove it completely (10-3).
(10-1)
(10-2)
(10-3)
11. Here is the hard part, removing the upper steering column cover. Start by unscrewing the two screws on the bottom side with a 4mm socket or nut driver (11-1). The one on the left is easy to see, but the one on the right is buried toward the top of the cover between the steering wheel and the ignition cylinder. Once you get those two screws out, the cover will be loose but you can not remove it yet. Now you will need to now push the cover out and up (like the bottom cover) to get the edge of the cover out from underneath the steering wheel. Next, you will need to remove the ignition cylinder to get the cover off. Start by inserting the key into the ignition, and turning it to the start position. With your right hand holding the key in the start position, use a small diameter allen wench with your left hand and insert it in to the little hole on the top of the ignition cylinder holder (11-2). You will need to be very careful because you will have to do this while the cover is on and you will have to slip your hand between the cover and the column to do this. Now push the allen wench down in to the hole, you should feel resistance, and then turn the key back to the run position and the ignition cylinder should start to pull out (It took me many attempts to do this, so if you don't get it right the first time, it happens). Once it is loose, it should just slide right out (you may need to turn it a little to get it out if its groves). Once the ignition cylinder is removed, the cover should come off freely.
(11-1)
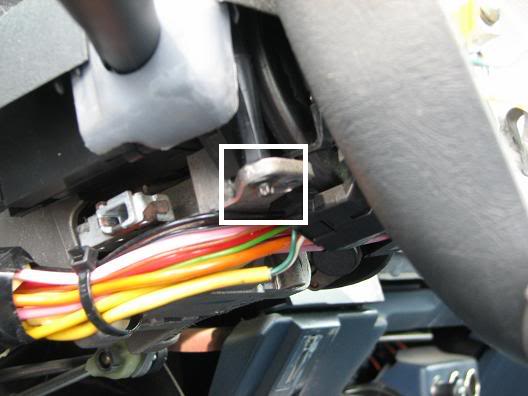
(11-2) I am showing this with the cover off because it was easier to see and take a picture, you will still have the cover on when you do this.
Please continue on the next post.
This is the Multifunction Switch you will be replacing.
Tools needed
Nut drivers or Sockets;
4mm
7mm
10mm
A letter "V" Torque driver (this has a star tip)
A wench to disconnect battery (this may vary depending on your battery)
A mechanical pencil ('95 models only)
A small headed standard screw driver
A pair of scissors
Before you start taking things apart, there are a couple of things you will need to do first. One, start the vehicle and turn the steering wheel so that the top of it is 90 degrees left or right from top dead center. Then turn the vehicles off and make sure the steering wheel stays or locks into this position. Two, then apply the Parking brake. Now you can start taking things apart.
1. First you will need to disconnect the negative side of the battery so that there is no power to the vehicle.
2. Second, pull the airbag fuse. This fuse is located in the drivers side end panel, between the door and the dash. On my '95 it was fuse #10 (2-1), it maybe different in your vehicle, so check the chart on the inside of the fuse cover to make sure you have the right one. After you have pulled the airbag fuse, wait a minimum of 10 minutes before moving to the next step. There are capacitors in the airbag module that will store a charge to allow for airbag deployment in case the battery is destroyed in an accident. Waiting 10 minutes will deplete this charge.
(2-1)
3. Next you will need to remove the airbag from the center of your steering wheel. On a '95 all you will need for this is a mechanical pencil. There are two holes on the right and left back sides of the steering wheel, which you will be able to access because the wheel is turned 90 degrees. Then insert the pencil into each of the these holes and give a slight push to release the airbag (see 3-1). On a '96-'98 model, the same four holes are on the back side of the steering wheel, but you will need to use a small standard screw driver to unclip the four springs (one in each hole) to remove the airbag.Now the airbag should be loose, but before you yank it out, you need to un-clip the wire and unplug the airbag before it can be completely removed (see 3-2).
(3-1)
(3-2)
4. Now remove any accessories the you may have attached to the under-dash cover panel.
(4-1)
5. Then, remove the parking brake release handle (see 5-1). This is done by pulling the handle out enough that can get the plastic clips to release the "T" handle. Reapply the parking brake if it lets loose while you are preforming this step.
(5-1)
6. There are now four screws along the bottom edge that you will need to remove before you can take the under-dash cover panel off. Use a 7mm nut driver or socket to loosen and remove them (6-1).
(6-1)
7. You may now begin removing the the cover panel. Start by pulling the cover panel toward you gingerly so you don't snap anything off. Once you get the cover panel off far enough, you will notice that there are two things attached to it: the parking brake cable and an air vent hose under the steering column (7-1). The vent hose can just be pulled off. To remove the parking brake cable, turn the cable base a quarter turn clockwise, and it should come right off (7-2). You can now completely remove the cover panel.
(7-1)
(7-2)
8. Next, you will need to remove the two metal plates that are under the steering column. The bigger of the two has four bolts that you will need to remove. To do this you will need a 10mm socket or wench (8-1). The one in the middle (the smaller of the two) is held in place by two screws and friction. To remove this one you will need a 7mm socket, wench, or nut driver (8-2).
(8-1)
(8-2)
9. Now you will need to remove the upper dash bezel. The easiest way that I found on vehicles with an automatic transmission is to start by turning your ignition to to the run position, step on the brake and then put your shifter into first gear (if you have a manual transmission then you can skip that last instruction). If your vehicle is equipped with tilt steering, then tilt your steering wheel to its lowest setting. Now start pulling the bezel toward you, it should not take much to get it loose but do not force it. When you have the whole bezel loose, you will need to disconnect the head light switch, cargo light switch and any other switches connected to the bezel. The best way I found the remove the head light switch is to use a small standard screw driver and un-clip the wire harness from the switch itself (9-1). Also a good trick for the cargo light switch is to push from the back side of the bezel and pop the whole switch forward, and then you can disconnect the wiring harness from that switch or set of switches. Once the switches are disconnected, lean the top of the bezel toward you and then push down the inner back part of the bezel (the part the sits against the gauge cluster) while you pull. You may have to bend the inner back part a little to get it out of the dash. Be careful not force it and make sure you do not break anything! The most common way to break a hazard light button, is by taking the dash bezel off carelessly. You can put the shifter in park now that you have the bezel out.
(9-1)
(9-2)
10. Now you will need to remove the lower steering column cover. Start by removing the two torque screws with a letter "V" torque driver on the bottom side of the steering column (10-1). Next, remove the tilt adjustment button, if equipped, by pulling the lever perpendicular to steering column (10-2). Now push the bottom cover away from you to get the cover lip out from underneath the steering wheel, then push down. You will need to unhook the bottom cover from the upper cover, and then you can remove it completely (10-3).
(10-1)
(10-2)
(10-3)
11. Here is the hard part, removing the upper steering column cover. Start by unscrewing the two screws on the bottom side with a 4mm socket or nut driver (11-1). The one on the left is easy to see, but the one on the right is buried toward the top of the cover between the steering wheel and the ignition cylinder. Once you get those two screws out, the cover will be loose but you can not remove it yet. Now you will need to now push the cover out and up (like the bottom cover) to get the edge of the cover out from underneath the steering wheel. Next, you will need to remove the ignition cylinder to get the cover off. Start by inserting the key into the ignition, and turning it to the start position. With your right hand holding the key in the start position, use a small diameter allen wench with your left hand and insert it in to the little hole on the top of the ignition cylinder holder (11-2). You will need to be very careful because you will have to do this while the cover is on and you will have to slip your hand between the cover and the column to do this. Now push the allen wench down in to the hole, you should feel resistance, and then turn the key back to the run position and the ignition cylinder should start to pull out (It took me many attempts to do this, so if you don't get it right the first time, it happens). Once it is loose, it should just slide right out (you may need to turn it a little to get it out if its groves). Once the ignition cylinder is removed, the cover should come off freely.
(11-1)
(11-2) I am showing this with the cover off because it was easier to see and take a picture, you will still have the cover on when you do this.
Please continue on the next post.
 April 28th, 2009, 11:58 PM
#2
Super Moderator
Thread Starter
Join Date: Oct 2007
Location: Dayton PA
Posts: 1,275
Likes: 0
Received 0 Likes
on
0 Posts
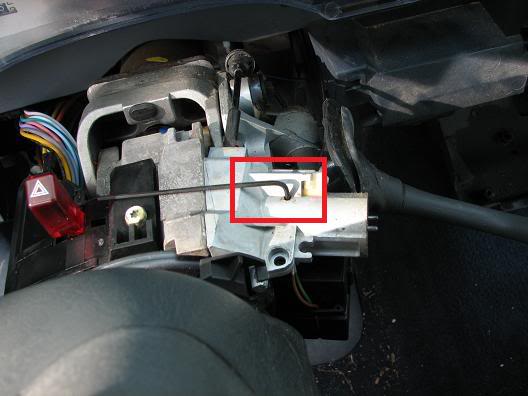
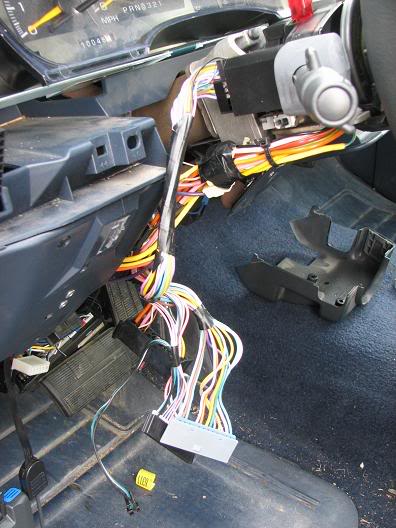
12. Now to disconnect the old unit. You may need to take the plastic wire tape off the bundle of wires going down the steering column into the dash so you can get the wires out. You can do this carefully with a pair of scissors. You will now need a 7mm socket or nut driver to undo the bolt holding the plug together (12-1). Once you have unbolted the plug, you can then precede to unplug the plug block (12-2). Now un-clip the two plug strips from both sides of the plug block (12-3). There is also a pair of wires (green and black) that go to the flasher unit that you will need to unplug. Just follow those two wires to the flasher and then un-clip the plug then unplug. All the wires coming from the turn signal unit should be free (12-4).
(12-1)
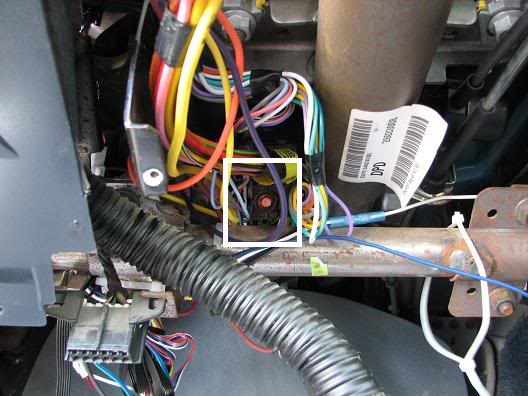
(12-2)
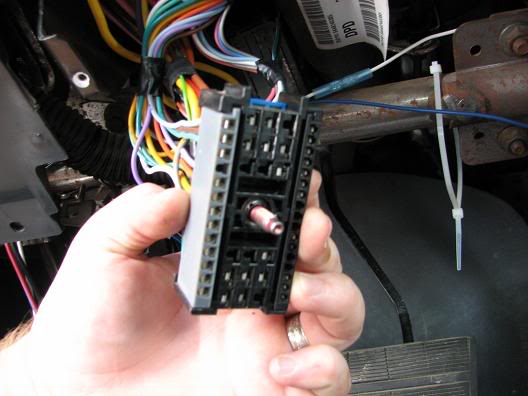
(12-3)
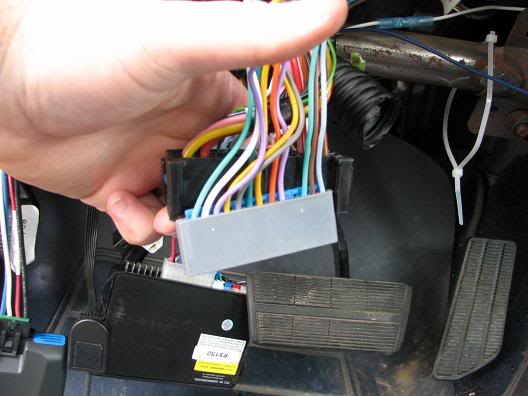
(12-4)
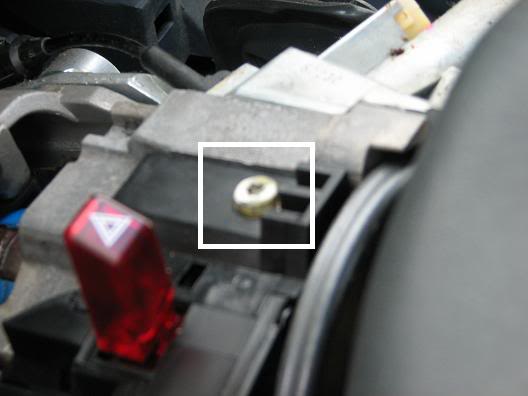
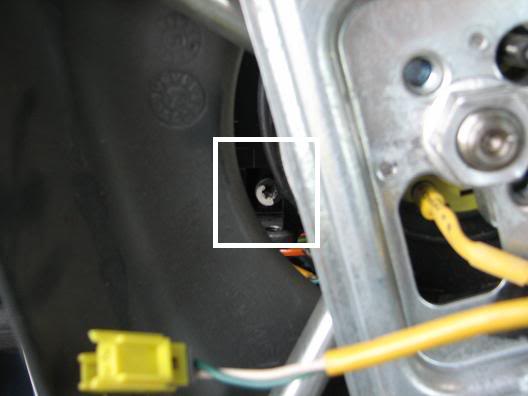
13. Now you can finally remove the old/broken unit. Use a letter "V" torx driver to remove the top bolt (13-1). Then using the same driver, you can unbolt the lower front bolt by inserting the driver between the steering wheel and the steering column (13-2). It is not necessary to remove the steering wheel to get the second bolt out, but if your model is somewhat different and you cannot get the torque driver through the opening then you may need to go ahead and remove the steering wheel. Once the unit is unbolted, just lift and the old/broken unit will come out.
(13-1)
(13-2)
14. To install the new unit, just go in the reverse order and put things back the way you took them off.
(12-1)
(12-2)
(12-3)
(12-4)
13. Now you can finally remove the old/broken unit. Use a letter "V" torx driver to remove the top bolt (13-1). Then using the same driver, you can unbolt the lower front bolt by inserting the driver between the steering wheel and the steering column (13-2). It is not necessary to remove the steering wheel to get the second bolt out, but if your model is somewhat different and you cannot get the torque driver through the opening then you may need to go ahead and remove the steering wheel. Once the unit is unbolted, just lift and the old/broken unit will come out.
(13-1)
(13-2)
14. To install the new unit, just go in the reverse order and put things back the way you took them off.

 January 25th, 2010, 9:54 AM
#5
CF Beginner

Join Date: Jan 2010
Posts: 1
Likes: 0
Received 0 Likes
on
0 Posts
Great post. A few questions. Nothing works at all, brake lights, blinkers, hazards...until I push the hazard switch to on. Still no. Brake lights or hazard lights, but the blibker turn signals work as long as the hazar#d switch is on. Does it sound like I nneed to replace the whole thing? I've heard @one talk of people replaccing just the hazard switch?


