Chevrolet Silverado 1999-2006: Common Noises Diagnostic
This article covers a wide variety of noises common to the hard working Chevrolet Silverado. Read on for effective ways to track down noises, both outside and inside the cabin, and what can be done to correct them.
This article applies to the Chevrolet Silverado GMT800 (1999-2006).
This article will identify and address these categories of noises:
- Engine squealing, knocking, clicking, and coughing
- Drivetrain clunking, steering whining, and clunking
- Suspension grinding, and brake screeching
- Cabin panel squeaking, climate door creaks, and speaker fuzz

Materials Needed
- Spray bottle with water
- Mechanic's stethoscope
- OBD-II code reader
- Small funnel
- GM 8902-1185 power steering fluid
- Plastic auto panel pry tools
- Squeak reduction tape
- Mechanic's gloves
Step 1 – Engine noise: drive belts
The most frequent and common engine noise comes from drive belts. Repetitive squeaking indicates the belt is not running true, and prolonged squealing means that the belt is overheating. This noise is typically caused by a mechanical problem, either a worn auto-tensioner or idler pulley.
The Vortec 4.8, 5.3, and 6.0 liter engines have a main accessory drive belt for the water pump, power steering, and alternator. The main belt has a GM auto-tensioner (which maintains spring pressure to automatically adjust for optimum tension as the belt wears) and an idler pulley. The air conditioning compressor is driven by a separate belt mounted low on the engine, behind the accessory belt, and has only an auto-tensioner.
- While the engine is idling and with the air conditioner on, lightly spritz the belts with a water bottle spray. A steady or increasing noise indicates that the belt tensioner is weak and should be replaced. Temporary quieting indicates the pulley bearings are worn.
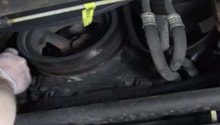
- To isolate pulley bearing noise, use a mechanic's stethoscope. When amplified, a good bearing will hum quietly and a worn bearing will grind or scrape. Figure 1 depicts the view of the belts underneath the air intake. Place the tip of the stethoscope on the non-moving, center bolt of the idler pulley (shown in Figure 2). Repeat on the center bolt of the main tensioner and the A/C tensioner, as shown.
For the DIY guide on replacing tensioners and belts, refer to this article: How to Replace A/C Belt Tensioner.
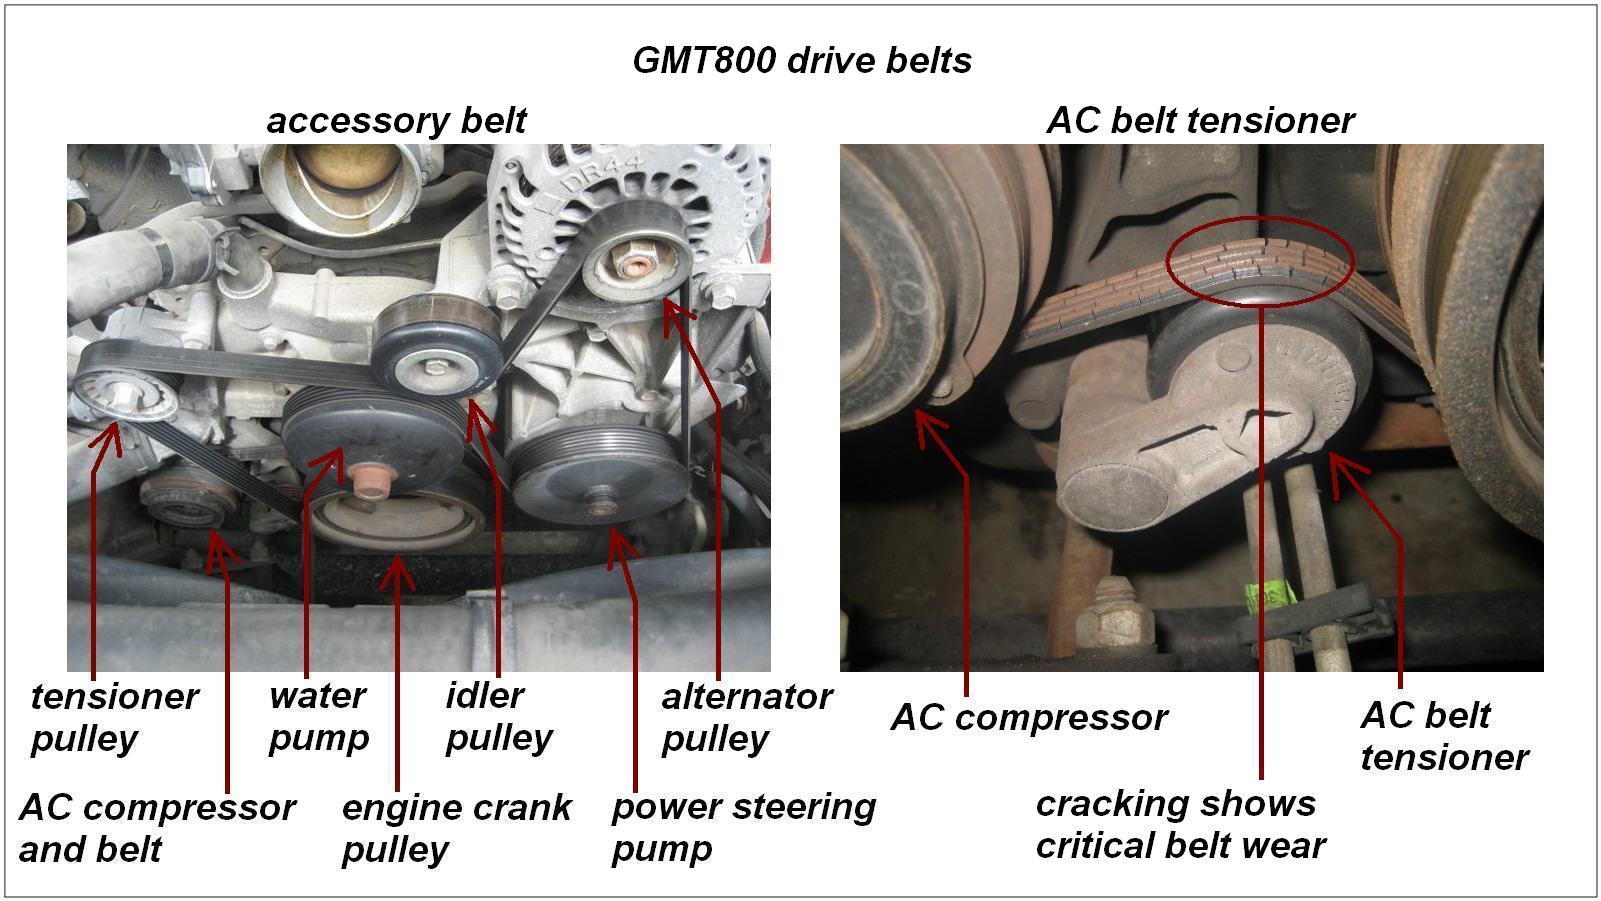
Figure 1. GMT800 accessory and A/C drive belts. 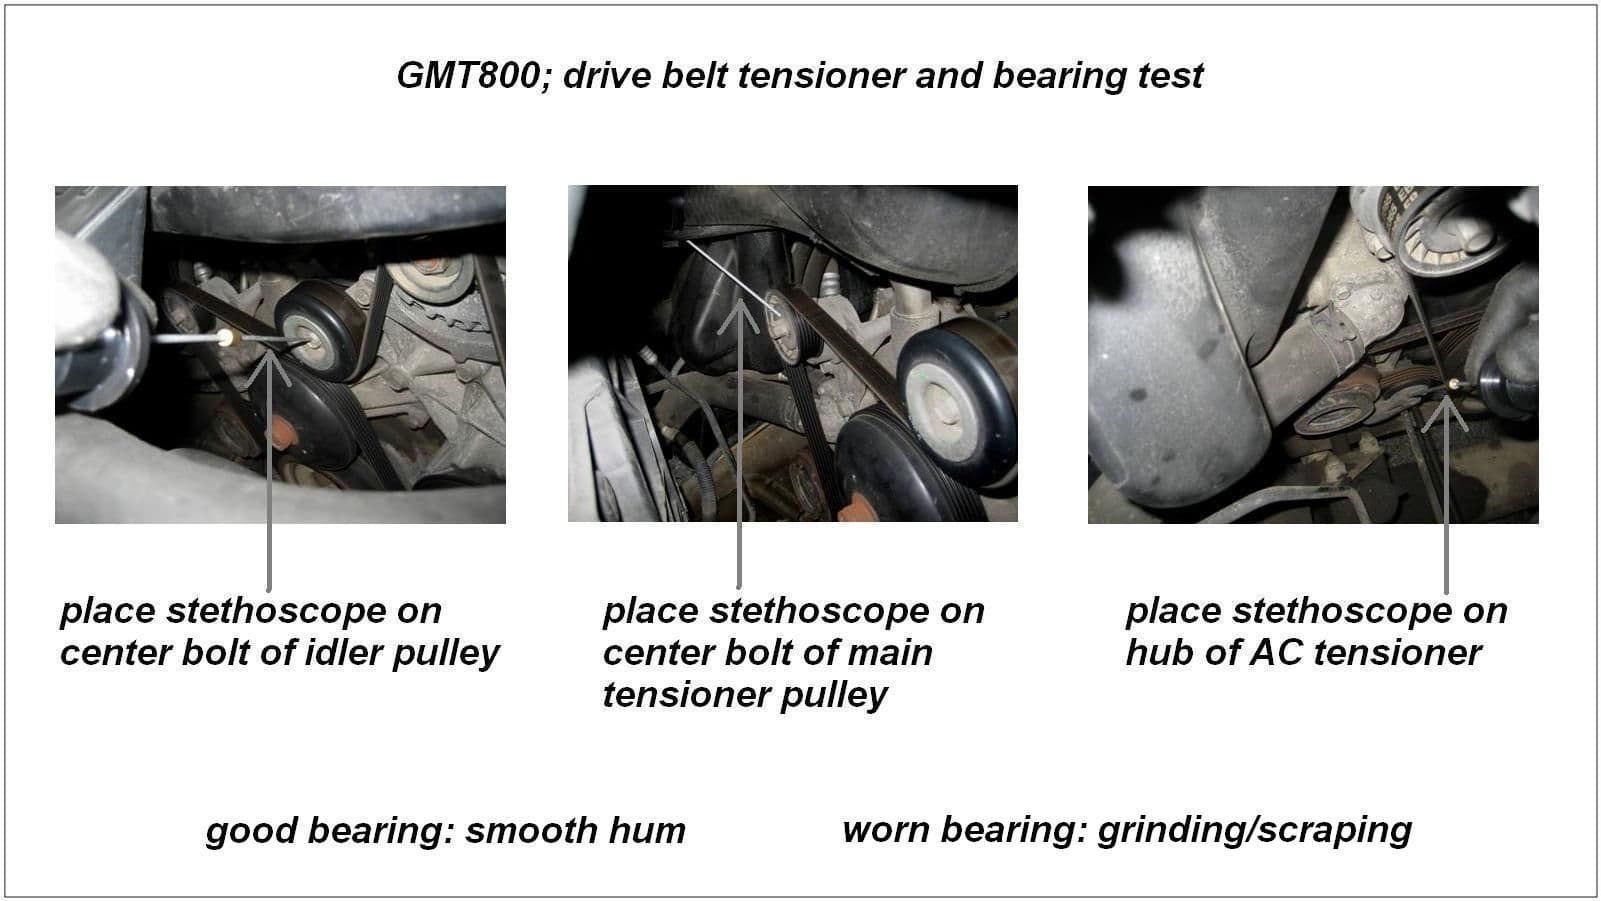
Figure 2. GMT800 drive belt tensioner and bearing test.
Pro Tip
Use caution not to get any tools or any part of you or your clothing in the moving parts, and do not wear loose clothing or jewelry. Be aware that the radiator cooling fans may operate at any time.
Step 2 – Engine noise: cold start knock and valve lifter click
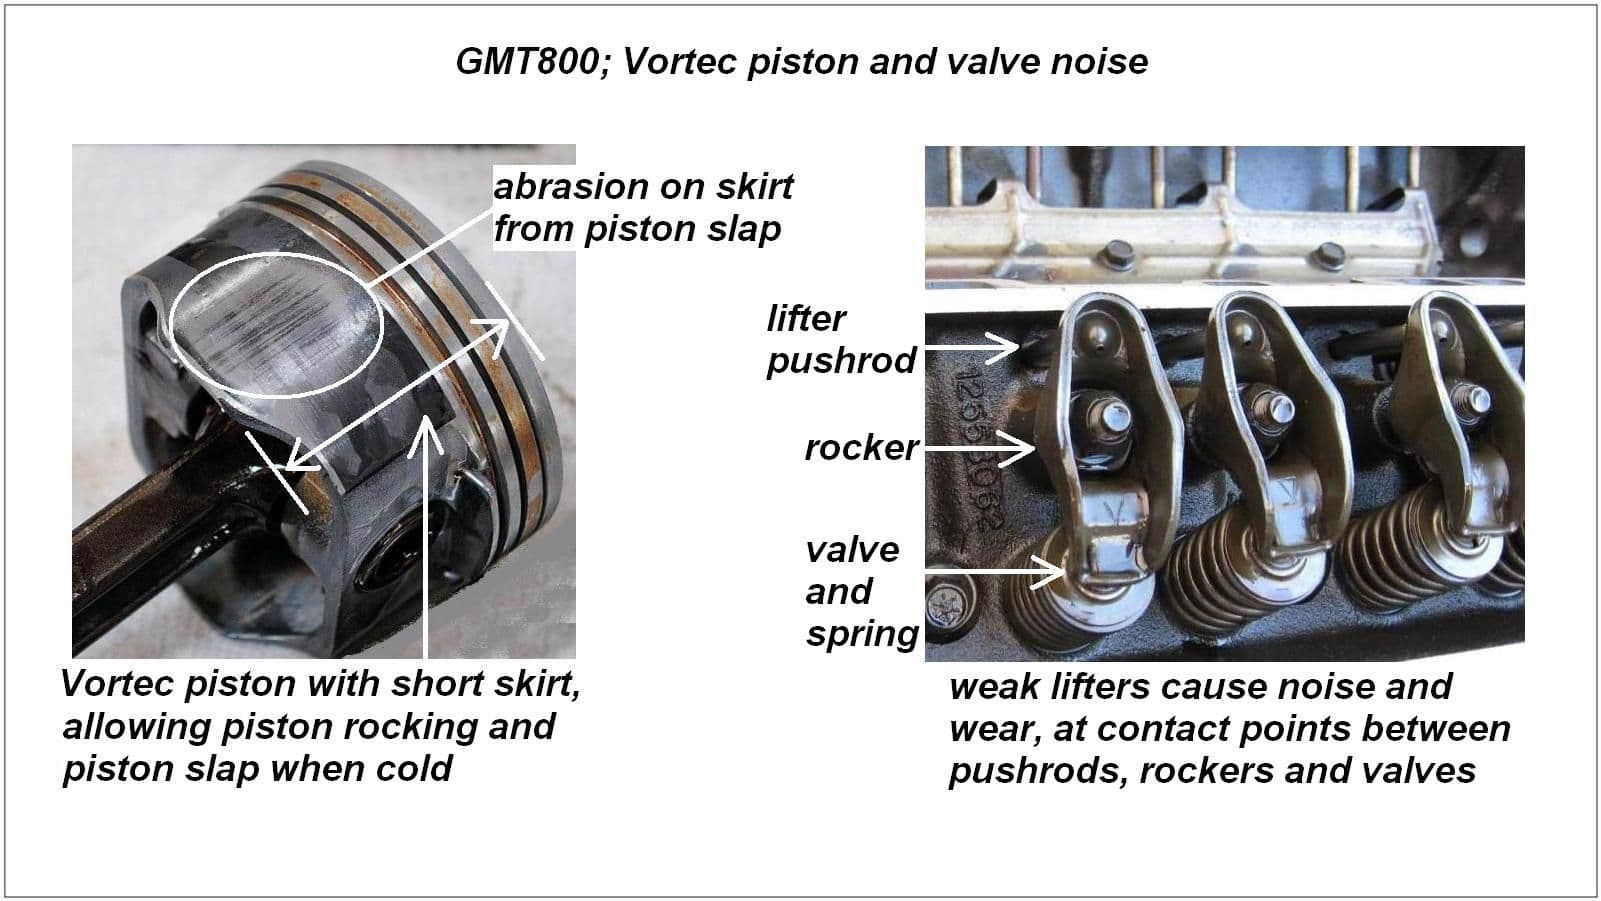
Cold start knock is generically called "piston slap," which is common in Vortec engines. For the first 30 to 60 seconds after a cold start, the short-skirted pistons rock inside the cylinders and slap against the cylinder walls, sounding rather like a diesel engine. The knocking can be heard around the top of the engine, but is much louder if you listen in the front wheel wells or beneath the truck. After a few minutes, engine heat closes the piston/cylinder tolerances and the knock goes away.
In TSB 01-06-01-022 (Aug 22, 2001) and TSB 01-06-01-028A (Mar 18, 2003) GM has stated that piston slap is not detrimental and will not affect the service life of the engine. Indeed, many owners report reaching 300,000 miles despite hearing piston slap.
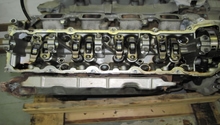
- Valve lifter noise is a light, rapid metallic clicking. Imagine 16 metal butterflies crashing together inside a jar. Old oil with dirty sludge prevents the valve lifters from pressurizing and maintaining contact with the rockers. You can hear lifter click best around the top of the engine, and isolate the noise with a stethoscope against the valve cover. It will occur at idle and increases as you rev the engine, continuing even when the engine is warm. Valve lifter noise is detrimental and should be addressed quickly.
- The best way to minimize both piston slap and valve lifter click is to keep the oil changed on schedule with 5W-30 synthetic, as well as keep it full.
- However, in TSB 02-06-01-038 (Dec 2, 2002) GM identifies a different engine knock or lifter click that is repaired by replacing the oil pump O-ring seal.
Featured Video: Piston Slap 2005 Chevrolet Silverado
Pro Tip
Older engines use oil, which exacerbates piston slap and lifter click. Check and top off oil at every gas fill-up.
Step 3 – Engine noise: coughing and cylinder misfire
Rough idle or interrupted acceleration are signs of cylinder misfire, often accompanied by the Malfunction Indicator Lamp (MIL). The MIL may illuminate steady to indicate that a fault has been recorded and your Silverado appears to be unaffected. However, a flashing MIL is serious; this means that a misfire is sending raw gasoline to ignite inside—and possibly ruin—the catalytic converter. You may be able to limp the truck home by driving at an RPM low enough to prevent the flashing and maintain the steady MIL.
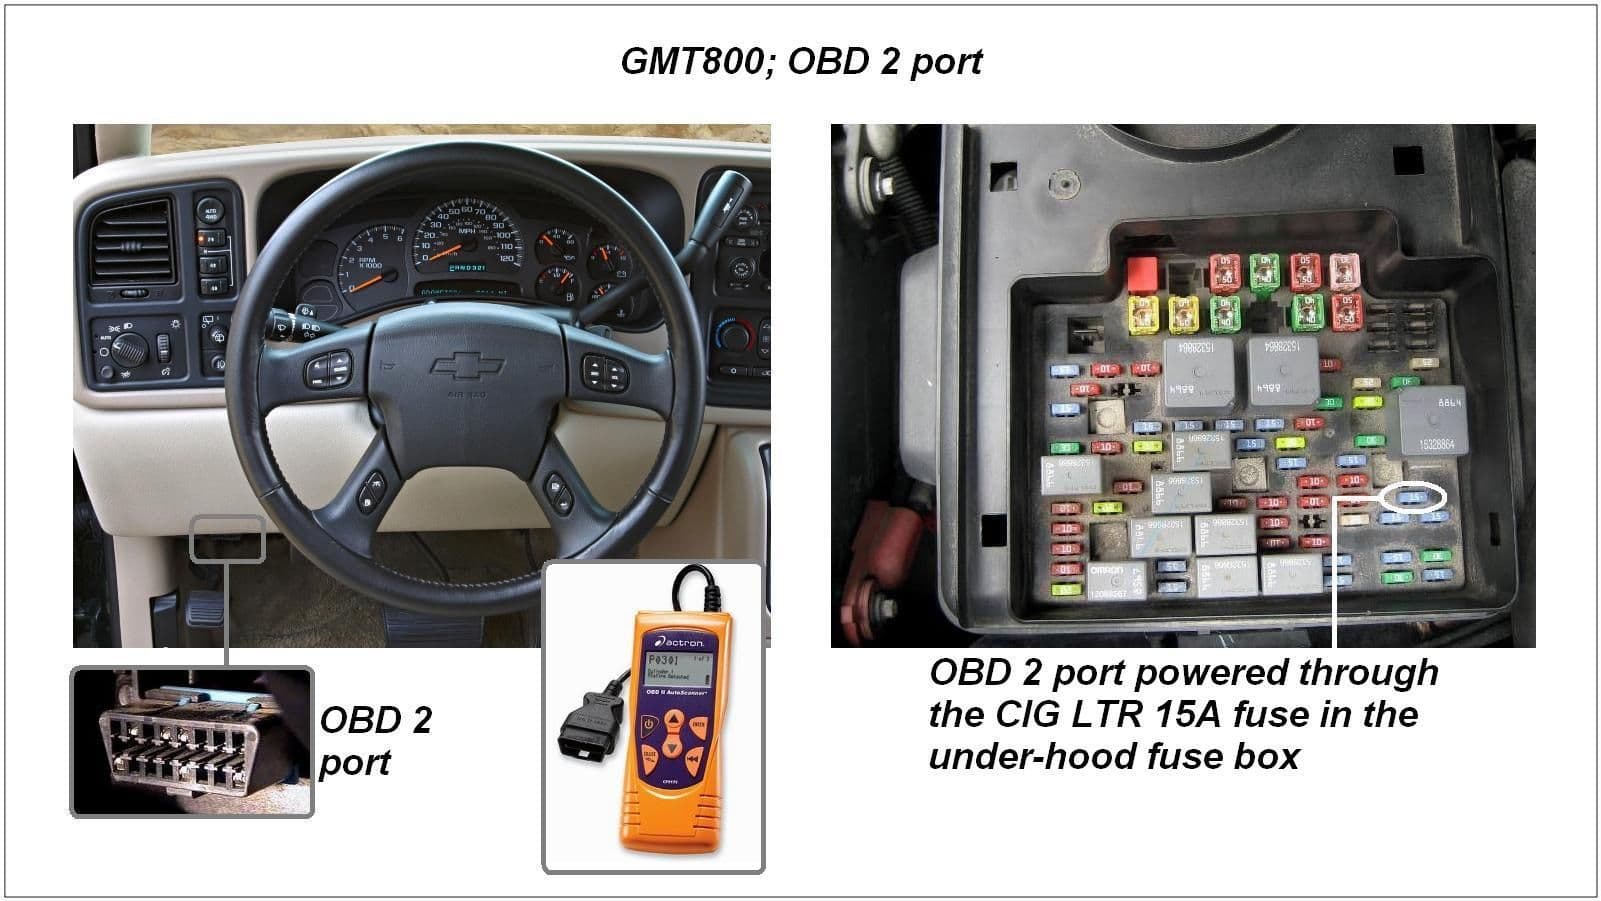
- Plug the code reader into the OBD-II port and switch the key to IG2, but do not start the engine. Follow the reader's instructions to retrieve Diagnostic Trouble Codes (DTCs).
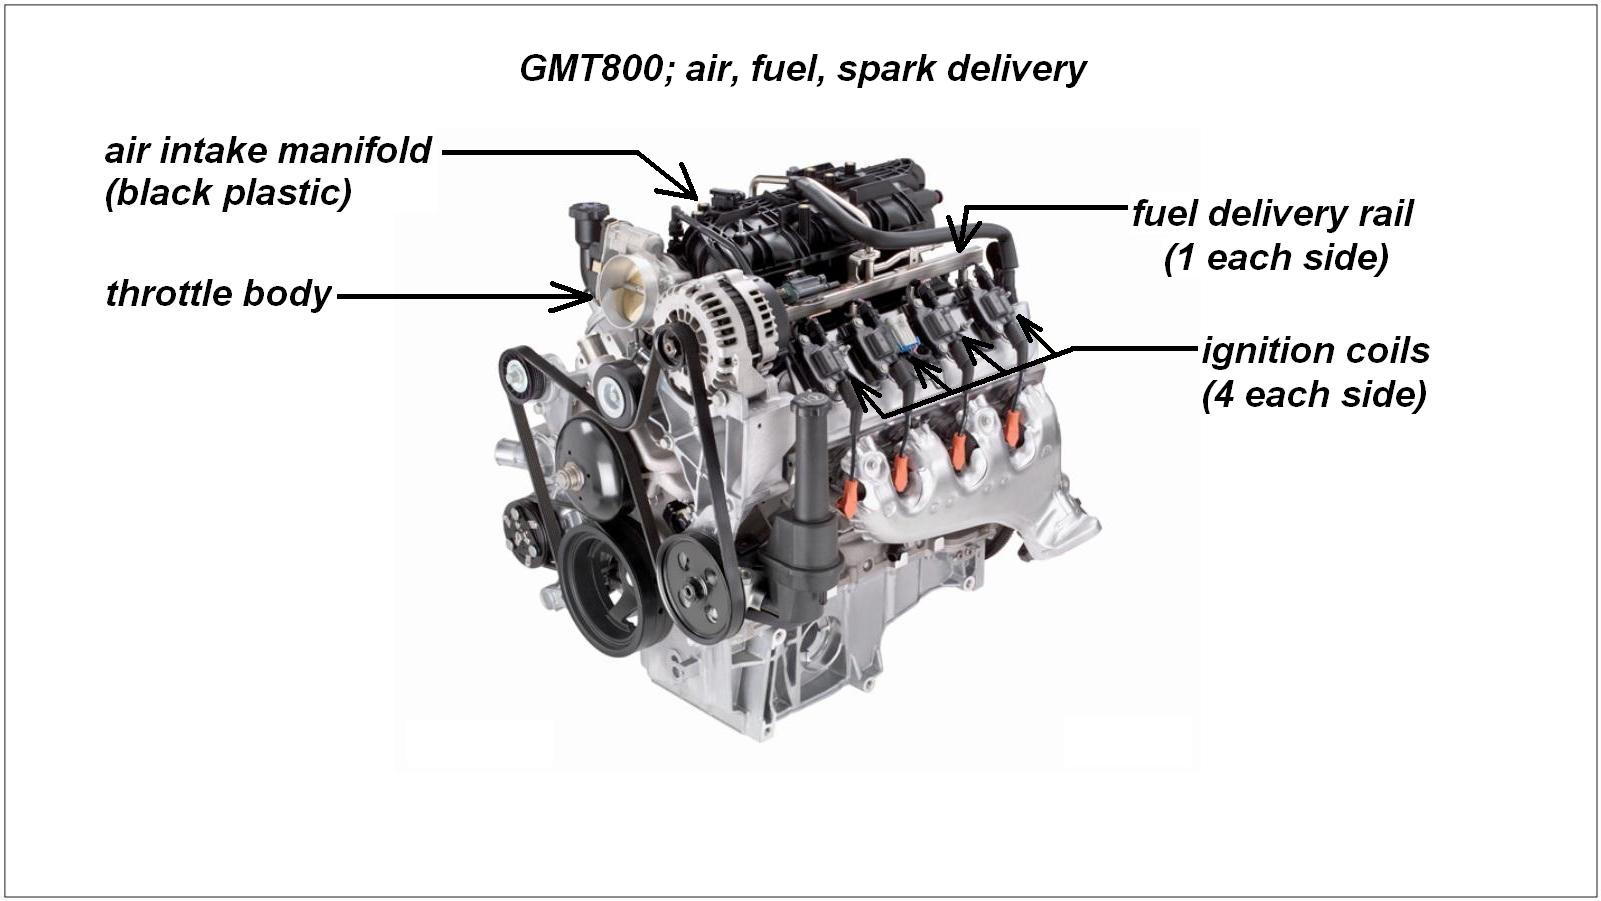
The combustion process requires three things: intake air delivery, fuel delivery, and electrical spark.
Check the Intake Air Delivery
- Ensure that the engine air filter is clean. Refer to this article: How to Replace Engine Air Filter.
- With the engine idling, listen around the intake manifold for the high pitched whistle of an intake or vacuum line leak. Use the stethoscope as needed.
- Here is an example of possible DTCs, which indicate that a leak in the intake manifold, downstream of the mass airflow sensor, has upset the fuel/air mixture in cylinder 2:
- P2279: Intake Air System Leak
- P0302: Cylinder 2 Misfire Detected
Check the Fuel Delivery
- Low fuel pressure can be caused by a weak fuel pump, a fuel leak, obstruction in the fuel lines, or a faulty fuel injector.
- Here is an example of possible DTCs, which indicate that a faulty fuel injector, or wiring to it, has stopped sending fuel to cylinder 2:
- P0202: Injector 2 Control Circuit
- P0302: Cylinder 2 Misfire Detected
Warning
Working with the gasoline delivery system is extremely hazardous and best done by a shop or an advanced DIY'er.
Check the Spark Delivery
- Most misfires are electrical faults. Either the spark plugs, ignition wires, or ignition coils are at fault.
- Here is an example of possible DTCs, which indicate the ignition coil, or wiring to it, has failed to ignite the mixture in cylinder 2:
- P0352: Ignition Coil B Primary/Secondary Circuit
- P0302: Cylinder 2 Misfire Detected
For code reader guidance, refer to this article: How to use OBD Scan Tool, Reset Service Engine Soon and Change Engine Oil Light.
- The code reader is powered by the OBD-II port and through the cigarette lighter fuse. If the code reader does not turn on, check and replace the CIG LTR 15 amp fuse in the under-hood fuse box (shown in Figure 5).
Step 4 – Drivetrain noise: transmission clunk
The clunk will appear to come from the front, under your feet.
- When upshifting from 2nd to 3rd or downshifting from 3rd to 2nd, the 4L60E transmission may clunk.
- In TSB 01-07-30-042B (Jan 16, 2004) GM has stated that this is normal and no service is required.
Step 5 – Drivetrain noise: U-joint clunk
The clunk will appear to come from the rear and underneath, during initial acceleration, from a stop, or when shifting from Drive to Reverse.
- The rear U-joint is often at fault.
For more information, refer to this article: Why Does My Transmission Clunk.
Step 6 – Steering noise: power steering whine
A steady whine from the front that is best heard while stopped or during low speed turns.
- With the steering wheel straight, the whine may be null or low, but the noise increases noticeably when the steering wheel is turned.
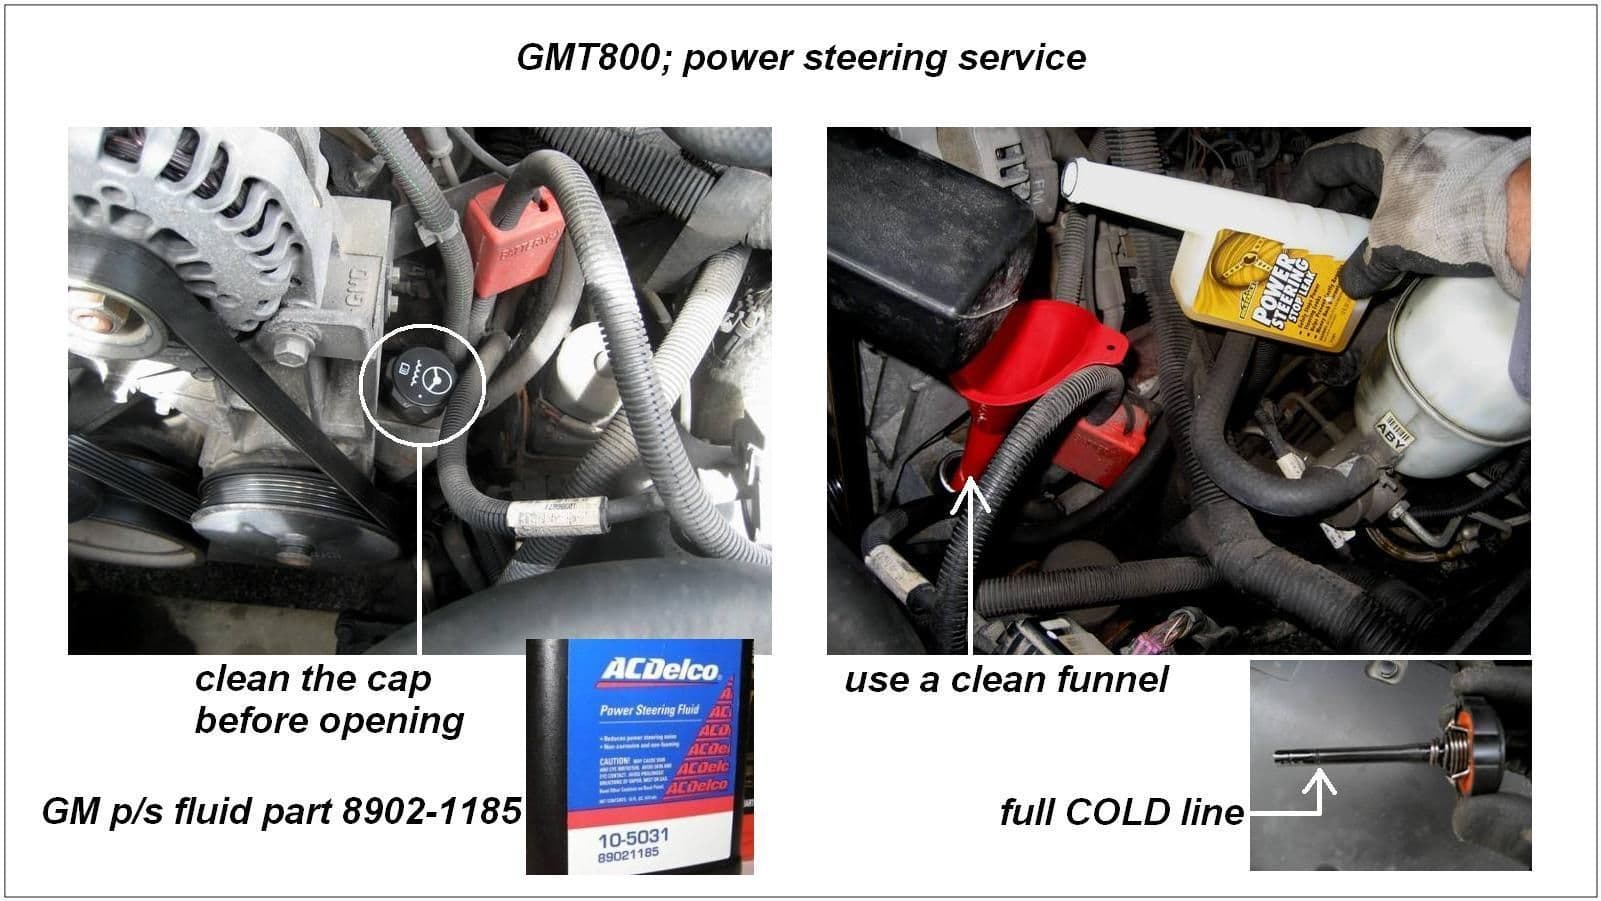
- This is often caused by low power steering fluid, which indicates a leak that must be corrected.
- The most recent GM p/s fluid part number is 8902-1185.
- Adding a few ounces of power steering stop-leak is very effective at sealing small leaks.
- Clean the p/s cap and neck. Then add fluid to the p/s reservoir fill line (shown in Figure 6).
Caution
Do NOT add automatic transmission fluid (ATF) to GM power steering systems.
Step 7 – Steering noise: clunk when turning
A loud clunk from the front end during low speed turns, which is particularly noticeable on unimproved roads.
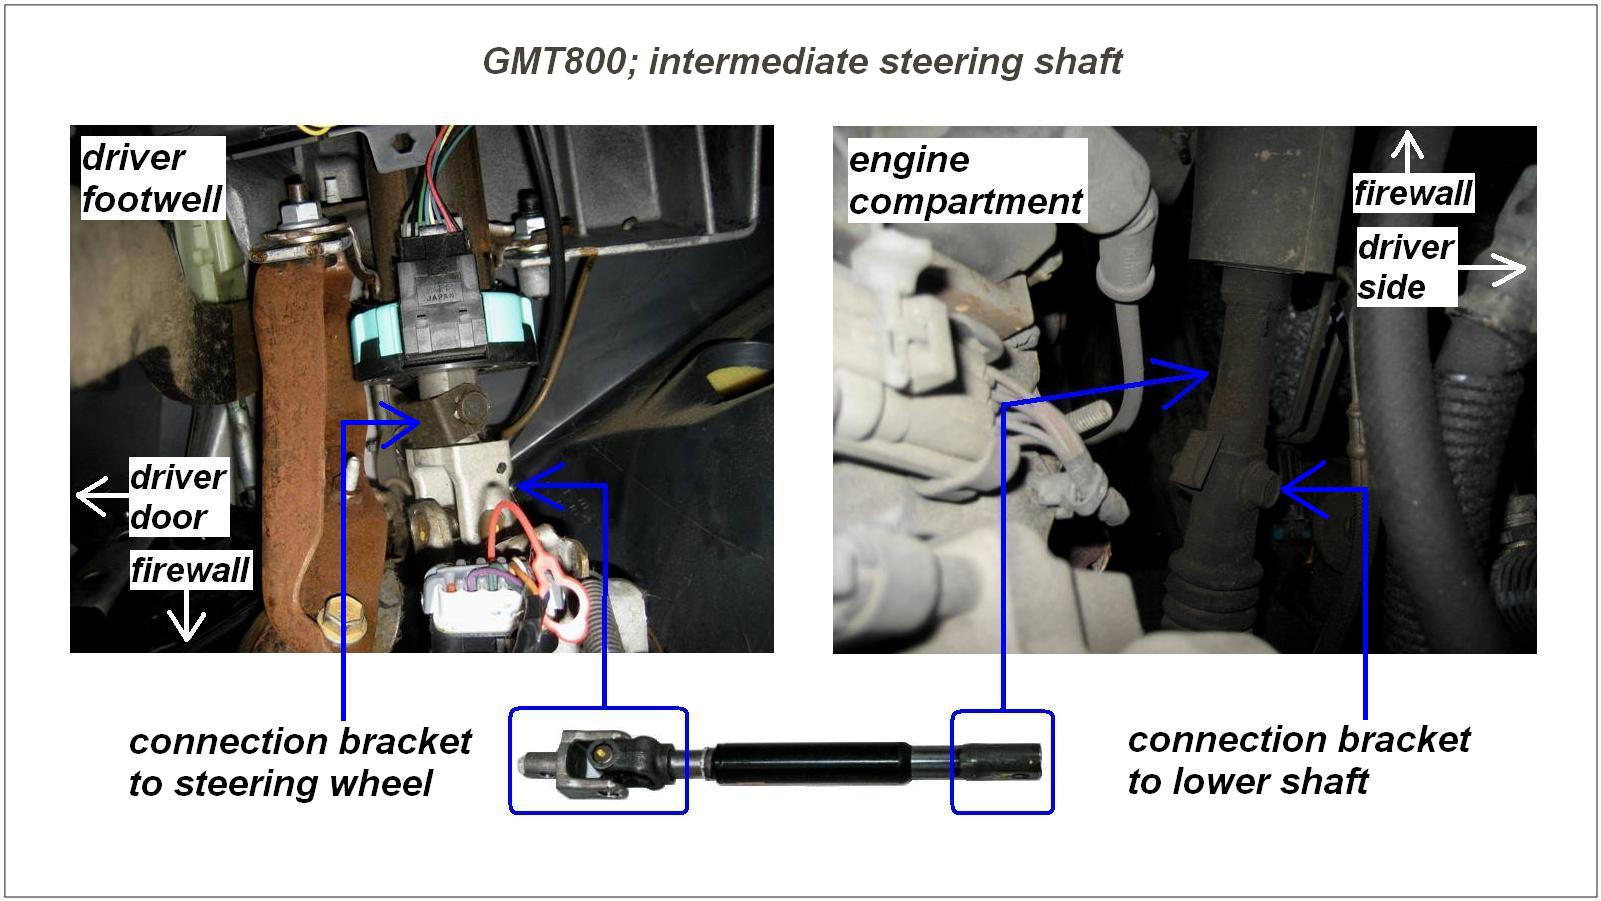
- The clunk vibration travels up to the steering wheel, particularly while turning the wheel.
- GM has released numerous TSBs, either calling to grease or replace the intermediate steering shaft.
- Recent TSB 00-02-35-003M installs a new, grease-less shaft (GM part 19153614), which can be a DIY job.
Step 8 – Suspension noise: front wheel bearings
A steady grinding from the front that begins with forward motion and corresponds to speed—this noise indicates front wheel bearing wear.
- At a steady speed, swerve the Silverado slightly left and right. A bearing's grinding tone will change as the side load changes.
- Determine if the sound is from the left or right front wheel and change the bearing.
For more information, refer to this article: How to Replace Wheel Bearings.
Featured Video: How to Diagnose a Noisy Wheel Hub and Bearing
Step 9 – Suspension noise: bent wheel or defective tire
- A steady drumming and vibration from the wheel well that corresponds to speed indicates a bent wheel or defective tire.
- Unlike a bad wheel bearing, swerving has little effect on the sound or vibration.
- Over-inflating the affected tire by 15 to 20 psi will reduce the drumming/vibration noticeably.
A tire shop's balancer machine can differentiate between a bent wheel and a defective tire. Specialty shops, such as Wheel Collision Center, can re-true the bent wheel: www.WheelCollision.com
Pro Tip
Over-inflating tires to mask bent wheels is an old used car dealer trick. Always bring a tire gauge to check out a used car.
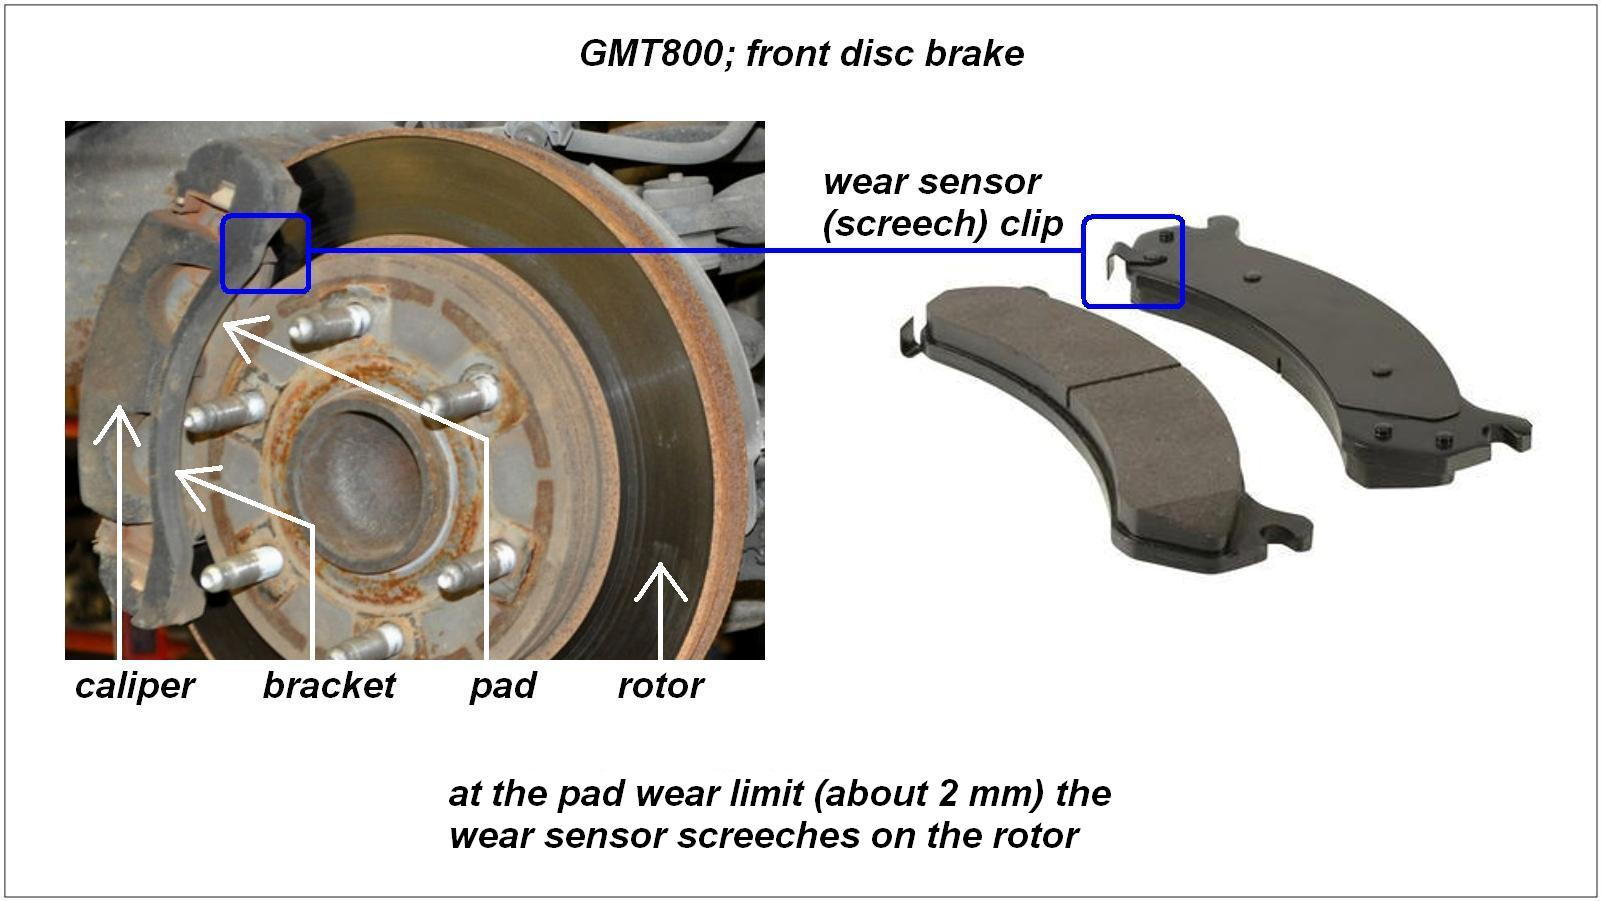
Step 10 – Brake noise: worn pad
As brake pads wear down to about 2mm, the wear sensors contact the rotors and make an atrocious screech when you apply the brakes.
- This ear-splitting screech is meant to grab your attention, so get the parts and replace your Silverado brakes.
For more information, refer to this article: How to Replace Brake Pads, Calipers, and Rotors.
Step 11 – Interior noise: cabin squeaks and rattles
Most panels can be quieted by inserting 3M-6356 clear, squeak reduction tape between the noisy parts.
- Drive on the road that generates that annoying cabin noise, and have a helper track it down. While the panel is noisy, press on it to stop the squeak and isolate the chafing area.
- To prevent scratching, use plastic pry tools to gently pry up the offending panel.
- Clean the area that is chafing, and apply squeak reduction tape.
- Press the panel clips back into place.
The B-pillar shown in Figure 9 is an example only.

Step 12 – Interior noise: climate doors
Motor driven climate doors direct mode airflow (foot, center, windshield) and blend airflow (mixing hot and cold). To isolate creaking or groaning from mode and blend doors:
- Turn the key to IG2, but don't start the engine.
- Set the fan mode to position 1.
- Operate the mode control, and listen carefully to identify a faulty mode door.
- Operate the temperature controls individually, and listen carefully to identify the faulty blend door actuators.

Step 13 – Interior noise: speaker fuzz
Rough truck duty and door slamming is hard on the audio speakers. To isolate a tinny, fuzzy speaker:
- Play a CD with strong bass and clear treble (such as Dire Straights' Love Over Gold).
- Press the AUDIO button to select FADE full front.
- Press the AUDIO button again to select BAL full left and full right.
- Select FADE full rear and repeat BAL full left and right.
- Isolate the fuzzy speaker.
To automatically return FADE and BAL to center:
- Press the AUDIO button once.
- Then press and hold the AUDIO button until the system beeps.

Related Discussions
- 1996 Chevy Z71 5.7 L Misfire Issues - ChevroletForum.com
- 2004 Silverado 5.3 L Whine Whine Whine - ChevroletForum.com
- Help Clicking Noise Coming Rear Truck - ChevroletForum.com