Chevrolet Silverado 1999-2006: How to Do Coolant Pressure Test and Repair Radiator Leak
This article shows you how to identify and isolate coolant leaks the professional way, and repair the cooling system with a reasonable cost as well as minimum down time.
This article applies to the Chevrolet Silverado GMT800 (1999-2006).
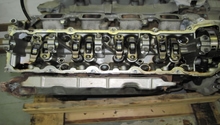
DexCool coolant performs critical functions by carrying the extreme heat of combustion away from the cylinders, and regulating the temperature of the Silverado's Vortec engine for optimum power as well as fuel economy. DexCool is expected to have a service life of about five years or 100,000 miles, but no small coolant leak stays small for very long.

Materials Needed
- Cooling system pressure tester
- Several gallons of DexCool
- Fiberlock Head Gasket and Block Repair
- Urethane Supply Co.'s Radiator Repair Kit
- GM lower radiator coolant hose
- Channel lock pliers
- Radiator hose pick
- Five-gallon coolant drain pan
- White paper
- Old towels
Step 1 – Initial coolant leak detection
These are initial signs that should call your attention to a possible coolant leak:
- The sweet, honeysuckle odor of DexCool; often in an enclosed garage after the Silverado has been shut off.
- The distinctive, orange-tinted puddle of slick, slippery feeling liquid on the garage floor under the truck's engine area.
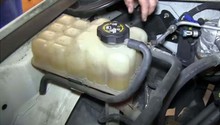
- The coolant is low in the expansion tank or regularly needs replenished to bring the level back up.
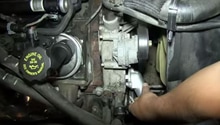
Step 2 – Isolating the coolant leak
- Place white paper under the engine area when the truck will sit overnight. Then use the drip locations on the paper to narrow down where coolant may be running off the engine.
- Look in the most likely places above the white paper locations. Hoses often seep where they connect to a nozzle. Older water pumps seep where they are sealed to the engine block. Radiators often develop pinhole leaks that will wet the fins as the coolant runs down. A warm radiator may very obviously spritz out coolant from a pinhole leak.
- If an area is generally wet, wipe it down with an old towel so that you can see fresh coolant tracks.
- Continue wiping down a persistently wet area until you find the source of the leak.
Warning
DexCool and other coolants are poisonous. Wear eye protection, long sleeves and gloves. Wipe up spills as soon as possible. Keep dogs and cats away where they cannot lick spilled coolant.
Step 3 – Pressure testing the cooling system
Pressurizing the cooling system quickly isolates leaks, since the coolant will bubble or spray out from the affected area. The Silverado Vortec engines use a pressurized expansion tank, so that is where the pressure tester will be attached to the system.
- Ensure that the cooling system is cold.
- Top up the coolant level before attaching the pressure tester. Air in the cooling system will compress under pressure and give misleading readings, but liquid coolant does not compress. If you intend to drain the system after pressure testing, then it is not necessary to waste good coolant topping up for pressure testing. It is OK to use water.
- Observe the pressure limit printed on the expansion tank cap; for example, 15 psi on the Vortec 5.3 liter. Do not pressurize the system over 15 psi.
- When you spot a leak, don't assume that is the only leak. Check the entire system.
- If the system loses pressure without evidence of an external leak, the coolant may be seeping through the head gasket into the cylinders. This can be confirmed by a puff of white tail-pipe smoke on start up.
Featured Video: Pressure Testing Cooling Systems
Step 4 – Repairing a coolant leak with Fiberlock
Many cooling system stop-leak additives require complex, exacting, and time consuming application processes to be effective. The cooling system must be flushed completely free of DexCool so that the sealant will cure. This is not the case with Fiberlock Head Gasket and Block Repair. You may pour Fiberlock directly into the cooling system as it is compatible with DexCool and all types of coolant. The Fiberlock cures while immersed in DexCool, and the pressurization of the system aids in creating a stronger seal. However, if you have the time and aptitude for a DIY, the best cooling system repair is always a new, properly installed gasket.
(Related Video: Fix Coolant Leaks - CarCareKiosk.com)
Step 5 – Repairing a plastic radiator with plastic welding
Due to its high petrochemical content, most efforts to glue plastic have limited success because the bond is weak. The most effective plastic bond comes from liquefying the plastic with heated tools and creating a weld. Urethane Supply Company utilizes a hot iron and nylon welding rod in their Radiator Repair Kit, which liquefies and mixes the plastics into a secure weld that will hold cooling system heat and pressure. For best radiator welds, the DIY'er should gain some experience and confidence in less critical projects, and then apply that knowledge to plastic radiator welding repairs.
Featured Video: Plastic Radiator Repair
Step 6 – Replacing a coolant hose
For cooling hose removal, GM provides very convenient spring clamps that lock open. The locking feature makes it very easy to move and position the hose clamps. In this example the lower radiator hose is replaced.
- Place the coolant drain pan under the lower radiator hose.
- Loosen the coolant expansion tank cap.
- Using channel lock pliers, squeeze the tabs on the radiator nozzle spring clamp until the hook locks it open, and then slide the loose clamp down the hose a few inches.
- Using a hose pick, carefully work the hose off the radiator nozzle and direct the hose into the drain pan.
- Repeat the process on the thermostat end of the hose and remove the hose.
- Transfer the locked-open hose clamps to the new hose and fit the new hose onto the nozzles.
- Position the hose clamps and release the locking hooks with a flat head screwdriver.
- Refill and bleed the coolant as described in Step 12 of the following Related Article: How to Replace Water Pump.

Related Discussions
- 1999 Silverado Coolant Leak on 5.3 - ChevroletForum.com
- 2002 Chevy Tahoe Coolant Leak - ChevroletForum.com
- 1998 5.7L Vortec-internal Coolant Leak Into Oil - ChevroletForum.com