Chevrolet Silverado 2007-2013: How to Replace Master Cylinder
The brake master cylinder plays a critical role in your Silverado's braking performance and capabilities. This how-to guide walks you through the process of replacing the master cylinder, so you can brake with confidence.
This article applies to the Chevrolet Silverado GMT900 (2007-2013).
The master cylinder is one of your truck’s most crucial components, and it is the heart of the hydraulic braking system. When the brakes are applied, the master cylinder pressurizes brake fluid through the connected brake lines. Like any other component beneath the hood, the master cylinder in your Silverado will eventually wear out, especially if you do a lot of stop-and-go city driving. When the master cylinder becomes worn, it can develop leaks and valve problems that affect your truck’s braking ability. Fortunately, replacing the master cylinder is a quick and easy job that even the most novice of DIY mechanics can accomplish.

Materials Needed
- New brake master cylinder
- Open-end or box wrench (15mm)
- Flare wrench (9/16")
- DOT 3 brake fluid
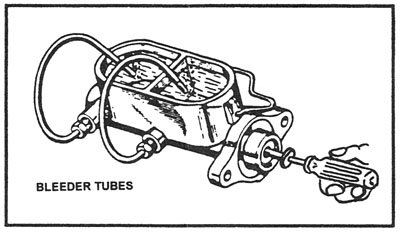
Step 1 – Bench bleed new master cylinder
Bench bleeding, also known as “burping,” will remove any air from the new master cylinder before installation. Set the new brake master cylinder in a vise on your work bench or table, and make sure it’s leveled to prevent air pockets from forming. Insert the two lengths of plastic tubing (that come with the supplied bleeder kit) halfway down into the reservoir. Fill the reservoir just short of the maximum fill line with DOT 3 brake fluid. Insert your screwdriver into the cylinder, and push against the piston to pump brake fluid through the cylinder to remove any air bubbles.
Pro Tip
If you don’t have a vise, wait to burp the new master cylinder until it’s installed in the engine. This will ensure the master cylinder is leveled, which is important for removing air bubbles.
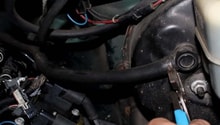
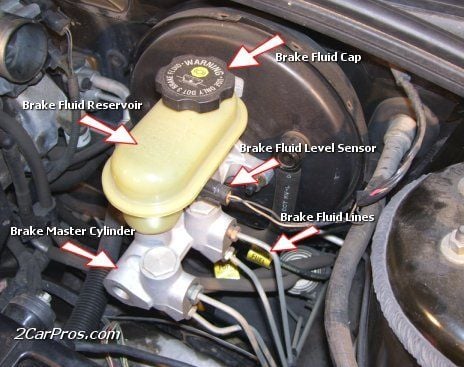
Step 2 – Loosen brake lines and unbolt master cylinder
After your new cylinder is primed and ready to go, use your 9/16” flare wrench to loosen the brake lines on the side of the master cylinder (two or four brake lines depending on your truck’s braking system). Next, use your 15mm wrench to remove the bolts that hold the master cylinder to the brake booster. Then, slowly pull the old master cylinder up and away from the booster. Finally, slide the brake lines out.
Featured Video: How to Disassemble Master Cylinder
Pro Tip
Before removing the master cylinder, use a shop vacuum or turkey baster to remove the old brake fluid in order to avoid spilling fluid inside your engine, on your driveway, and on your clothes.
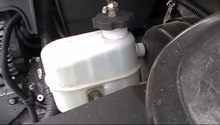
Step 3 – Install new master cylinder
Take your primed master cylinder out of the vise and put in in the opposite way the old cylinder came out. Finger-tighten the mounting bolts on the brake booster and the brake line nuts before wrench-tightening to ensure the master cylinder is on correctly. The final step is to bleed the brake lines and add new fluid inside the master cylinder reservoir.
Pro Tip
Never reuse old brake fluid. A quart of DOT 3 brake fluid is considerably less expensive than the resulting brake system damage that can occur if you reuse old, contaminated fluid.
(Related Article: How to Bleed Brakes - ChevroletForum.com)
Related Discussions
- Problem Brake Booster or Master Cylinder? - ChevroletForum.com
- Master Cylinder Troubleshooting and Diagnostics - ChevroletForum.com
- Causes of Soft Brake Pedal - ChevroletForum.com