Chevrolet Silverado 2007-2013: Noise Diagnostics Guide
Your Chevy Silverado is your pride and joy, but the noises the truck makes are more aggravating than your mother-in-law's back seat driving. Let's review some of these annoyances and see if there's a fix... or not.
This article applies to the Chevrolet Silverado GMT900 (2007-2013).
You're driving along in your Chevy Silverado and approaching a railroad crossing. As you apply your brakes, you suddenly hear this gawd-awful CLUNK. What is that noise? Is your Silverado's radio emitting an irritating "buzz" sound that is really getting on your nerves? Guess what? You're not alone. Maybe your Silverado has developed an annoyingly loud wind leak coming from the top of the windshield when you get up to around 70 mph? Or perhaps, you've been freaked out by some really loud popping noises when you shut your truck off? If you are experiencing any of these noise, then continue reading to find a solution.
Materials Needed
- Triple Guard Grease (a marine grease marketed by Evinrude/Bombardier)
- Sharpie marker
- Scotch-Brite pad
- Double-sided tape (1" wide)
- Open end wrench set
- 14 and 15mm socket and ratchet
- Rubber gloves and eye protection
- Ziplock bag
- Denature alcohol
- Razor blade
- Patience... and lots of it
Step 1 – Your radio is really driving you nuts!
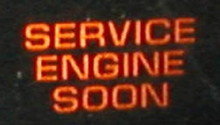
Many owners of the 2007 to 2013 Silverado (and Sierra) are experiencing a loud buzzing sound that seems to emit from inside their radios. It's starting to bug them...drive 'em crazy. Well, guess what? GM is treating it like they're crazy!
Are you one of the unlucky owners of the buzzing radio? Many online discussions are available about this issue. Some say it's the cooling fan inside the radio. Whatever the cause, you'll have to settle it with your dealer's service manager, or maybe just go enjoy a leisurely root canal instead.

GM may be replacing these radios. But your dealer may be giving you the run-around. If so, check this out: GM document #PIT5166C. Google it! You know you want to.
Pro Tip
Many Silverado owners are digging deep and purchasing aftermarket replacement radios. If you're at a wit's end with your dealership's service manager, just bite the bullet!
Step 2 – You are hearing a loud clunk when you brake
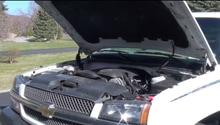
You approach a stop light, apply your brakes and.... CLUNK! The sound is very disturbing. Relax, you can fix this! Grease your slip yoke! This part of the driveshaft often experiences "lashing" movements under heavy acceleration and braking. Look under your truck and start poking around its driveshaft while listening for abnormal noises.
You'll need a 14mm metric wrench or your 14mm metric socket and ratchet. (The wrench is easier.)
Remove the rear U-joint so you can slide the slip joint off the transmission end of the driveshaft, grease up the assembly, and re-install.

Pro Tip
Mark the rear U-joint with a Sharpie pen, so you can line up the U-joint correctly when you re-install it. Also, many people use some masking tape to wrap the U-joint and hold the bearing caps in place.
Step 3 – Pull out the driveshaft to clean and grease the slip yoke
Take a Scotch-Brite pad to the exposed yoke and remove any surface rust. While removing the rust on the yoke is not absolutely necessary, it is the surface of the yoke that passes through the dust boot on the transmission tail shaft. Why not clean it to provide a better seal?

After wiping out as much of the OEM grease as possible, grease the inner splines using marine-grade wheel bearing grease. A good choice is Triple Guard Grease, marketed by Evinrude/Bombardier. This stuff has proven to be a waterproof and very durable lubricant for this application. Professional mechanics swear by it. Apply plenty of grease–liberally–and wear your rubber gloves because it'll be a much easier clean-up for your hands later.
Pro Tip
The aluminum shaft is light and easy to maneuver, but be careful not to bump the rear bearings on the pavement, cement, or dirt. A Ziplock plastic bag and thick elastic band will protect the bearings while you work on the front end.
Step 4 – But wait....I still hear the clunk!
Nine times out of ten it's your slip yoke, but one guy on YouTube found it wasn't that at all!
There's a skid plate beneath your transmission's transfer case. When you brake or come to a sudden stop, it will "clang" against the tranny housing. This is an easy fix as well. See those four bolts on the skid plate? Grab your 15mm socket and loosen them up. No need to take them completely out. Tighten those four bolts back up and you're done! Now go drive your truck an see if the clangs as well as clunks are gone.

Figure 4. This skid plate protects the trans housing for all you off-roaders. For the rest of us, it's louder than a Zildjan cymbal on a drum set when it clangs against the housing. 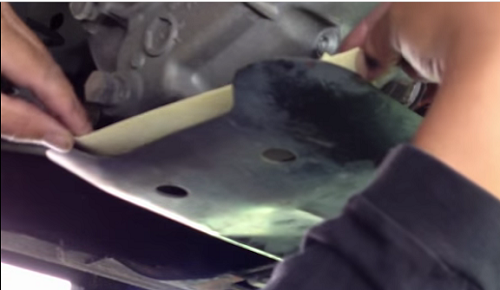
Figure 5. Slide in some 1" wide double-sided tape. This will hold it in place while you re-tighten the skid plate bolts.
Pro Tip
If you need to apply tape to some other contact points, go crazy with the tape. But remember to check it often if you go off-road quite often. The tape is just a cushion between your skid plate and the trans housing.
Step 5 – Your windshield is leaking wind around the upper edge
The sound you're hearing is actually created by the molding on either side of the windshield. The molding is fastened with Torx screws that are underneath the door molding.
First, get some 3M super strength, double-sided, molding tape.
- Loosen the molding screws. (There's no need to remove them.)
- Clean the window and the molding with denatured alcohol.
- Apply the tape to the windshield edge.
- Be sure to apply firm pressure along the entire length, and then remove the protective plastic from the exposed side of the tape.
- Press the windshield molding firmly against it.
- Re-tighten the Torx screws.

Pro Tip
Use a razor blade to trim out an excess tape that is showing.
Step 6 – OMG! What the heck was that?
Are you experiencing some really loud popping noises when you shut your truck off?
There's no need for alarm. You have a brand new exhaust system that's expanding while you drive, and then quickly contracting when you shut the truck off in a cold garage. Your cats are just getting settled in, which also causes lots of crazy-loud noise. (Uh, no... by "cats" we didn't mean "Fluffy," we meant the catalytic converters.)
Pro Tip
In order to avoid all those really loud pops you're hearing from underneath your Silverado, make a mad dash for the house door and get out of ear range. Hooray! You've fixed the problem!
Related Discussions
- High-Pitched Whirring From Radio - ChevroletForum.com
- Surging, Clunk Noise - ChevroletForum.com
- Transmission Noise - ChevroletForum.com
- Windshield Wind Noise - ChevroletForum.com
- Creaking Sound - ChevroletForum.com
- Exhaust Popping Sound - ChevroletForum.com