Chevrolet Silverado: Brake Diagnostics Guide
Brake maintenance and repair isn't incredibly interesting, but it's crucial if you want to stay safe and prevent major problems (and expensive repairs) later on. Here's a look at some of the top signs of brake failure and what is required to get your Silverado back on the road.
This article applies to the Chevrolet Silverado (2007-2013)
The Chevy Silverado is a big, heavy full-size pickup truck that needs every inch it can get to come to a complete stop. Normally this isn’t a problem, but when the brakes start to go, it can be dangerous for you and others. Bad brakes increase your risk of being involved in an accident and also threaten to get worse, which will require more expensive repairs the longer they go without being fixed. These following brake problems typically precede major brake failure, so don’t waste any time diagnosing and fixing the issue. This brief how-to guide can save you time and money diagnosing your Silverado’s brake problem.

Materials Needed
- Brake fluid
- Brake cleaner
- Floor jack and 2 jack stands
- Lug nut wrench
- Ratcheting wrench (19mm socket and 7/8" socket)
- "C" clamp
- Replacement brake pads (optional)
- Replacement master cylinder (optional)
Issue 1 – Soft brake pedal
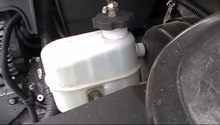
Does your brake pedal feel squishy or spongy? Does it sink all the way to the floor with little or no resistance? If so, you have a major brake issue that needs immediate attention. A soft brake pedal is typically the result of a hydraulic fluid leak in the braking system. Check the brake fluid level in the master cylinder, also known as the brake fluid reservoir. If the brake fluid is low, a leak is to blame for your soft brake pedal. If you don’t notice pools of brake fluid underneath your truck, top off the reservoir and visit a mechanic to find and fix the leak. If the reservoir seems full, the master cylinder itself may be faulty and should be replaced.
Alternatively, you may just need to bleed your brakes and run fresh fluid through the system. Old brake fluid becomes increasingly hygroscopic, which means that it absorbs moisture. This causes air bubbles to form in the brake fluid. Air bubbles cannot be compressed like brake fluid, meaning that when you push the pedal in, the brake fluid isn't circulating through the brake lines and fully pressing down against the brakes. Basically, you'll have a soft brake pedal with reduced stopping power.
(Related Article: How to Bleed Your Brakes - ChevroletForum.com)
Featured Video: How to Replace Brake Master Cylinder
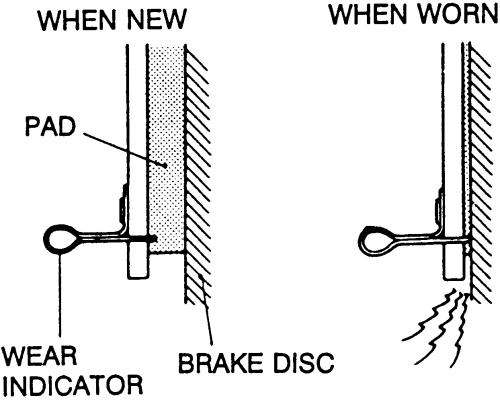
Issue 2 – High-pitched squealing
Modern brake pad manufacturers have built auditory warnings into their products to give you a heads up before you completely wear the pads down and cause damage to the rotors. This is especially helpful since replacing your truck’s brake pads is much cheaper (and much easier) than resurfacing the rotors.
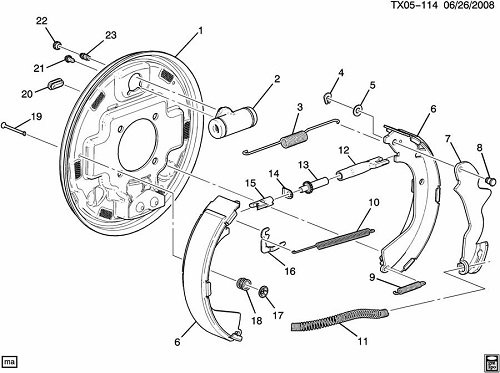
To replace worn brake pads:
- Park on level surface, engage parking brake, slightly loosen front wheel lug nuts, and raise the front of the truck with a floor jack.
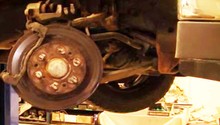
- Remove lug nuts and pull off the front wheels to reveal the front brake calipers and rotors.
- Loosen and remove the two caliper bolts on each side. Then carefully remove each front brake caliper without stressing the attached fluid line.
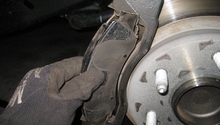
- Remove the outer/inner brake pads (note how they are seated in the bracket). Then replace with new pads and “anti-rattle” clips.
- Thoroughly clean off the brake rotors, caliper brackets and assembly, and lug nut studs with brake cleaner spray.
- Repeat these steps for the rear brake pads if squealing continues.

Pro Tip
Go hard on the brake pedal at first to make sure the new brake pads are properly seated in the brackets.
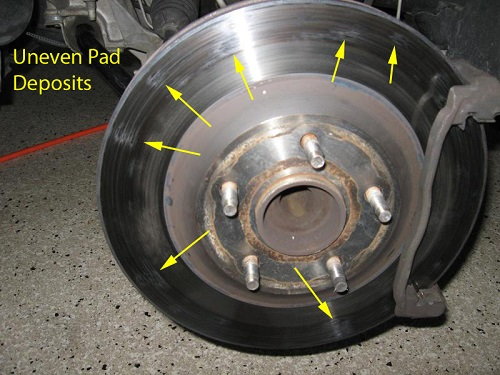
Issue 3 – Steering wheel and/or brake pedal shakes when braking
By the time you start noticing excessive shaking in your steering wheel or brake pedal during braking, the damage to your rotors may already have been done. Steering wheel and/or brake pedal pulsation can be fixed very easily by having your rotors resurfaced. If rotors are not resurfaced properly, you will feel it every time you step on the brake pedal, so trust this job with a certified brake repair specialist. You can tell if your rotors need to be resurfaced if you feel noticeable grooves when running your finger vertically down the brake rotor friction surface.
Related Discussions
- 1999 Silverado Brake Failure - ChevroletForum.com
- 2004 Silverado Brake Problems - ChevroletForum.com
- 2008 Silverado Brake Issue - ChevroletForum.com
- Low Speed Brake Failure - Chevroletforum.com
- Brake Trouble, Help Please! - Chevroletforum.com