

 August 4th, 2015, 6:27 PM
Last edit by: IB Advertising
See related guides and technical advice from our community experts:
Browse all: Engine and Powertrain
- Chevrolet Silverado 1999-2006: How to Replace Oil Pressure Switch Sending Unit
Step by step instructions for do-it-yourself repairs.
Browse all: Engine and Powertrain

07 oil pressure sensor/switch location
May 16th, 2013, 5:40 PM
#31

just a suggestion: these right ups are great but a step by step with photos would be outstanding to help guys such as myself who can't read. LOL. but seriously i'm a visual learner as i guess a lot of guys on here are. so pics along with instructions and make these stickys since it seems like a common occurance
 October 13th, 2013, 12:02 AM
#32
CF Beginner

Join Date: Oct 2013
Posts: 3
Likes: 0
Received 0 Likes
on
0 Posts
After following this thread, finally mustered up enough courage to attempt the procedure on 2007 Suburban 5.3L.
After two hours, dropped a switch, dropped the socket, a few of choice words and with a bit of luck, I got the new switch in.
No more dancing oil gauge, DIC doesn't tell me to STOP ENGINE, V8 to V4 fuel management feature works again and Check Engine Light went off!
I found it easier to put rachet assembly on in stages; I put the socket/uni joint/ext together and was able to put that on the switch, then added 2nd ext and finally the articulating rachet.
When I disconnected the wired plug, it's rubber seal stayed in the bad switch, I had to take it out of the switch and put it on the plug before plugging it into the new switch.
After all was said and done, the ordeal was worthwhile as I saved over $300; I might feel differently had I not been able to find and retrieve the dropped switch and socket!
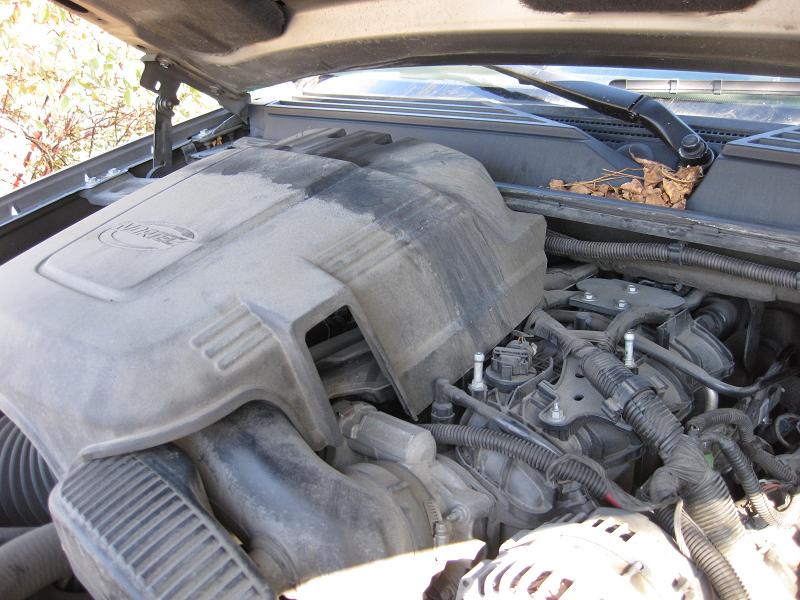
Took the following photos to try to help others who are considering the task,
1) Heat shield on 07's have no bolts. Just lift and wiggle out.
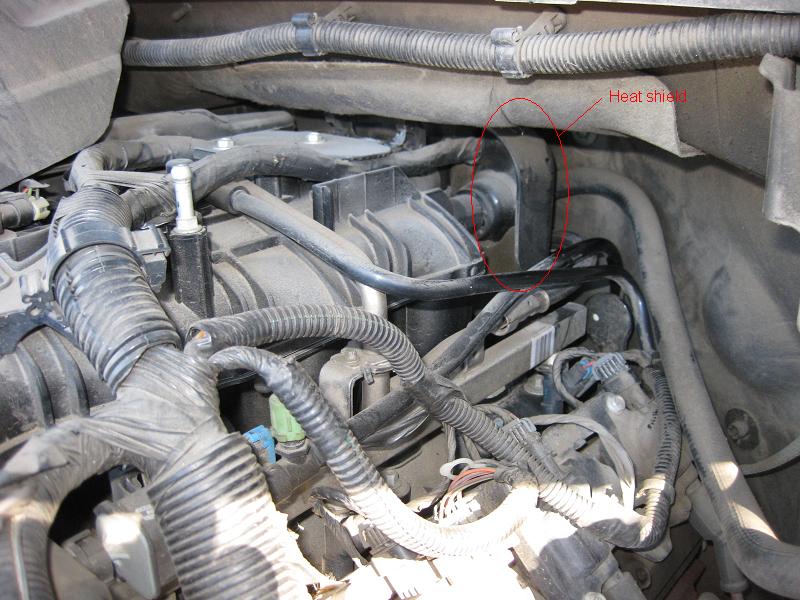
2) 07's have another heat shield at the back of the engine.
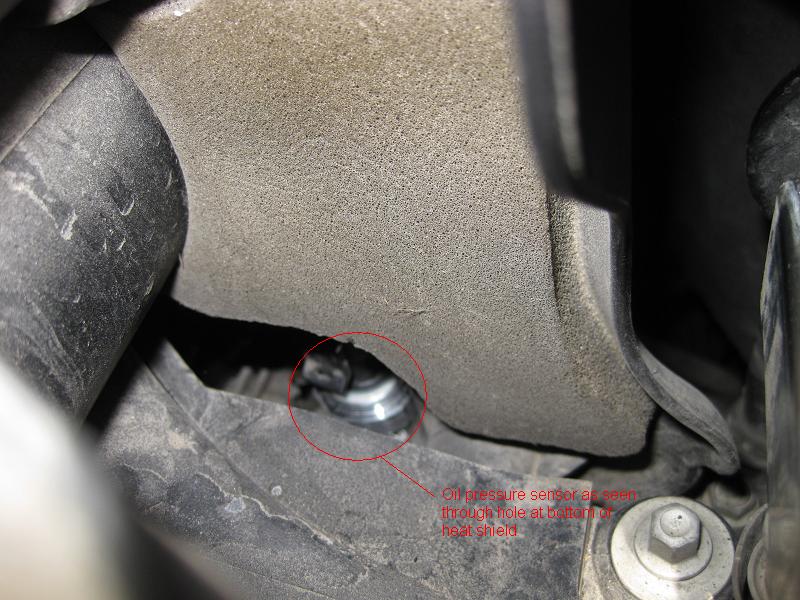
3) Switch is barely visible through a hole at the bottom of the heat shield.
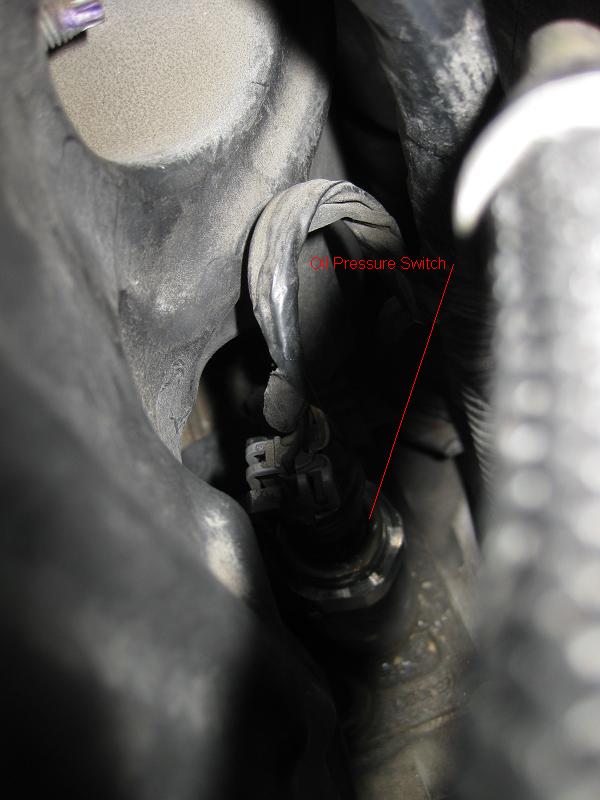
4) Photo of switch behind the heat shield.
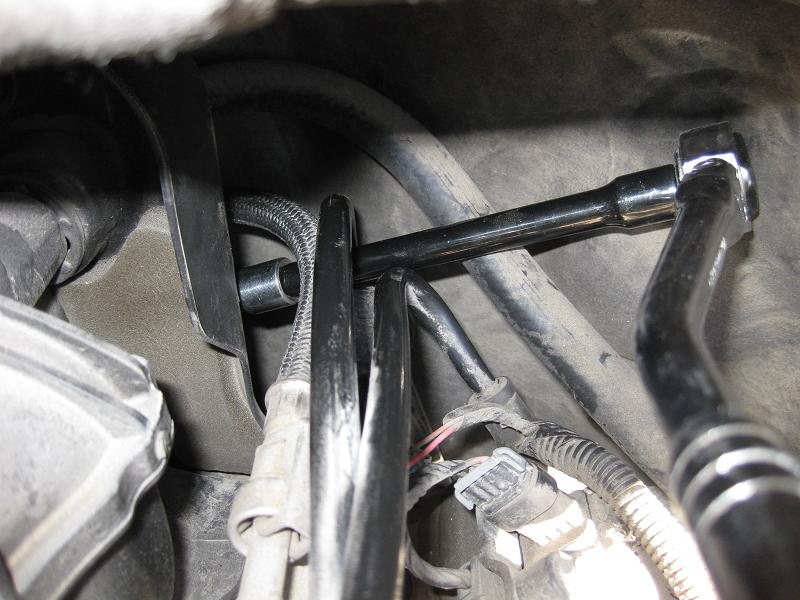
5) Position of socket/universal joint/extension/extension/rachet.
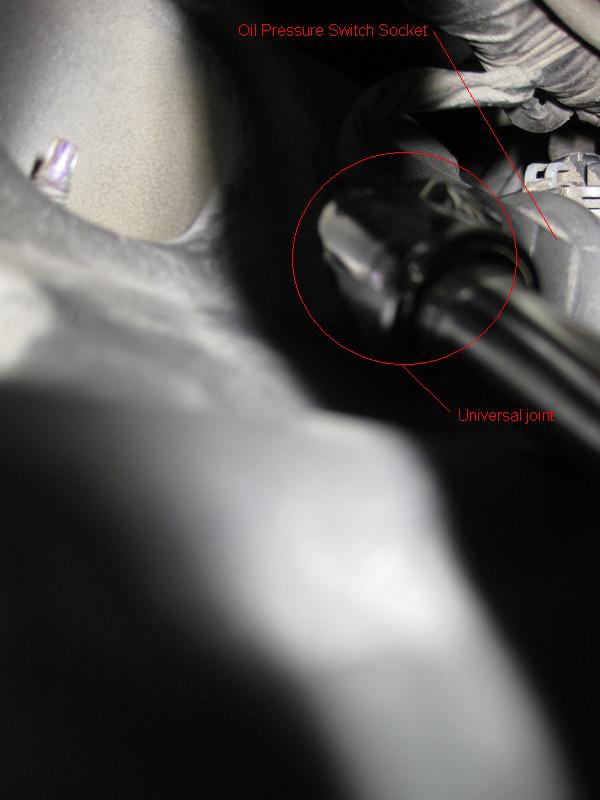
6) Photo of socket on switch.
Good luck to those who will give this a try.
After two hours, dropped a switch, dropped the socket, a few of choice words and with a bit of luck, I got the new switch in.
No more dancing oil gauge, DIC doesn't tell me to STOP ENGINE, V8 to V4 fuel management feature works again and Check Engine Light went off!
I found it easier to put rachet assembly on in stages; I put the socket/uni joint/ext together and was able to put that on the switch, then added 2nd ext and finally the articulating rachet.
When I disconnected the wired plug, it's rubber seal stayed in the bad switch, I had to take it out of the switch and put it on the plug before plugging it into the new switch.
After all was said and done, the ordeal was worthwhile as I saved over $300; I might feel differently had I not been able to find and retrieve the dropped switch and socket!
Took the following photos to try to help others who are considering the task,
1) Heat shield on 07's have no bolts. Just lift and wiggle out.

2) 07's have another heat shield at the back of the engine.

3) Switch is barely visible through a hole at the bottom of the heat shield.

4) Photo of switch behind the heat shield.

5) Position of socket/universal joint/extension/extension/rachet.

6) Photo of socket on switch.

Good luck to those who will give this a try.
 January 19th, 2014, 3:51 PM
#34
CF Beginner

Join Date: Jan 2014
Posts: 1
Likes: 0
Received 0 Likes
on
0 Posts
Thank You!! This worked perfectly. The pics were very helpful! Did the whole job in 2 hours. My only addition to the suggested tool set was a 2 inch wabble extender. That extra wiggle made all the difference. Good luck to those who come after me.
April 5th, 2014, 3:14 PM
#35
CF Beginner

Join Date: Apr 2014
Posts: 6
Likes: 0
Received 0 Likes
on
0 Posts
Engine Mechanical - 4.8L, 5.3L, 6.0L and 6.2L
Service Information
2007 Chevrolet Tahoe - 2WD | Avalanche, Escalade, Suburban, Tahoe, Yukon (VIN C/K) Service Manual | Document ID: 1698844
--------------------------------------------------------------------------------
Engine Oil Pressure Sensor and/or Switch Replacement
Tools Required
J 41712 Oil Pressure Switch Socket
Removal Procedure
Remove the intake manifold. Refer to Intake Manifold Replacement .
Disconnect the engine harness electrical connector (1) from the oil pressure sensor.
If not equipped with active fuel management perform the following step, using J 41712 or equivalent, remove the oil pressure sensor (706) and washer (707).
If equipped with active fuel management perform the following step, using J 41712 or equivalent, remove the oil pressure sensor (706) and washer (707).
Installation Procedure
Apply sealant to the threads of the NEW oil pressure sensor. Refer to Adhesives, Fluids, Lubricants, and Sealers .
Notice: Refer to Fastener Notice in the Preface section.
If equipped with active fuel management perform the following step, using J 41712 or equivalent. Install the oil pressure sensor (706) and washer (707).
Tighten
Tighten the sensor to 35 N�m (26 lb ft).
If not equipped with active fuel management, perform the following step, using J 41712 or equivalent. Install the oil pressure sensor (706) and washer (707).
Connect the engine harness electrical connector (1) to the oil pressure sensor.
Tighten
Tighten the sensor to 35 N�m (26 lb ft).
Install the intake manifold. Refer to Intake Manifold Replacement .
� 2011 General Motors Corporation. All rights reserved.
November 16th, 2014, 1:14 PM
#36

I replaced the sensor about 1 week ago. Had no problems out of it until today. Started the vehicle got to the end ml of my street and the check engine light, oil pressure light, and stabilitrak light came on. All these lights came on the first time as well. The code that came up on the last engine reading with P0521 which was Oil Pressure Sensor High Voltage. Any information on any possible fix for this problem?
November 17th, 2014, 11:19 AM
#37
CF Beginner

Join Date: Nov 2014
Posts: 1
Likes: 0
Received 0 Likes
on
0 Posts
I replaced the sensor about 1 week ago. Had no problems out of it until today. Started the vehicle got to the end ml of my street and the check engine light, oil pressure light, and stabilitrak light came on. All these lights came on the first time as well. The code that came up on the last engine reading with P0521 which was Oil Pressure Sensor High Voltage. Any information on any possible fix for this problem?
I just did this job today on my 2007 suburban. Used a wobble joint, a 6 inch extension, and a swivel 3/8 drive. Took me 20 min.
SOME ADVICE -
The engine cover just pops off. No bolts. Lift up and pull out.
1. Blanket on the fender so you can lay down without getting stuck in the gut. Much more comfortable. That took the longest. Finding a way to lay in there comfortably. Best when I could get really close to firewall.
2. Smash your hand into the firewall padding first to get your hand back there and feel around. The padding is thick and gives a lot.
3. Feed the socket and all down in there with your left while your right hand is around back by firewall to receive everything. If you do it piece by piece it will take longer. Just move slow and steady.
4. Don't remove the socket and ratchet when you break it lose. Tried to remove with my bare hand and it was a bit too tight. Take your time to make sure you got it lose before you use your hand. I had to put the socket back on twice.
4. Keep the 3 tubes clear the best you can. Those are the ones that get in the way. Don't be afraid to gentle shift them around. The hard line is the worst one. Might need to pull it your way a bit so your right hand can clear.
5. Putting the new one back in with my hand against the firewall was super fast and easy. Make sure plug lock faces the tab on the new sensor. Mine was facing the other way from the old one and had to twist a bit.
6. When done disconnect the battery to reset computer.
Job is very fast and easy if you get familiar with the space and how the tubes move around. I actually removed the breather tube on the back of the valve cover because it just slide off. Not needed, but was 1 less tube to deal with.
Thanks to all for the advice to do myself. Spent $40 on sensor and $40 on some nice craftsman tools.
December 4th, 2014, 10:48 AM
#38
CF Beginner

Join Date: Dec 2014
Posts: 1
Likes: 0
Received 0 Likes
on
0 Posts
Thank you so much for the pictures and instructions!!! I have a 2007 Tahoe with the 5.3L Flex Fuel motor. My experience mirrored Thrill68, right down to the "Oh S...t!" moment when the new plug fell out of the socket. I would only add that I found the best approach for getting the tools in there to be to first put the socket over the plug, then with both in position, put the swivel adapter on the socket, then you can thread the 6" extension in the straightest path through the blind spaghetti of fuel rails, vacuum hoses and wires. forget about trying to thread the whole socket, swivel, extension, wrench assembly in there at once. This may be obvious to most, but it took trial and error for me. Lastly, I think the switch removal socket picked up from O'Brian's Auto parts made a big difference. Check the fit at the store however, I was amazed to find that, of the two sockets they had is stock with the same part number, one fit the sensor and the other was a little too small. I can't imagine the frustration if I had headed home with the faulty one. Happy wrenching!
December 8th, 2014, 8:38 PM
#39
CF Active Member

Replaced O.P. switch in 2008 Tahoe5.3. Took about 1hr. with most time trying to remove PIA plastic heat shield. Finally took small block of wood and wedged out of way,plenty of room then. Also used 5/16"x4" bolt to remove filter after switch removed. Threaded it in to filter (about 2 threads) gently and pulled it out carefully. Be sure not to drop it because it is a dealer only part which probably costs $150(LOL) Cleaned it with brake cleaner,dropped it back in hole and installed new switch. No hoses or lines in way except heat shield. Used 27 mm deep socket, swivel joint,2 extens. and ratchet. Did not put ext. thru the fuel rail as in picture because the straighter up you keep everything the easier to turn. DO NOT OVERTIGHTEN!!(26 ft. lbs.) Hope this helps. Can't see how they charge $400 for this!
January 21st, 2015, 5:08 AM
#40
CF Beginner

Join Date: Jan 2015
Posts: 1
Likes: 0
Received 0 Likes
on
0 Posts
Ok I just replaced this after the dealer said it would cost $380.00 bucks. $41.00 part at Auto Zone. I used a 1 1/16 socket make sure this is not an impact socket but the thinnest wall socket you can find. I then added a swivel on top of this. I actually welded it on so it wouldn't fall off. Then get this unit on to the sensor. Believe me it is a pain because of the fuel line and two other lines. It goes on though, Once you get that on then stick one of two smaller extensions on to this. Then I added another small extension. So in total I had two small extensions. I then was able to get it loose. Took off socket then turned it out by hand. Placed the new one in by hand got the socket on and then repeated the process torqued to 24 ft lbs. Put on wire plug started and revved up engine and it worked. My gauge was pegged to zero before hand.
This job sucks. build yourself al little platform to lay on. Your hand will get rubbed raw from the firewall and the vacuum hose to brake is in the way. And that fuel line is the real pain.
Hope that helps.
This job sucks. build yourself al little platform to lay on. Your hand will get rubbed raw from the firewall and the vacuum hose to brake is in the way. And that fuel line is the real pain.
Hope that helps.