Chevrolet Silverado 2007-2013: 4WD Super Diagnostic Article
Silverado pickup trucks were born for a life of hard work. The option of 4WD typically means adding more components, switches, motors, and controllers to the vehicle, making a hard-working truck work even harder. But if the 4WD starts to act up, then what? This article includes the steps you can take to track down the problem.
This article applies to the Chevrolet Sillverado GMT900 (2007-2013).
In the bad old days, putting your spartan-finished, harsh-riding vehicle into 4WD required that you stop, get out, and manually lock each of the grimy front wheel hubs. Then get back in, clean your now-filthy hands with a moist towelette, shift the New Process (OEM transfer case-maker for almost every vehicle—now New Venture) floor-mounted lever into 4-high or 4-low—which often required jockeying your vehicle a bit forward or backward so the gears could mesh,—and finally driving away. If your 4WD system acted up (like one or both hubs wouldn't lock or the transfer case lever refused to engage or disengage), you immediately knew what was wrong.
But those days are long gone. Today, all that's required to go four-wheeling is slowing your Silverado down below 70 mph, and then turning a switch from 2-High to 4-High. Then, again, you could just leave it in “Auto” during questionable driving conditions. And compared to the previously-mentioned “bad old days,” how amazing is it with “Auto” to have the PCM, using traction, stability, wheel speed, and other road condition inputs decide whether your truck should be in 4WD or 2WD for you?
In this article, investigating possible 4WD problems will be broken down into five steps:
- Check the Transfer Case Selector Switch
- Check the Dashboard Warning Light (TCCM)
- Check the Front Axle Actuator
- Check the Transfer Case Shift Motor
- Check the Transfer Case (Noisy)

Material Needed
- Flat-blade screwdriver or plastic trim removal tool for un-clipping dashboard tabs
Step 1 – Check the transfer case selector switch
It is located on the left side of the dashboard. How the transfer case selector switch behaves can be your first clue that your 4WD system has a problem, and also what might be the possible cause.
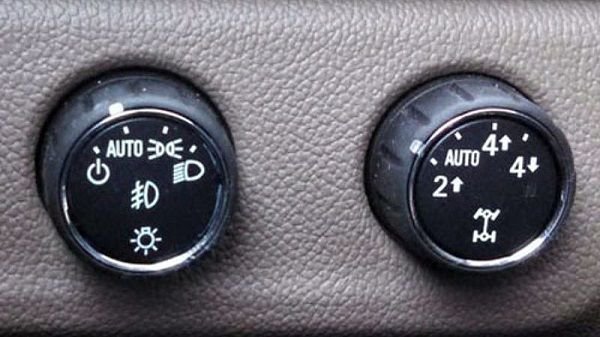
If your transfer case selector switch:
- Doesn't light up at all when you start your vehicle, then your transfer case selector switch is the suspect.
- Won’t switch into the drive mode you’ve selected (that is, the position indicator won’t stay lit in that selection), then again the selector switch is the suspect.
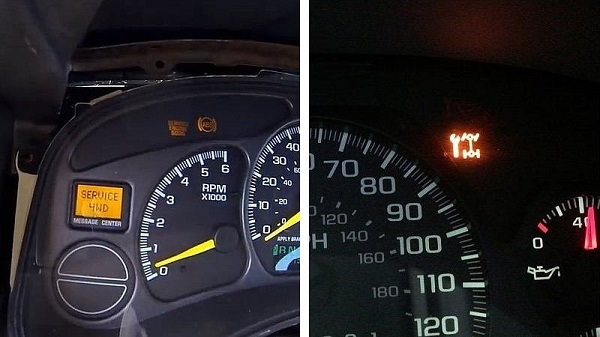
- Lights up when you start your vehicle but then goes off by itself, then your Transfer Case Control Module (TCCM) is the suspect (a “Service 4WD” dashboard warning light may also come on).
- Switches into 4WD just fine but your vehicle isn’t actually sending power to the front wheels, then your front axle actuator is the suspect.
- Blinks with nothing happening (drivetrain-wise), then your transfer case actuator motor (the motor that shifts the transfer case mode selections) or the transfer case itself is the suspect.
In the event that either of the first two items listed above are what you’re experiencing, replacing the selector switch is in order. But before you do that, many have found that the ground wires attached to the TCCM can give an insufficient or intermittent ground. These ground wires are attached to the frame under the front of the driver’s door. Unbolt these wires, clean their contact area to bare metal as well as the bolt threads, and reattach the wires to the frame (a 5-minute job).

If the ground wires are okay, replace the transfer case selector switch. To do this, remove the instrument panel knee bolster, and then use an appropriate tool to depress the tabs to remove the switch assembly from the bezel. Remove the plugs from the back of the switch and plug in the new switch.
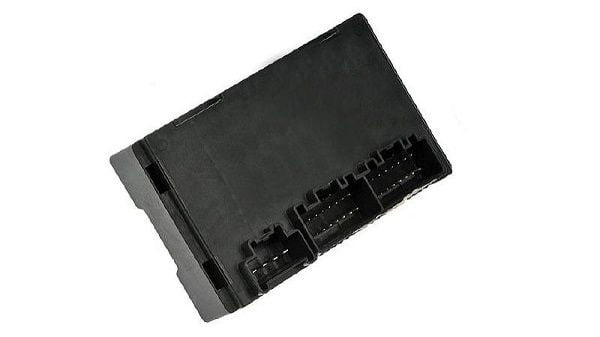
If this doesn’t correct the problem, then the next suspect is the transfer case control module (TCCM).

Material Needed
- Flat-blade screwdriver or plastic trim removal tool for un-clipping dashboard tabs
Step 2 – Check the dashboard warning light (TCCM)
The dashboard DIC warning light (indicating the need to “service 4WD”) will turn on. This can happen if the transfer case control module (TCCM) senses a communication failure between it and the powertrain control module (PCM). If this occurs, the TCCM turns on the warning light in the IP. If the light turns on after the vehicle has been driven awhile with no issues, the TCCM is suspect.
Be aware that there have been problems and a recall concerning the TCCM’s controller software, causing the transfer case to unexpectedly switch to “Neutral” when parked or moving. The solution for this is having the TCCM re-flashed (overwritten with new firmware). Check to see if your vehicle was part of this recall, and if it was, have the dealer re-flash the TCCM.
Controller communication issues between such components as the front axle actuator and transfer case shift motor will typically be indicated by the the transfer case selector switch (see Step 1).
To do a quick check to see if the PCM is communicating properly with the TCCM, try the following:
- Turn the ignition on, but keep the engine off.
- Put the selector switch through all of its modes, while both watching the behavior of the dashboard warning light area and the selector switch lights, and listen carefully for component activation noises from under the front of the vehicle.
Running through the selector switch choices, starting from the “normal” selection of “2-Hi,” should accomplish the following:
- In "2-Hi," the front axle is not engaged and the transfer case only sends power to the rear wheels.
- Turning it to “Auto” engages the front driveshaft via the front axle actuator (no more locking wheel hubs!), and keeps the front axle engaged to make automatically switching to and from 2WD as well as 4WD quicker (“Auto” can’t select “4-Low).
- By turning it to “4-Hi” (at less than 70 mph only) with the front axle actuator already engaged from the previous position (“Auto”), the transfer case is shifted by the transfer case shift motor from 2WD, past Neutral (as noted previously the transfer case has its own Neutral mode) to “4-Hi.”
- Turning it to “4-Low” (at speeds less than 3 mph or stopped, and with the transmission in Neutral, not Park, with the parking brake on) with the front axle encoder still engaged, the transfer case actuator motor is shifted from 4-Hi to 4-Low.
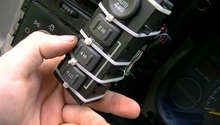
If the most obvious culprit looks to be the transfer case control module, then you will find it behind the dash on the drivers' side. But, as mentioned previously, if you haven’t already done so, first check the ground wire connections going to the frame under the front of the driver’s door. Ensure that they are clean as well as tight, and not causing a ground fault. If they’re not the problem, you’ll need to replace the TCCM.
If you unplug and replace your TCCM with a compatible used one, it may be set up for a different final drive ratio. It can work, but with the Automatic Transfer Case option, you will need to keep your truck out of the “Auto” selection until you have had your replacement TCCM re-flashed at a dealership with firmware for your vehicle’s drivetrain configuration.

Material Needed
- Jacks
Step 3 – Check the front axle actuator
Finding out if the front axle actuator is the culprit is not difficult to test.

With the vehicle up on jacks, the ignition on with the motor off, and “4-Hi” selected, the front differential should be engaged to the transfer case, and the front tires should not be able to spin without moving the front driveshaft. If they can spin, very likely you need to replace the front axle actuator.
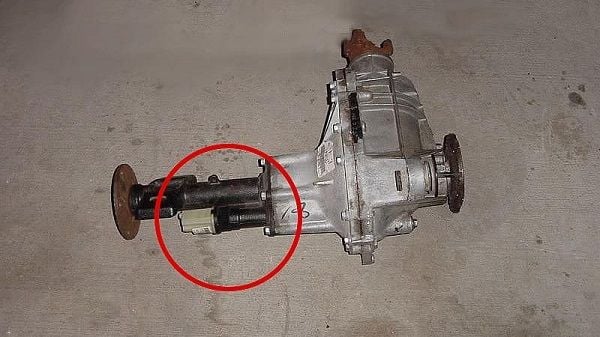
To remove the front axle actuator, unplug the wiring harness and remove the actuator's screws from the front differential casing. When replacing it, be sure to use the proper sealer and tighten it to the proper torque.

Materials Needed
- Socket set with metric and/or star (Torx) sockets and extensions
- Small pry bar or large screwdriver
Step 4 – Check the transfer case shift motor
The transfer case shift motor, sometimes referred to as the “shift actuator” or “shift encoder,” is attached directly to the transfer case. It may be the culprit if you’re not able to select a different drive mode with the transfer case selector switch.
When the drive mode is switched from “2-Hi” to “4-Hi,” the actuator motor turns a shaft in the transfer case to one of four possible settings: “2-Hi,” Neutral, “4-Hi,” and “4-Low.” If you don’t hear this shift happening (the selection of “4-Low” being the loudest) or hear it trying to make the shift but failing, chances are you will need to replace the transfer case shift motor.
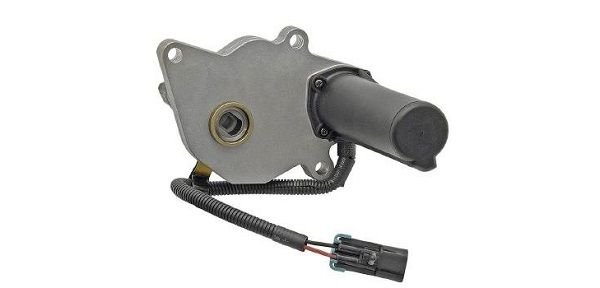
Note that you will have to remove the front drive shaft to replace the encoder motor. Three bolts hold the encoder motor on, and if the old encoder’s gasket is in good condition, it can be reused.

Materials Needed
- Long and short handle socket set with metric and/or star (Torx) sockets and extensions
- Box wrench set
- Ratchet wrench set
- Small pry bar or large screwdriver
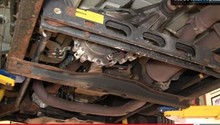
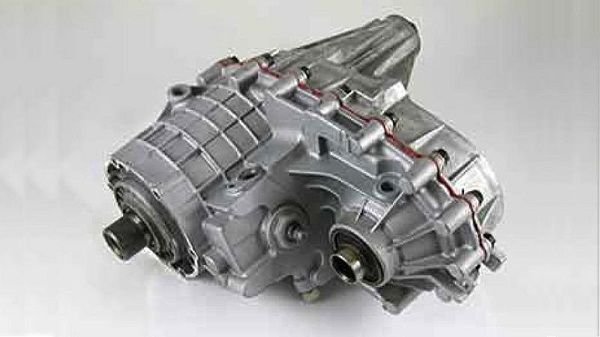
Step 5 – Check the transfer case (noisy)
Although the transfer case shift actuator motor is much more likely to require replacement than the transfer case itself, the need to replace the transfer case does wise. A clue to problems with it would be if it has been making a strange grinding noise when engaged, or was doing so before it stopped working altogether.
Perform the following:
- Drain the oil out of the transfer case.
- Remove the skid plate below the transfer ace.
- Remove the front drive shaft completely.
- Prop the transmission up from underneath.
- Detach the rear drive shaft at the rear differential.
- Remove the crossmember below the transmission, and nuts attaching it to the two transmission mount bracket bolts.
- Remove the transmission mount bracket from the bottom of the transmission.
- Lower the transmission until its rear rests on the crossmember beneath it.
- Unplug all of the electrical connections, and remove the harness tangs as well as vent tube.
- Remove the six nuts holding the transfer case to the transmission with a pan beneath to catch the fluid.
- Remove the transfer case (easier with two people).
To install the new transfer case, reverse the procedure.
Related Discussions
- 4WD Problems - ChevroletForum.com
- 4WD Not Working - ChevroletForum.com
- Silverado Transfer Case Issue - ChevroletForum.com