
HOW TO: Adding a back-up camera to an 07+ C\K SUV


Thread Starter
Banned
Joined: Jan 2008
Posts: 2,541
Likes: 14
This HOW TO is going to cover all NBS C\K SUV's including tahoe, suburban, escalade & yukon.
It shows how to add an aftermarket camera, into a factory bezel, for the cleanest, most factory looking install
For an advanced installer, this should take about 3 hours start to finish. Anyone can do it, it might just take a little longer to get it the way you want it
The install was done on an '07 Tahoe that belongs to JTS001.
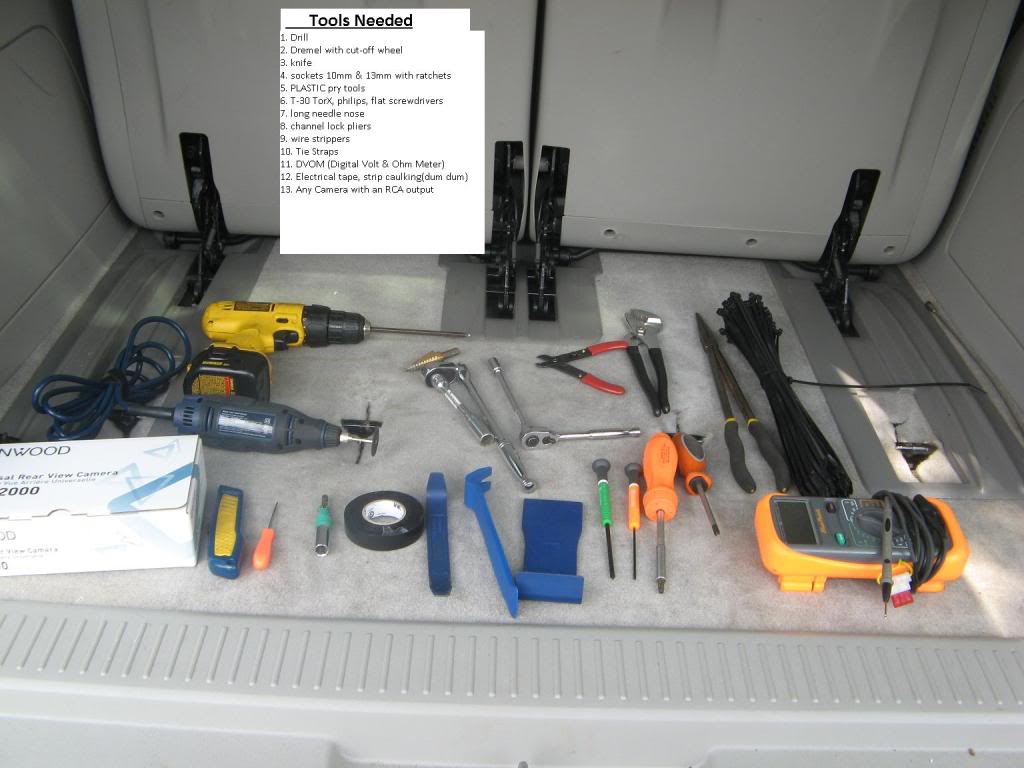
First lets start with tools & Parts
The camera I used was a Kenwood CCD-2000. It was small enough to fit into the factory bezel with the least amount of work.
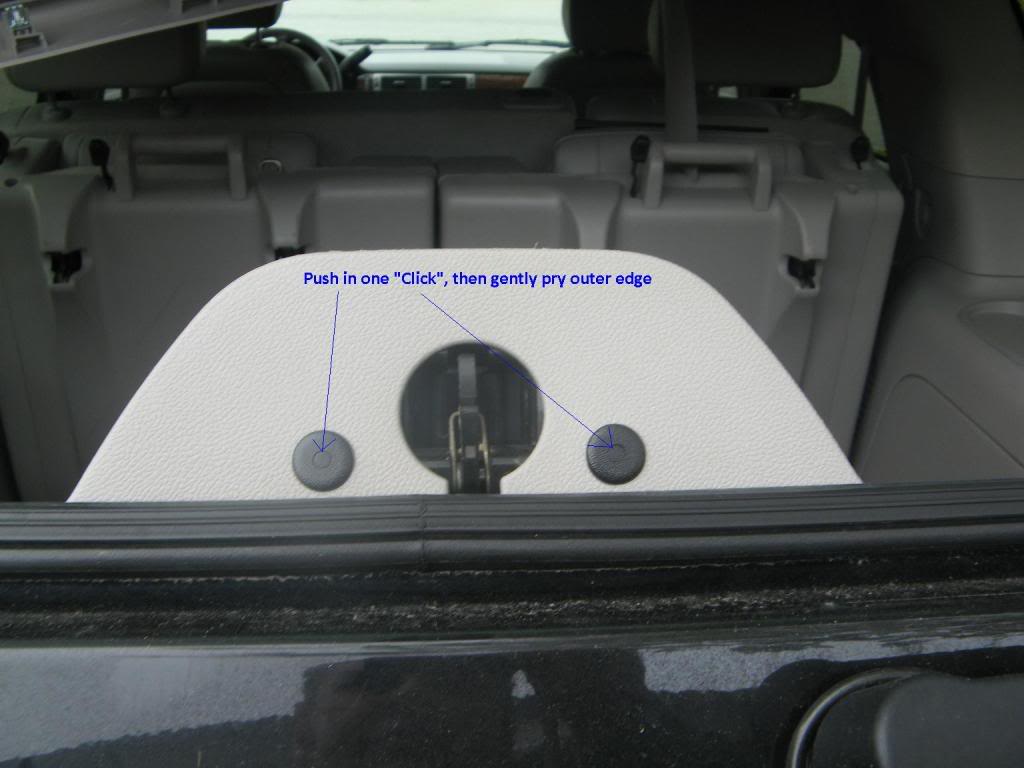
First step should be to open the glass and get the 2 little clips under the glass. Push the center with a pick by one "click", and gently pry out the entire thing
Next, pop the cover off of the wiper arm. remove the 13mm nut holding the wiper arm to the motor. Remove the hose from the nozzle sticking out of the body. Gently pull up on the wiper arm in hopes that it comes free. This one was stuck on there very well. I just used the channel locks to rock the arm up and down to free it up
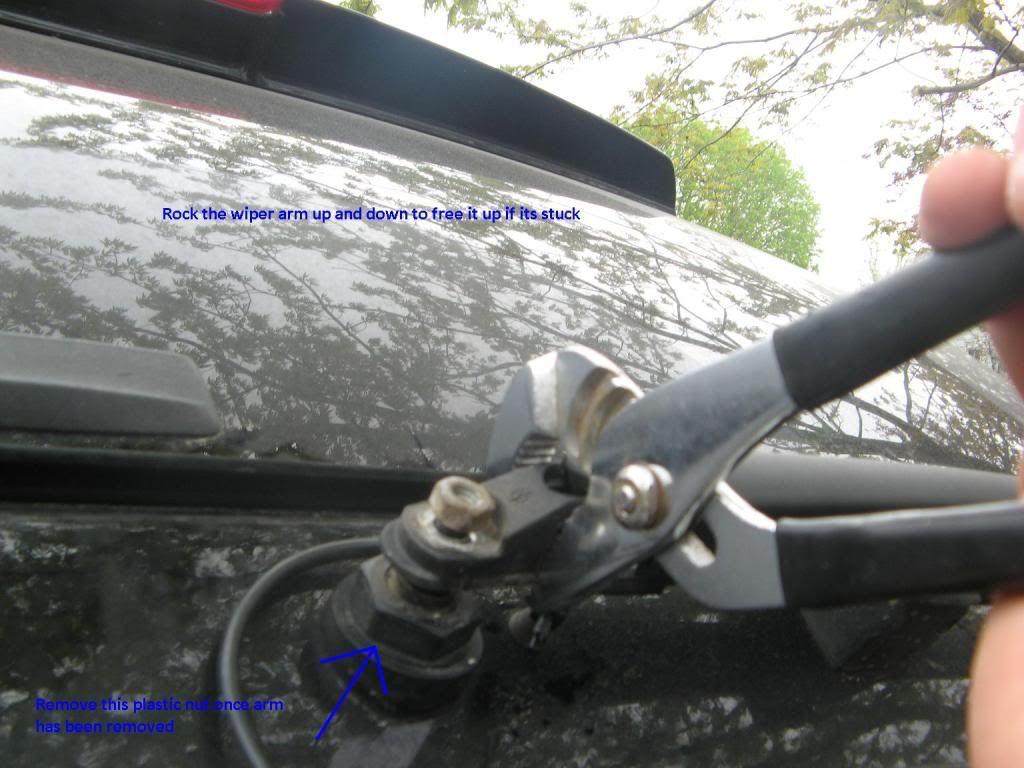
Once the wiper arm is off, remove the plastic nut with the channel locks, and pull off the rubber O-Ring thats under the nut
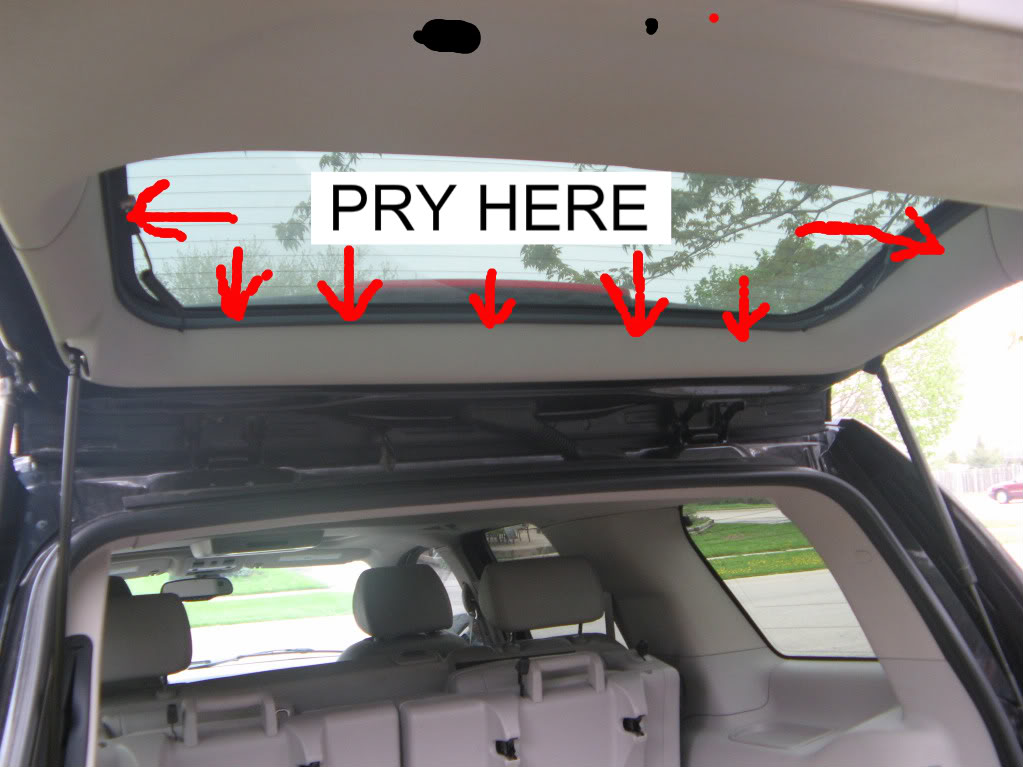
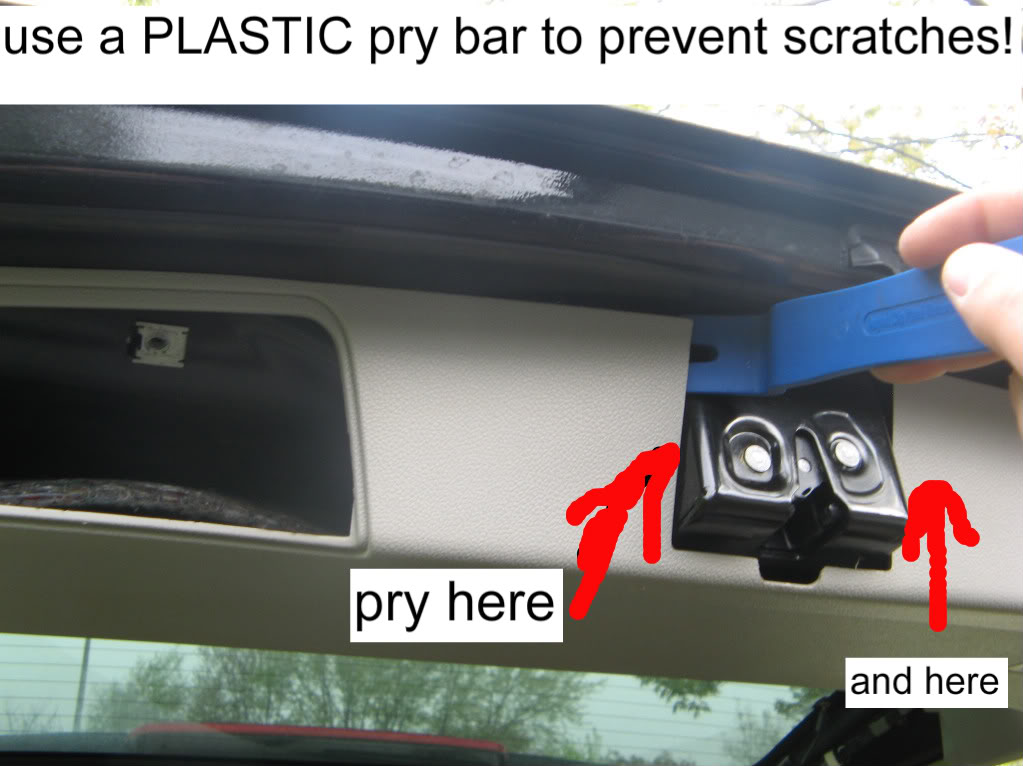
Open the lift gate and remove the the trim panel around the glass and set aside (REMEMBER TO USE PLASTIC PRY TOOLS!!)
Then, Using your T-30 Torx screw driver, remove the two screws shown below

You can pull out the pocket on the left, and using a plastic pry tool, pry out on the trip around the latch. once the 2 clips are loose, disconnect the electrical connector. Pull down on the trip releasing the clips as you go. Don't pull too hard though! and top is still holding on!
Once the trim is just hanging there, with the glass open, slide the whole thing up and you should have it in your hands. Set it aside where it won't get scratched or kicked.
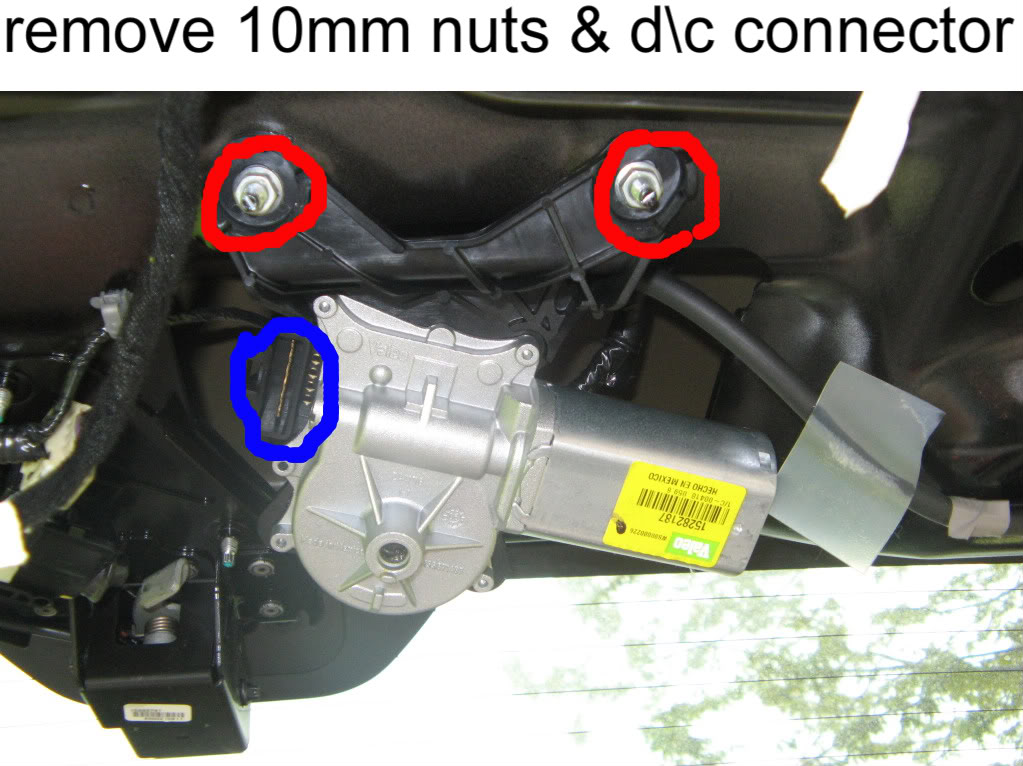
Find the wiper motor, and pull out the connector. Using a 10mm socket, and your drill, undo the nuts holding the motor up. There is no stuf welded to the body, nor is there a head on the other end the of bolt you're now spinning. Either find your way in with a pair of pliers to hold the bolt, or press down really hard with your finger as you spin the nut with the drill. Works about 90% of the time for me.
Remove the motor and set aside
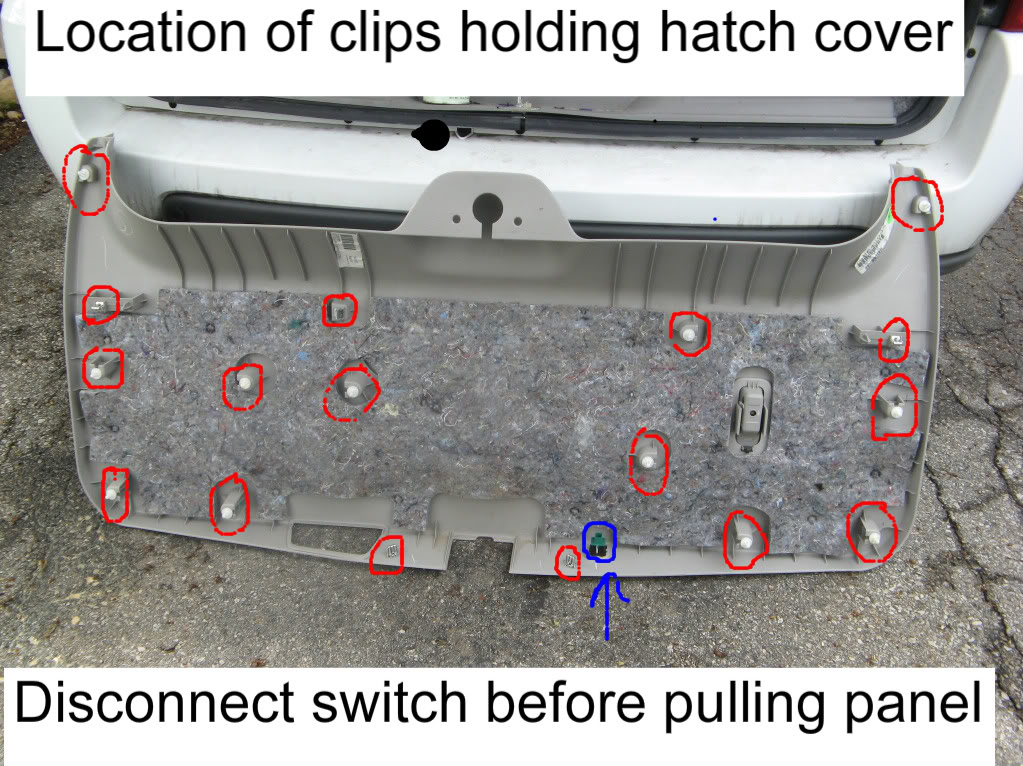
Right about where the motor was, there is another 10mm nut. VERY GENTLY remove it. there are also 3 more that are accessable through holes in the hatch. they all go in a straight line. If you put too much force on the nut, you will strip the plastic holding the stud. And there is not much plastic.
I break about 50% of them, so if yours breaks, don't feel bad.
Once one breaks, you can stop being gentle as the rest are going to break as well. break them all free at this point.
There are two clips holding the applique the the hatch that you need to squeeze while pulling up to release them. This is a little harder to do if the studs have stripped. The clips are located on the outside edges of the applique. Squeeze the clips and remove the applique.
If the studs have stripped, I have found the easiest way to remove the applique, is to have a helper pull up on the applique, while you are spinning the nuts. Start from left to right, and one by one, pop the studs out. have your helper use vise grips to hold the stud, while you turn the nut from the inside. You must remove all the studs in order for the applique to go back on properly.

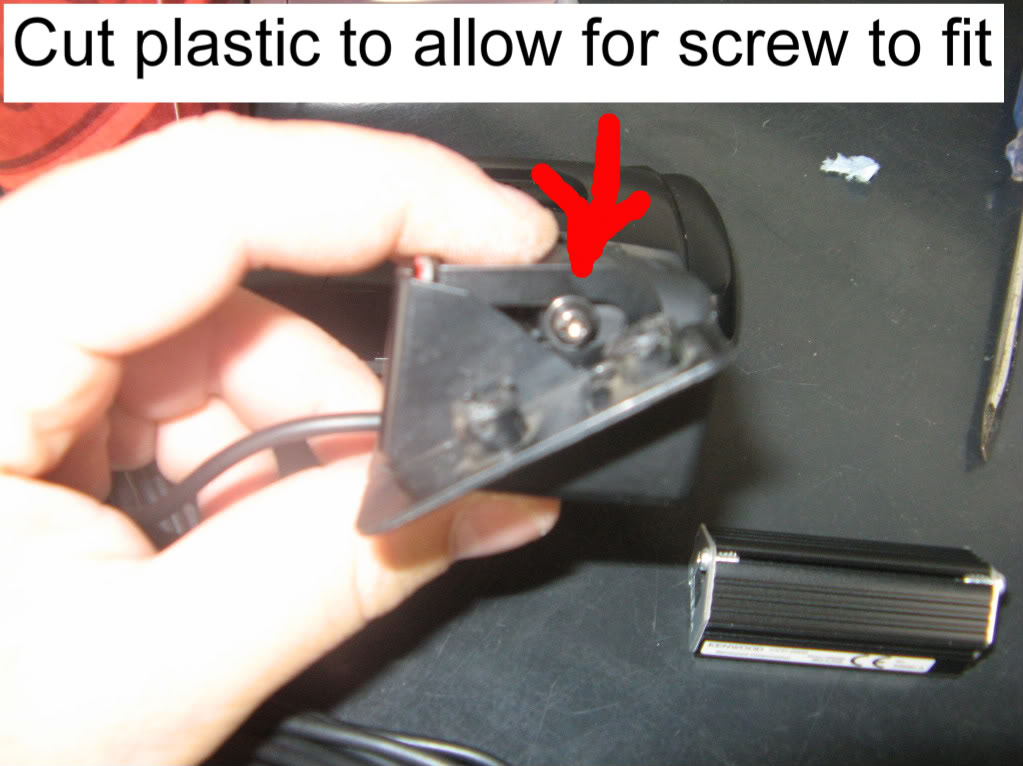
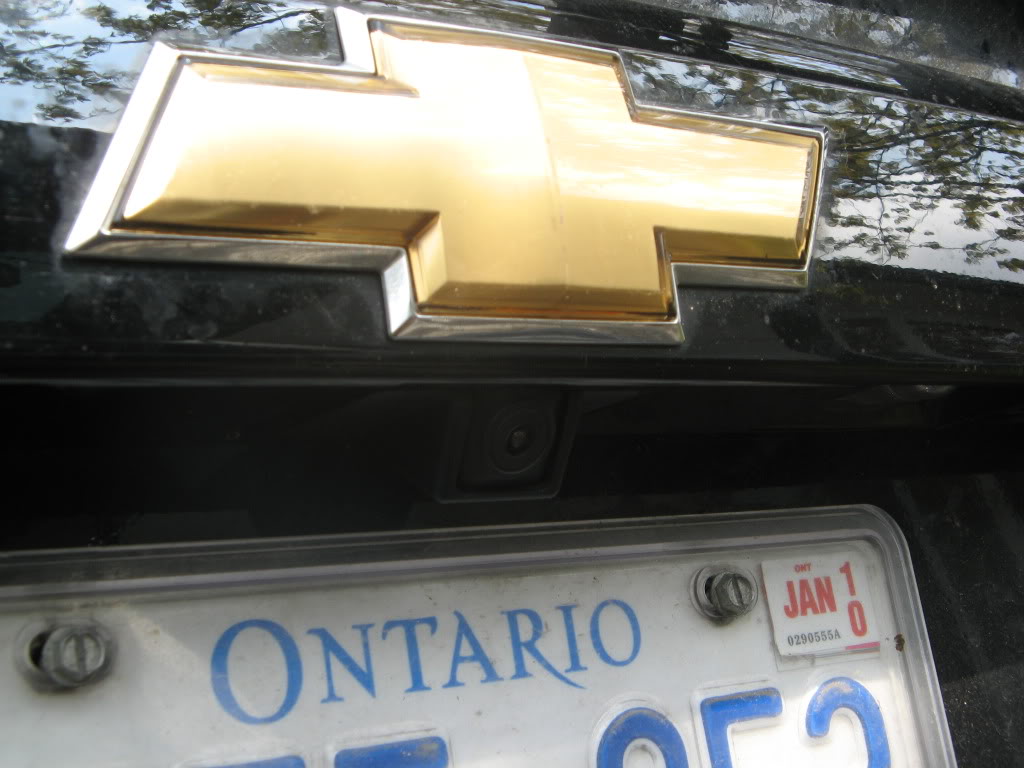
Once you have the applique off, you need to cut a hole in the center of it where the factory camera would be. I used a dremel with a cut-off wheel for the camera opening, and a 3/8" drill bit for the four holes
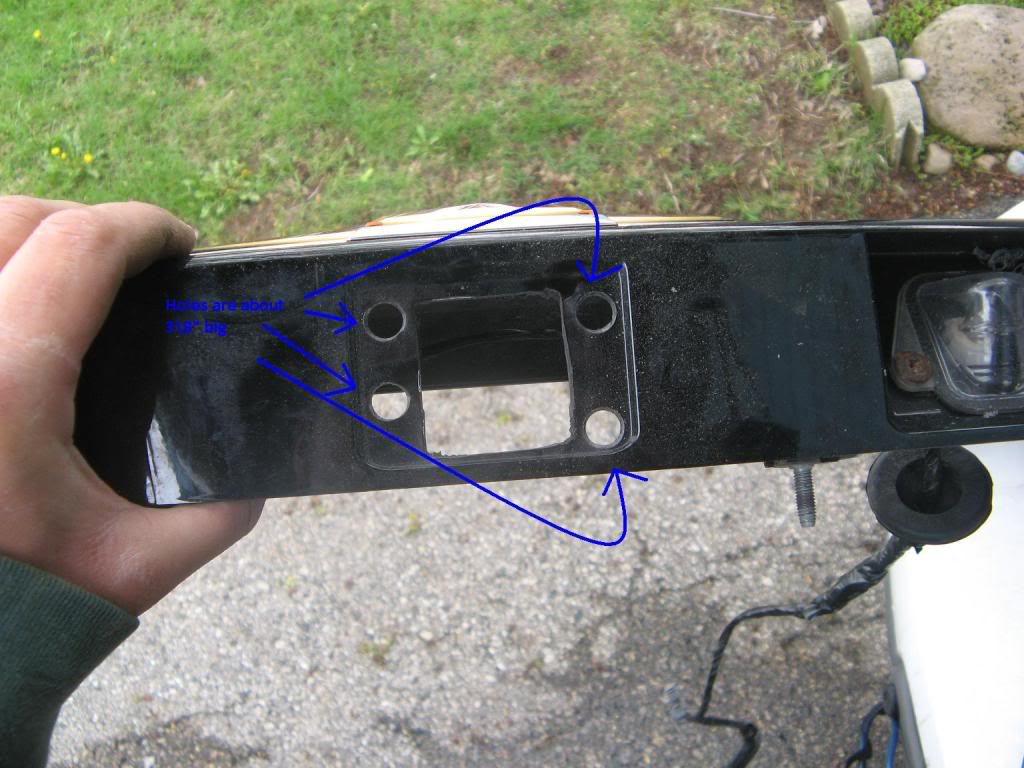
Place the camera bezel into the hole to test fit. Cut away as neccessary.
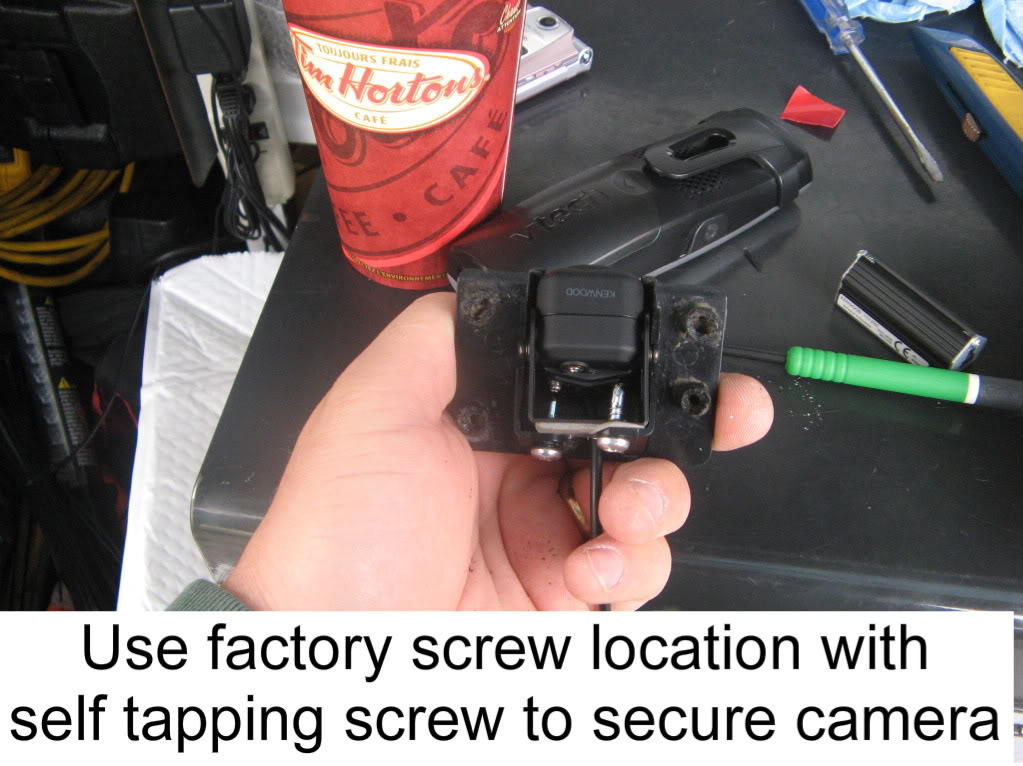
Next step is going to be mounting the camer to the bezel. I used the small metal mount that came with camera, and used self tapping screws to secure it to the bezel. I also had to cut a small piece off of the bezel to allow for clearance of the screws in the side of the camera. Once I had it to my liking, I used hot glue and filled in some of the voids for added strength and to keep some water out of it.
Very Important Point To Remember: MAKE SURE THE CAMERA IS RIGHT SIDE UP WHEN MOUNTING IT
I'd hate to hear of guys getting the job done only to find out that the image is upside down!
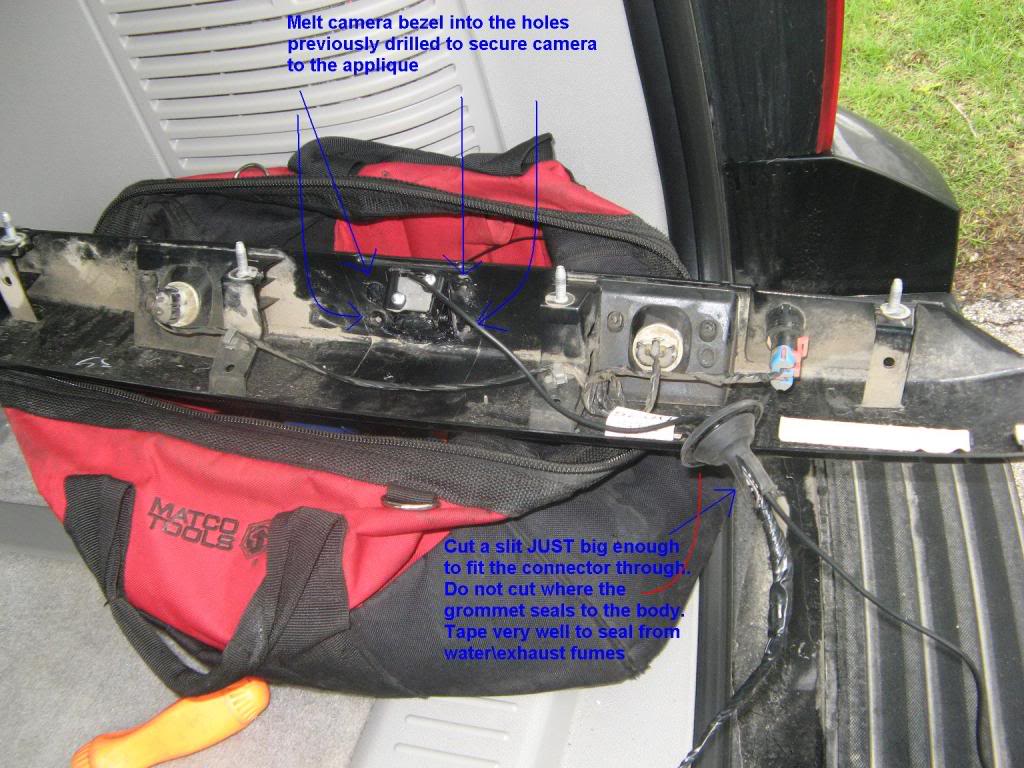
Cut back some of the tape that it holding the wires to the rubber grommet there. If you can squeeze to wire through the grommet, great. If you cannot, cut the rubber at the tail end of it. Try not to cut the rubber where it seals to the body. Slip the wire in and pull it all the way through. Tape up the wires and the grommet really well to prevent water and exhaust fumes from entering the vehicle.
Re-attach the applique and put the four nuts back on. Zip tie the camera wire to a harness in the hatch to the right(or left) up around the glass to the rubber grommet. Use the plastic pry tool to pop the grommet out of the body. There is a plastic piece in the rubber that clips to the body. Pry on the four corners of it. There will be indications on the rubber boot on where to pry.
DO NOT FORCE THIS PIECE OFF. If you do, you can destroy the plastic piece, and the rubber will no longer seal and you'll have a water leak.
Once both sides are off, you can get the wire through the boot in one of two ways. Put a fish through the boot, and tape the wire to it and pull it through. Or stick the needle nose through the boot, open the pliers and grab hole of the wire and pull it through. Either way its gonna be tight. Don't pull too hard so you don't rip the end of the wire off. A very small amount of grease or WD-40 will help you pull it through. Try not to use too much of it though as it will deteriorate the rubber boot. Run the wire down the passenger side of the rear pillar.
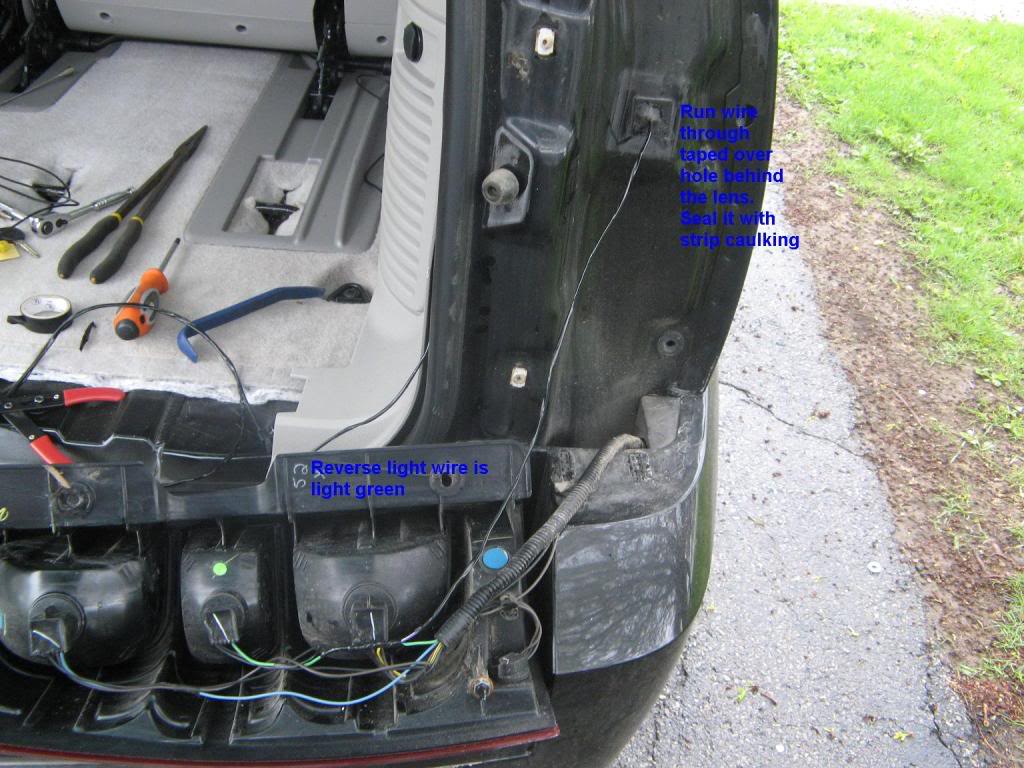
While you're back in the area, it might be a good time to get power for your camera. I got it at the lens. Two phillips screws, and the lens just pulls out. Solder a wire onto the light green wire, and run it into the vehicle through a small piece of tape that is covering a hole, and put some dum dum on it to seal it up.
Run all the wires up to the right-front kick panel. If you are working on an 07 that was built with NAV from the factory, there will be a connector in the kick panel behind another connector. This connector is for the factory camera connection.
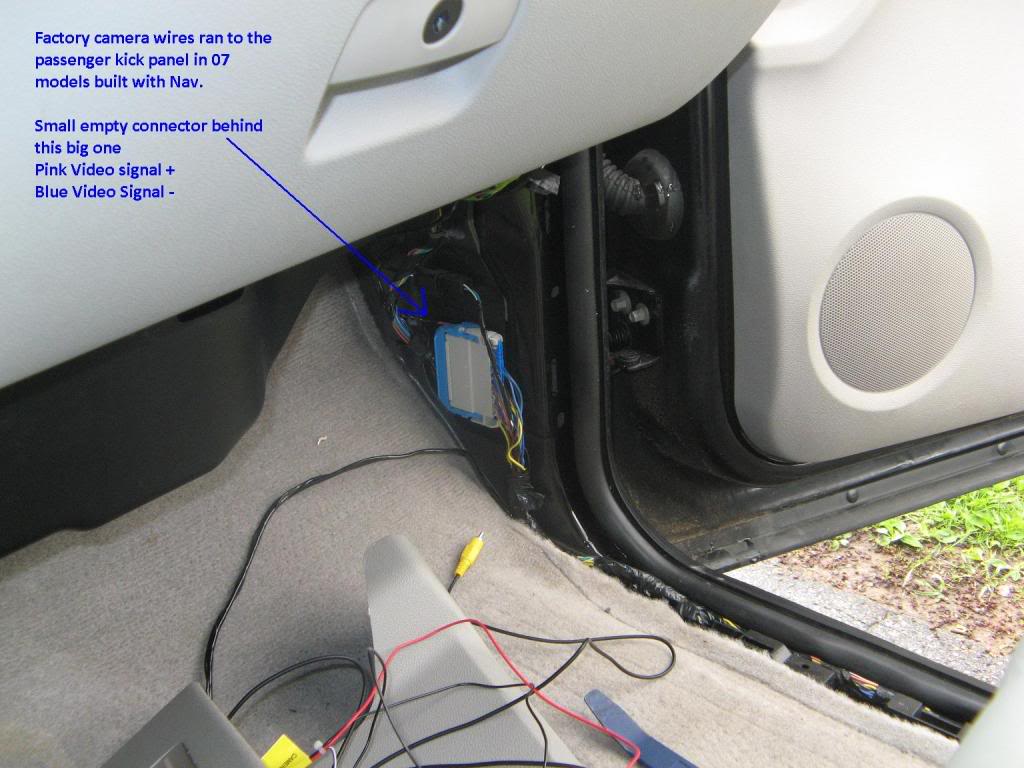
Pry out the grey connector, and pull off the small black connector, and chop the end off. The blue wire is to be soldered to the shield of an RCA, and the pink wire goes to the center. There is also a bare wire there, you can either just tape it up, or attach it to the outer shield of the RCA if the picture is fuzzy.
If the vehicle does not have this connector, you must pull the radio out, and insert pins into the brown connector. Pin 6 is positive, and pin 5 is negative.
If you need the pins, go to your local parts dept, and tell them you need pin 15359541 out of tray 4
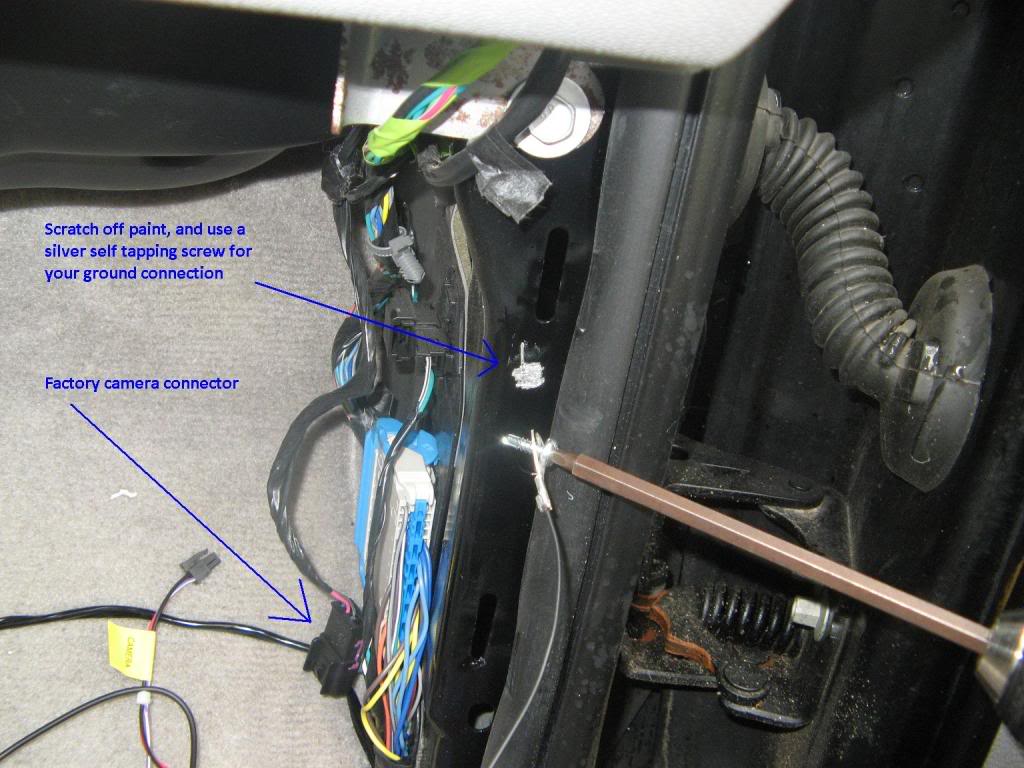
This is probably the best place to get your ground for the camera. A good ground is CRUCIAL to getting a good picture. poor grounds can cause staticy\fuzzy\intermitent pictures. Crimp on a ring terminal, scratch the paint off the body behind the kick panel, and using a silver self tapping screw, screw it into the bare metal, but don't over tighten it.
This particular camera needed an ignition feed. Not all do, but if you need it, use the pink wire in the brown connector at the junction block under the drivers side of the dash.
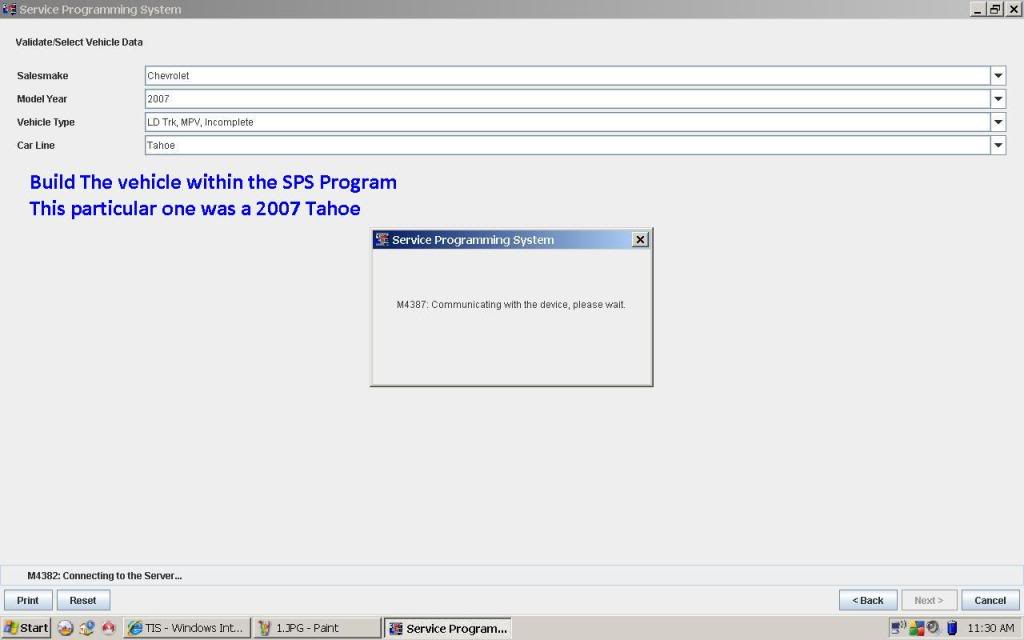
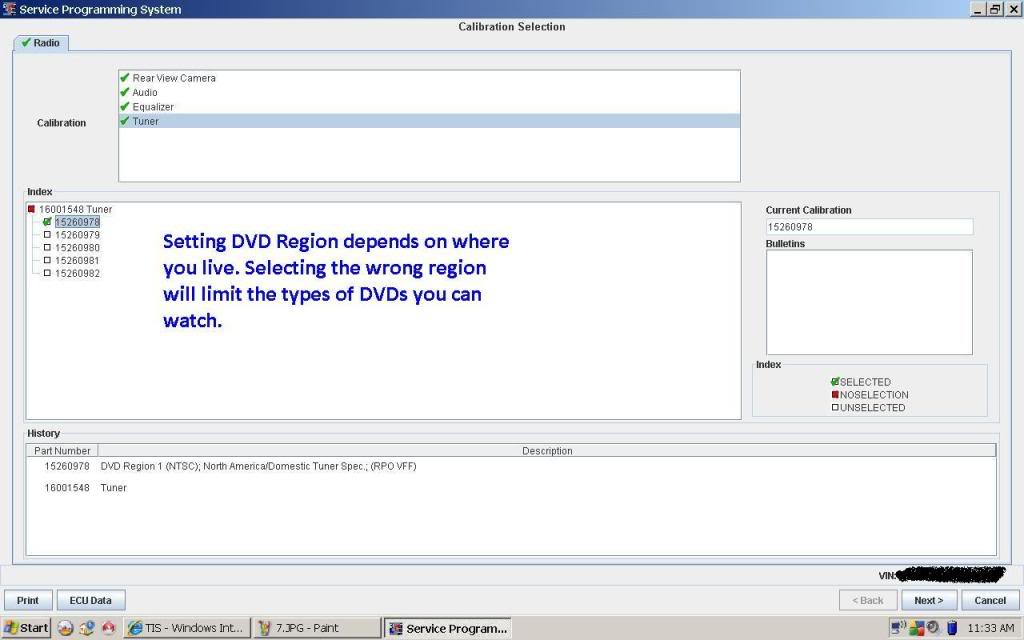
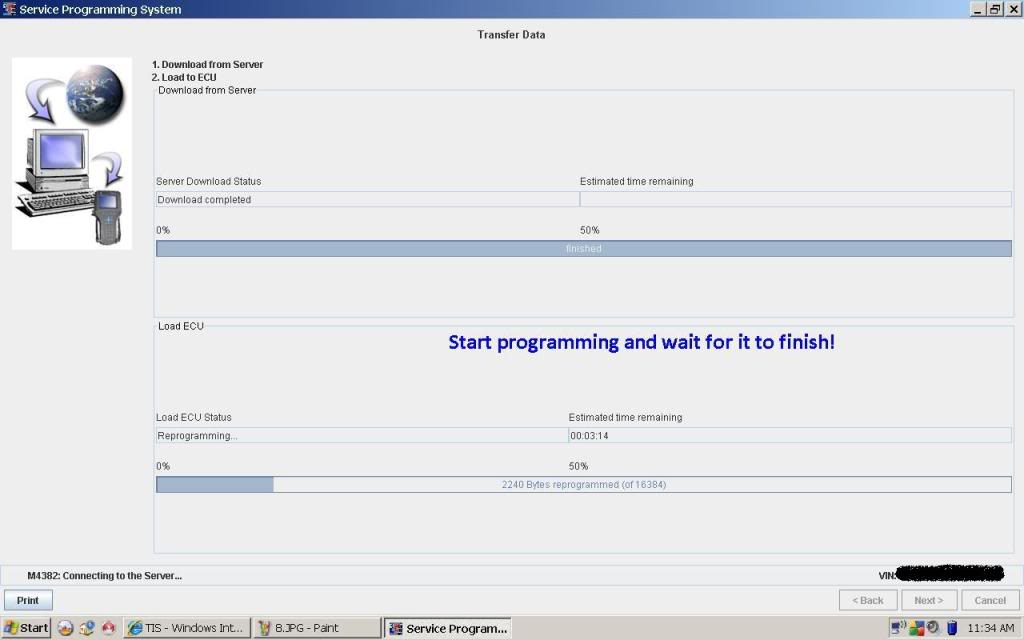
Now that all the connections are made, we need to program the radio. This can be done before-hand if you want to do it earlier for convienance.
Programming must be done using a Tech2\MDI, and by using GM's Web-based programming software.
If you don't have access to this stuff, then sorry but you must go to the dealer to get it done
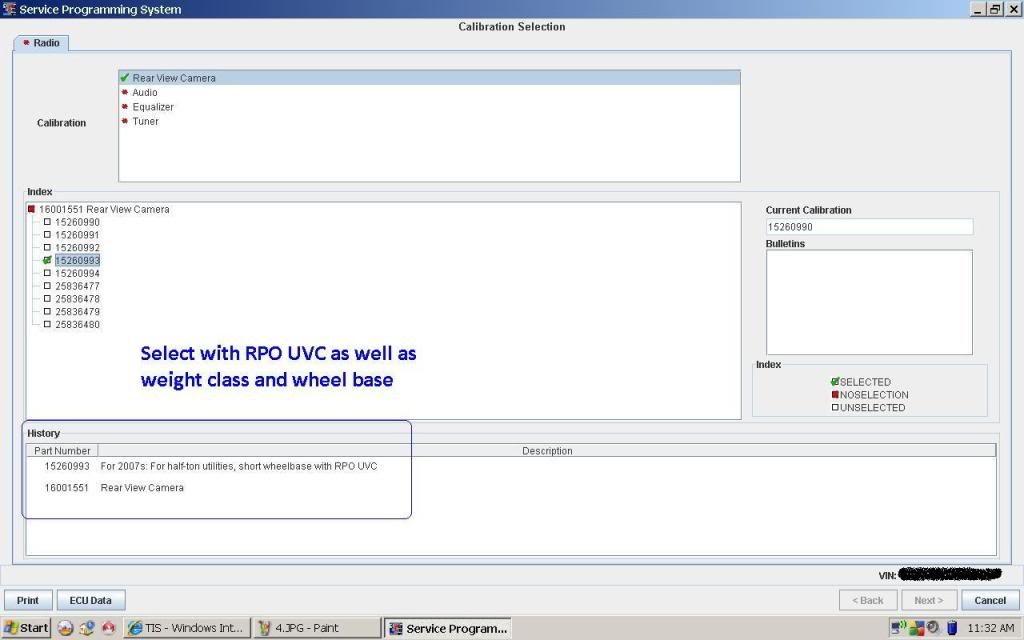
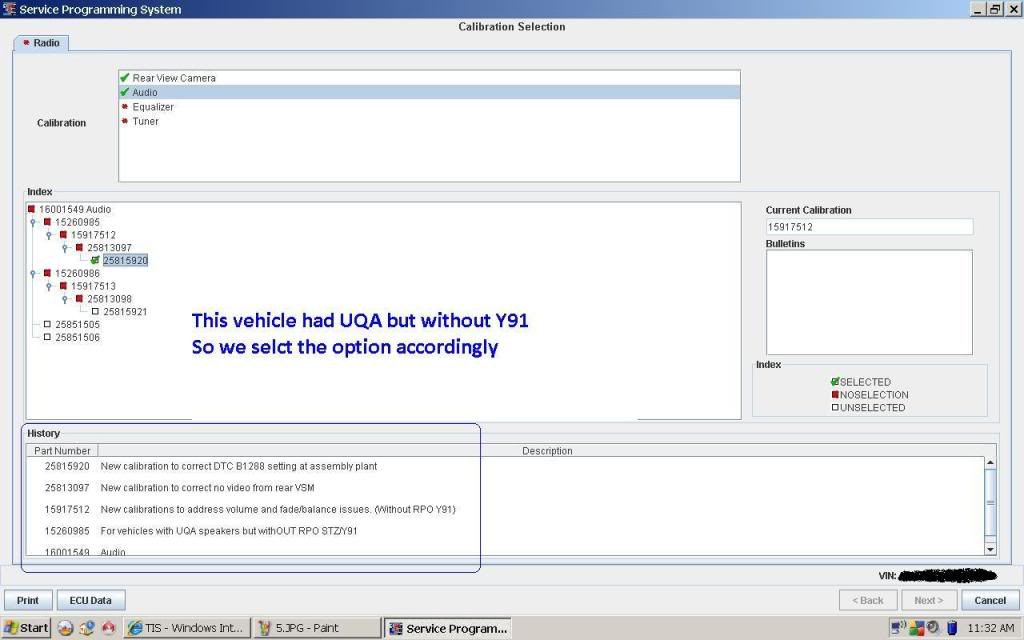
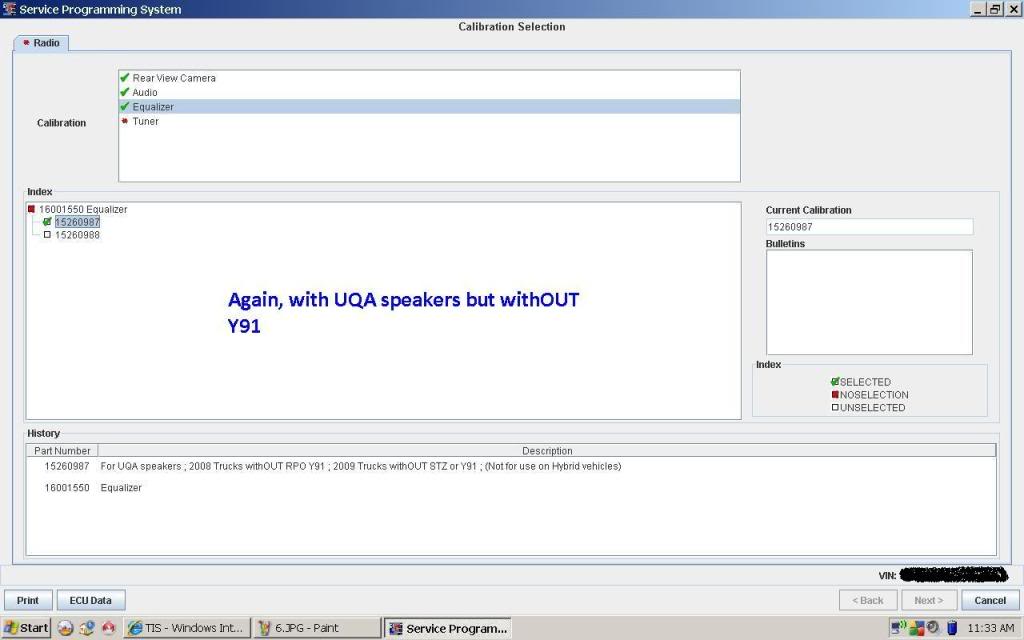
I will just post a series of pics for the importants steps.
It shows how to add an aftermarket camera, into a factory bezel, for the cleanest, most factory looking install
For an advanced installer, this should take about 3 hours start to finish. Anyone can do it, it might just take a little longer to get it the way you want it
The install was done on an '07 Tahoe that belongs to JTS001.
First lets start with tools & Parts
The camera I used was a Kenwood CCD-2000. It was small enough to fit into the factory bezel with the least amount of work.
First step should be to open the glass and get the 2 little clips under the glass. Push the center with a pick by one "click", and gently pry out the entire thing
Next, pop the cover off of the wiper arm. remove the 13mm nut holding the wiper arm to the motor. Remove the hose from the nozzle sticking out of the body. Gently pull up on the wiper arm in hopes that it comes free. This one was stuck on there very well. I just used the channel locks to rock the arm up and down to free it up
Once the wiper arm is off, remove the plastic nut with the channel locks, and pull off the rubber O-Ring thats under the nut
Open the lift gate and remove the the trim panel around the glass and set aside (REMEMBER TO USE PLASTIC PRY TOOLS!!)
Then, Using your T-30 Torx screw driver, remove the two screws shown below
You can pull out the pocket on the left, and using a plastic pry tool, pry out on the trip around the latch. once the 2 clips are loose, disconnect the electrical connector. Pull down on the trip releasing the clips as you go. Don't pull too hard though! and top is still holding on!
Once the trim is just hanging there, with the glass open, slide the whole thing up and you should have it in your hands. Set it aside where it won't get scratched or kicked.
Find the wiper motor, and pull out the connector. Using a 10mm socket, and your drill, undo the nuts holding the motor up. There is no stuf welded to the body, nor is there a head on the other end the of bolt you're now spinning. Either find your way in with a pair of pliers to hold the bolt, or press down really hard with your finger as you spin the nut with the drill. Works about 90% of the time for me.
Remove the motor and set aside
Right about where the motor was, there is another 10mm nut. VERY GENTLY remove it. there are also 3 more that are accessable through holes in the hatch. they all go in a straight line. If you put too much force on the nut, you will strip the plastic holding the stud. And there is not much plastic.
I break about 50% of them, so if yours breaks, don't feel bad.
Once one breaks, you can stop being gentle as the rest are going to break as well. break them all free at this point.
There are two clips holding the applique the the hatch that you need to squeeze while pulling up to release them. This is a little harder to do if the studs have stripped. The clips are located on the outside edges of the applique. Squeeze the clips and remove the applique.
If the studs have stripped, I have found the easiest way to remove the applique, is to have a helper pull up on the applique, while you are spinning the nuts. Start from left to right, and one by one, pop the studs out. have your helper use vise grips to hold the stud, while you turn the nut from the inside. You must remove all the studs in order for the applique to go back on properly.
Once you have the applique off, you need to cut a hole in the center of it where the factory camera would be. I used a dremel with a cut-off wheel for the camera opening, and a 3/8" drill bit for the four holes
Place the camera bezel into the hole to test fit. Cut away as neccessary.
Next step is going to be mounting the camer to the bezel. I used the small metal mount that came with camera, and used self tapping screws to secure it to the bezel. I also had to cut a small piece off of the bezel to allow for clearance of the screws in the side of the camera. Once I had it to my liking, I used hot glue and filled in some of the voids for added strength and to keep some water out of it.
Very Important Point To Remember: MAKE SURE THE CAMERA IS RIGHT SIDE UP WHEN MOUNTING IT
I'd hate to hear of guys getting the job done only to find out that the image is upside down!
Cut back some of the tape that it holding the wires to the rubber grommet there. If you can squeeze to wire through the grommet, great. If you cannot, cut the rubber at the tail end of it. Try not to cut the rubber where it seals to the body. Slip the wire in and pull it all the way through. Tape up the wires and the grommet really well to prevent water and exhaust fumes from entering the vehicle.
Re-attach the applique and put the four nuts back on. Zip tie the camera wire to a harness in the hatch to the right(or left) up around the glass to the rubber grommet. Use the plastic pry tool to pop the grommet out of the body. There is a plastic piece in the rubber that clips to the body. Pry on the four corners of it. There will be indications on the rubber boot on where to pry.
DO NOT FORCE THIS PIECE OFF. If you do, you can destroy the plastic piece, and the rubber will no longer seal and you'll have a water leak.
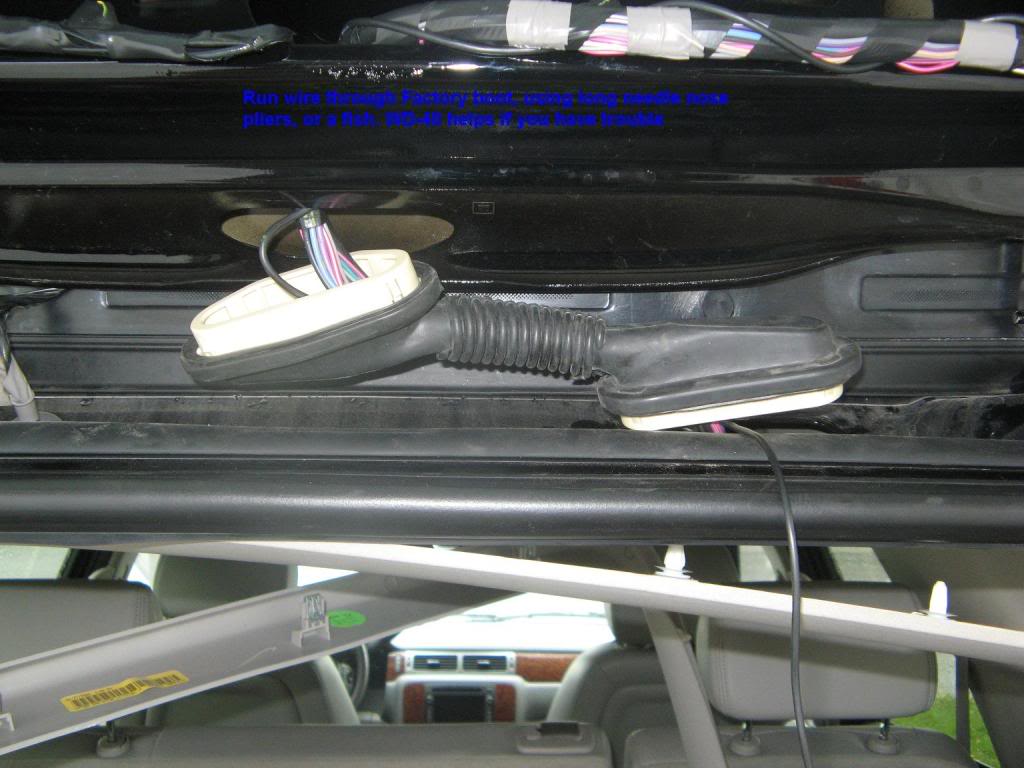
Once both sides are off, you can get the wire through the boot in one of two ways. Put a fish through the boot, and tape the wire to it and pull it through. Or stick the needle nose through the boot, open the pliers and grab hole of the wire and pull it through. Either way its gonna be tight. Don't pull too hard so you don't rip the end of the wire off. A very small amount of grease or WD-40 will help you pull it through. Try not to use too much of it though as it will deteriorate the rubber boot. Run the wire down the passenger side of the rear pillar.
While you're back in the area, it might be a good time to get power for your camera. I got it at the lens. Two phillips screws, and the lens just pulls out. Solder a wire onto the light green wire, and run it into the vehicle through a small piece of tape that is covering a hole, and put some dum dum on it to seal it up.
Run all the wires up to the right-front kick panel. If you are working on an 07 that was built with NAV from the factory, there will be a connector in the kick panel behind another connector. This connector is for the factory camera connection.
Pry out the grey connector, and pull off the small black connector, and chop the end off. The blue wire is to be soldered to the shield of an RCA, and the pink wire goes to the center. There is also a bare wire there, you can either just tape it up, or attach it to the outer shield of the RCA if the picture is fuzzy.
If the vehicle does not have this connector, you must pull the radio out, and insert pins into the brown connector. Pin 6 is positive, and pin 5 is negative.
If you need the pins, go to your local parts dept, and tell them you need pin 15359541 out of tray 4
This is probably the best place to get your ground for the camera. A good ground is CRUCIAL to getting a good picture. poor grounds can cause staticy\fuzzy\intermitent pictures. Crimp on a ring terminal, scratch the paint off the body behind the kick panel, and using a silver self tapping screw, screw it into the bare metal, but don't over tighten it.
This particular camera needed an ignition feed. Not all do, but if you need it, use the pink wire in the brown connector at the junction block under the drivers side of the dash.
Now that all the connections are made, we need to program the radio. This can be done before-hand if you want to do it earlier for convienance.
Programming must be done using a Tech2\MDI, and by using GM's Web-based programming software.
If you don't have access to this stuff, then sorry but you must go to the dealer to get it done
I will just post a series of pics for the importants steps.
Last edited by shawnvw; May 13, 2009 at 4:05 PM.

CF Junior Member
Joined: Apr 2007
Posts: 31
Likes: 0
From: Ontario, Canada
I checked with Chevy dealers on both sides of the border as well as various car and truck audio/video stores. They all said it couldn't be done this way.
Thanks to this forum and Shawn, I couldn't be happier. It looks great and works perfectly.
Thanks for a great job Shawn.
Thanks to this forum and Shawn, I couldn't be happier. It looks great and works perfectly.
Thanks for a great job Shawn.

CF Active Member
Joined: Aug 2009
Posts: 117
Likes: 0
Hi Shawn,
I can't seem to locate a part # for the camera bracket/bezel. GM doesnt seem to sell it alone it is part of the applique w/rv camera. How did you get yours for this installation and do you have a part#?
Thanks
I can't seem to locate a part # for the camera bracket/bezel. GM doesnt seem to sell it alone it is part of the applique w/rv camera. How did you get yours for this installation and do you have a part#?
Thanks
Thread Starter
Banned
Joined: Jan 2008
Posts: 2,541
Likes: 14
it not only comes with the rear applique, it comes with(or used to at least) the camera as well. When replacing both the applique and the camera, you have some spare parts left over. Or if I have replaced the applique, I take that part of.
Check the scrap yards for an applique you can rob, send me a PM if you have no luck
Check the scrap yards for an applique you can rob, send me a PM if you have no luck

CF Junior Member
Joined: May 2007
Posts: 49
Likes: 0
From:
I followed your intructions and everything worked out perfectly. Thanks for this post!
The only problem I am having now is there is water getting into the roof liner throught the rear hatch boot.How do you get those things back in and seated correctly?
The only problem I am having now is there is water getting into the roof liner throught the rear hatch boot.How do you get those things back in and seated correctly?
Thread Starter
Banned
Joined: Jan 2008
Posts: 2,541
Likes: 14
make sure the boot is seated onto the plastic inserts perfectly. There is a notch on the inside of the boot that lines up with a notch in the pastic piece.
Also make sure you haven't broken any of the locking tabs that hold the boot tight to the body.
If you have, get the silicone out!
Also make sure you haven't broken any of the locking tabs that hold the boot tight to the body.
If you have, get the silicone out!
Trending Topics
CF Junior Member
Joined: May 2007
Posts: 49
Likes: 0
From:
Ok,it does that part alright.
I just think there is a flange in the rubber on both sides that was somehow sealed in between that plastic piece and the hole in the metal.It is almost impossible to get that flange back in the hole along with that plastic piece.There is very little gap between the plastic and the metal for the rubber to fit.
The flanges were in there somehow before I pulled them off and ran the wire through the boot.
Thanks for the reply!!!
Last edited by SENECA; Oct 28, 2009 at 2:09 PM.

CF Active Member
Joined: Aug 2009
Posts: 117
Likes: 0
Yes, the wiper hose runs from the wiper moter locationm, then along the passenger side of the liftgate through to the rubber grommet on the top of the liftgate then to the center of the of the rear headliner. You can just locate the hole/leak and splice it off and connect the two ends or replace the hose.