

EXPRESS REAR A/C EXPANSION VALVE or EVAPORATOR or FAN MOTOR REPLACEMENT PROJECT


Thread Starter
CF Beginner
Joined: Jul 2012
Posts: 19
Likes: 3
Here is my 1999 Chev Express 1500 Conversion Van....built by a company called Gladiator/Glaval. Don't bother looking it up.....most of these van conversion companies all went out of business 10-15 years ago.... It is equipped with an aftermarket REAR A/C unit built into the left rear quarter trim panel....which I will be outlining the steps I used to repair it.
Please NOTE: This rear A/C unit is an aftermarket assembly....not produced by GM. I have been told that Chevrolet-produced rear A/C units are located in the RH quarter panel area. The procedures for servicing those units should be very similar to the ones described herein.
THE PROBLEM: Rear A/C is not cooling. Front A/C cools fine with 40 degree output temperature.
THE DIAGNOSIS: Since there are no leaks in the system.....and since the input compressor line to the rear unit is warm to the touch and the output of the Expansion Valve is also warm......the Expansion Valve is defective. ( Expansion valve output into the Evaporator should always be icy cold.)

BEFORE WE BEGIN.....please read this DISCLAIMER
Proper service and repair procedures are vital to the safe, reliable operation of all motor vehicles as well as the personal safety of those performing the repairs. Standard safety procedures and precautions (including use of safety goggles and proper tools and equipment) should be followed at all times to eliminate the possibility of personal injury or improper service which could damage the vehicle or compromise its safety.
Although this material has been prepared with the intent to provide reliable information, no warranty (express or implied) is made as to its accuracy or completeness. Neither is any liability assumed for loss or damage resulting from reliance on this material. SPECIFICALLY, NO WARRANTY OF MERCHANTABILITY, FITNESS FOR A PARTICULAR PURPOSE OR ANY OTHER WARRANTY IS MADE OR TO BE IMPLIED WITH RESPECT TO THIS MATERIAL. In no event will I, jerryr be liable for any damages, direct or indirect, consequential or compensatory, arising out of the use of this material. THE INFORMATION, PRODUCTS, MATERIALS AND SERVICES MENTIONED AND/OR CONTAINED IN THIS PUBLICATION, INCLUDING WITHOUT LIMITATION, GRAPHICS, TEXT AND LINKS ARE PROVIDED ON AN "AS IS" BASIS WITH NO WARRANTY OF MERCHANTABILITY, FITNESS FOR A SPECIFIC USE OR REPRESENTATION OF ACCURACY.
STEP ONE: GAIN ACCESS TO THE UNIT
This particular van has a THIRD SEAT / SOFA BED assembly. You need to remove this unit before you can remove the left quarter plastic trim panel.
Trust me on this.....I tried to get the panel off without removing the seat and all you will do is break and crack it in more than one place.
Depending on your SECOND SEAT configuration.....you may be able to do what I did......and that is .......rather than remove the sofa bed assembly ( its too heavy for 1 person to yank and drag out of the van ).....after you get it all unbolted from the floor brackets.....you can just TIP IT FORWARD.....and then secure it with seat belts or ropes or cables....(depending on your level of fear it will come crashing down on you when you are laying there trying to get the evaporator case out.)
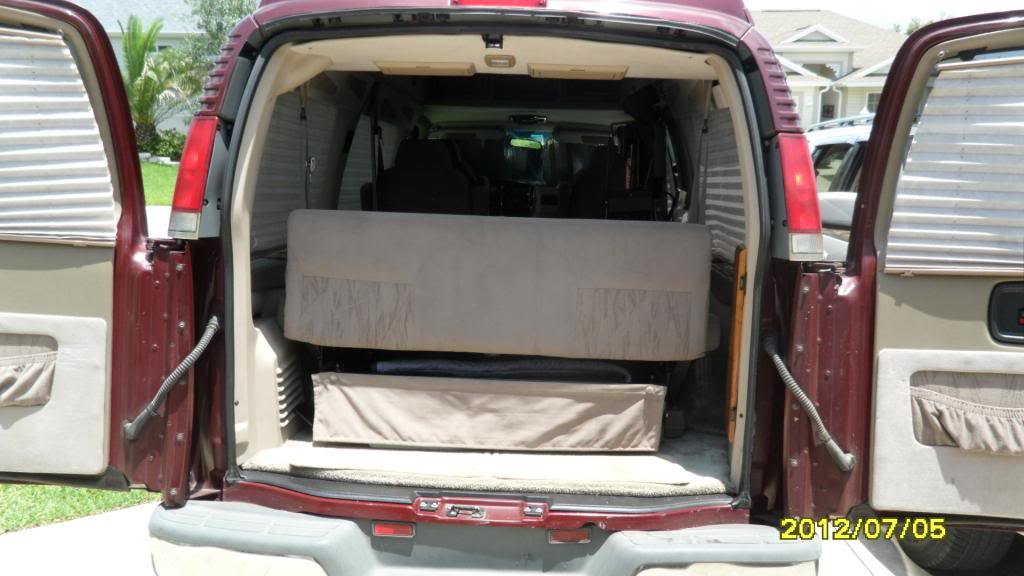
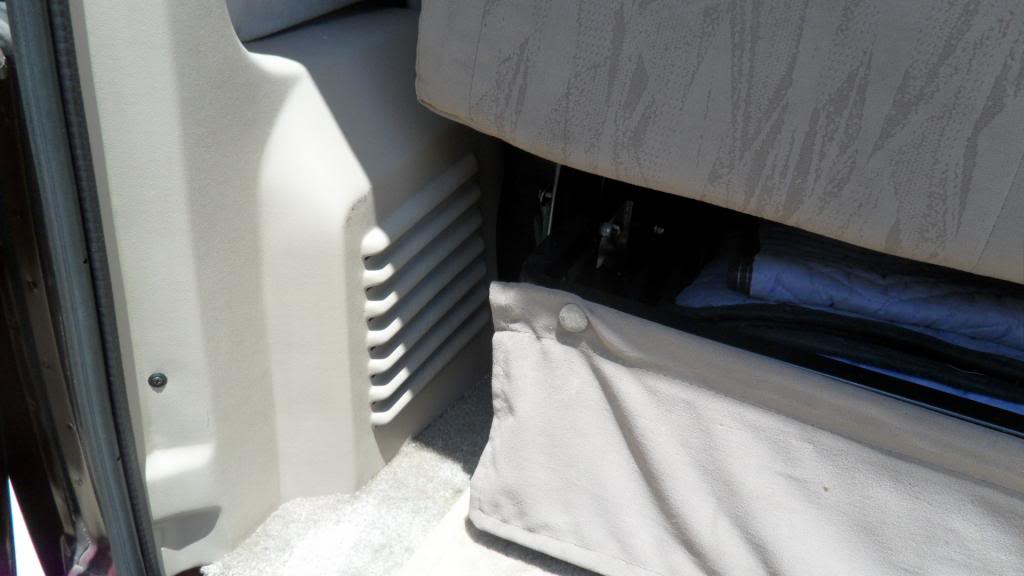
Here is a closeup of the INTAKE GRILL for the rear A/C unit. Behind this grill is the actual evaporator case assembly. This area should NEVER be blocked by groceries or baby seats or luggage or boxes of old issues of Popular Mechanics. If it is........expect the same result if you put a piece of plywood in place of your home A/C filter. Can you say........."Gee......its hot in here".
Here is a shot of the SEAT / SOFA BED unbolted from the floor mounting brackets and TIPPED forward. Don't forget to secure the seat from falling down rearward......( like I did on a quick trip to the corner store one night.) It WILL scare the bejesus out of you when it falls.....not to mention damage anything you've got laying back there like tools.....or the new parts you are going to put in. !
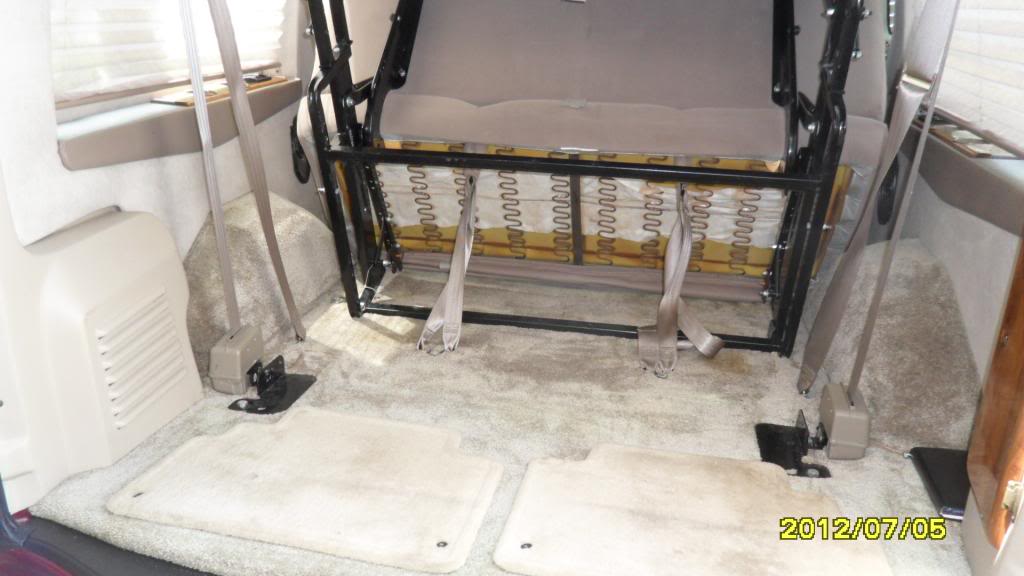
Once you have the SEAT / SOFA BED tipped up and secured.....you can start removing some smaller TRIM PIECES so that you can remove the large quarter trim panel. If it won't tip up out of the way.....find someone bigger than you to help you get it out of the van.
On this van.....the LR quarter window cup holder panel.....LR door weatherstrip.....the overhead storage compartment woodgrain trim panel.....the overhead storage compartment trim panel foundation panel......and the rear dome light / assist handle panel above the rear doors..........all need to be removed.
You can see the 3 wires for the dome light hanging down. Mark the color on the appropriate terminal before you unplug them.....and just tie them out of the way until reassembly. ( Depending on your conversion company....you may or may not have a light back here. )
When you have everything removed.....unscrew the bracket holding the quarter trim panel to the outside van wall. The only thing holding the panel in the van now is several dozen choice cuss words. ( It's REALLY in there tight.) Good Luck and I look forward to tomorrow.....picking up where we left off today. ( You will need some serious R & R if you do manage to get it out. ) Might as well call it a night now. Did I tell you to be VERY CAREFUL here ???
STEP 2: SURVEY THE BATTLEFIELD
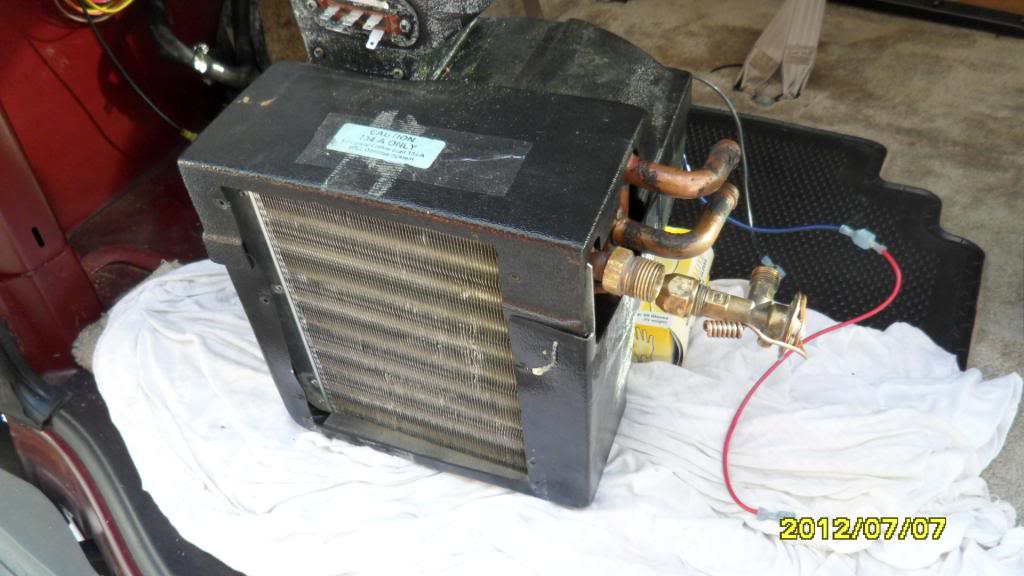
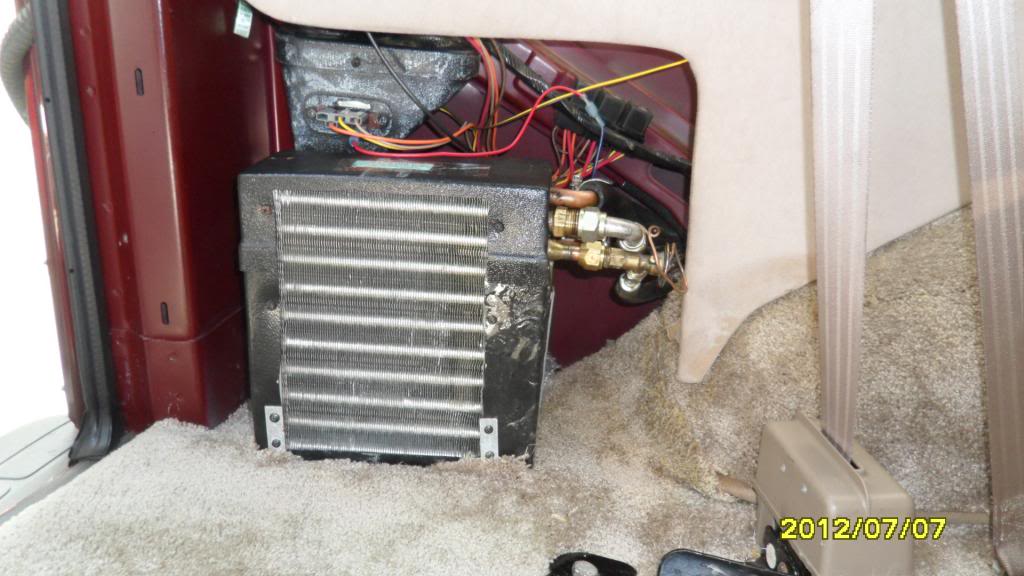
Back for more I see ? I trust the cuss words worked. What you are looking at here is the entire REAR A/C unit.....all neatly packaged into this little black plastic case.
Take your time here........before you start flailing wrenches all around.....and survey the area and locate where everything and what everything is. Pay particular attention to the wiring to the fan motor and the resistor pack for the fan motor. Sometimes they are individually hooked up. Mark the color code down BEFORE you pull the connectors off. Notice the plumbing connections of the airflow hoses up to the roof.
Those aluminum fins you see are the evaporator coil. That grey stuff on the rear of the unit is DUCT TAPE someone put there years ago......probably to try to help seal the output air flow to the hoses that go up the rear pillar to the roof outlets.
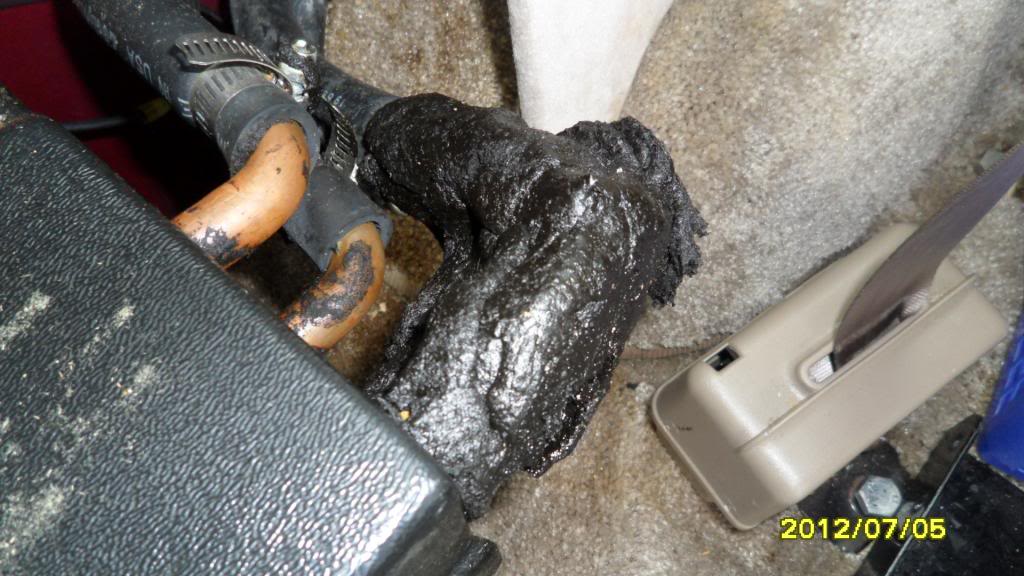
The black stuff on the right hand side of the unit is officially called CORK TAPE.....as it is known to refrigeration techs. It's the asphalt-based tar-like insulation tape used to prevent ambient air from reaching the surface of the expansion valve. It's also got a lot of less civil names. ( Do this job on a hot day and you will see what I mean when you get it all over your hands.)
Our expansion valve we are changing is under all this black stuff. Removing it is going to be another fun activity. Whatever you do or however you decide to remove it.......just be very careful......so you wont damage a line or a fitting......which are under all that goop too.
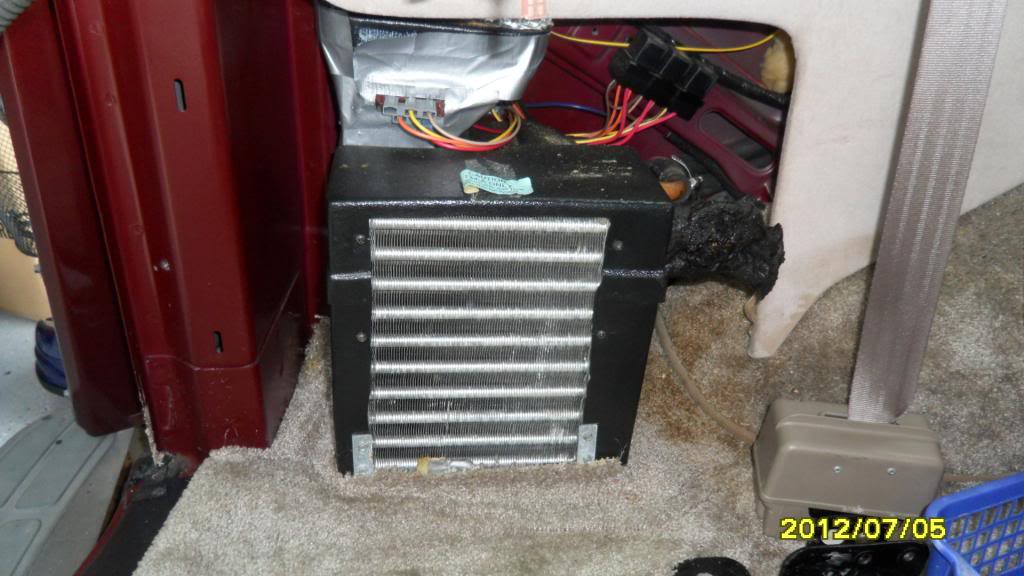
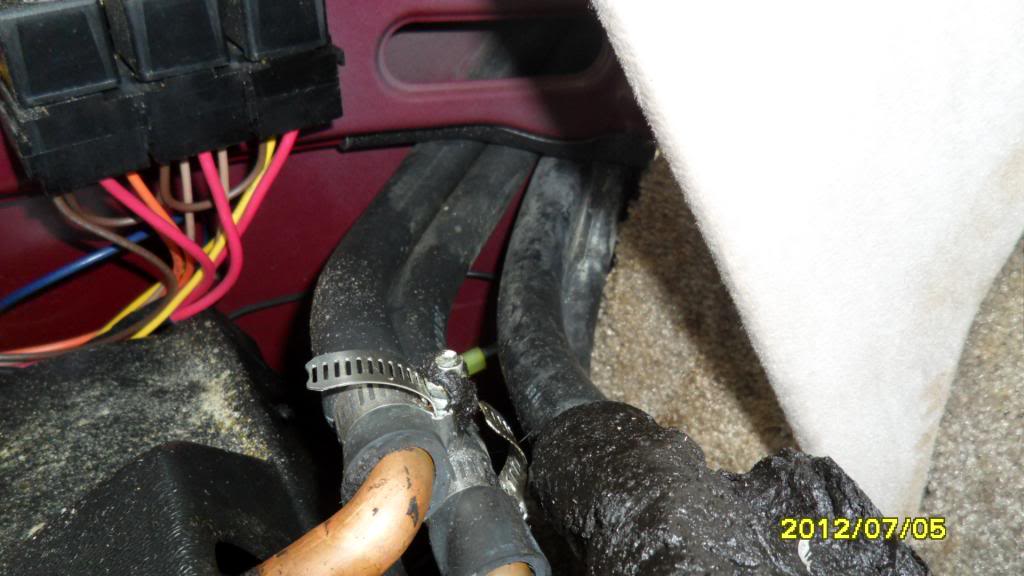
This is a closeup of the A/C lines and the Heater hoses that connect to the dual core. If you are noticing that it looks like there are 4 hose connections going to this unit......you are very good. You are looking at two (2) heater hoses and two (2) A/C lines. More on this later.
STEP 3: GRAB YOUR TOOLS
OK men..........let's get to work. If your A/C system is charged......recover the freon in a suitable manner. Drain the radiator by about half......you don't have to empty the whole thing. (Don't worry.....just go ahead and do this. ) If you haven't already........remove the black insulation tape from around the expansion valve........and whatever else it is stuck too.
Next........remove the clamps holding the 2 heater hoses onto the core. Be VERY CAREFUL removing them. If yours are anything like mine......they are original from 1999 and are stuck on there like the jaws of a Louisiana hound dog on a fresh pork bone.
There is not a lot of slack in these hoses....so try not to damage and to save as much of the end of the heater hoses as you can. Don't go taking a razor blade and making a 2 inch slash in the hose so it will come off easier. On mine.....I was able to pull only about ONE INCH out of the quarter panel.....and that was IT !
Worst case scenario here.......if you cut off too much of the heater hoses.......is that you won't be able to pull those hoses out from their run inside the quarter panel and/or body panels and/or frame to connect back to the heater core. Then you might (WILL) be faced with replacing the entire lengths of heater hose under the frame up to the front engine connections at the heater control valve. On a happy note should this problem befall you........the hoses are standard OEM heater hose......and aren't anything esoteric to rear A/C equipped models.
Note: If you would have drained the radiator like I told you.......you wouldn't have to clean up those 2 quarts of coolant that came running out of those hoses you just took off......and could not stop. Liquid does flow downhill ya know.
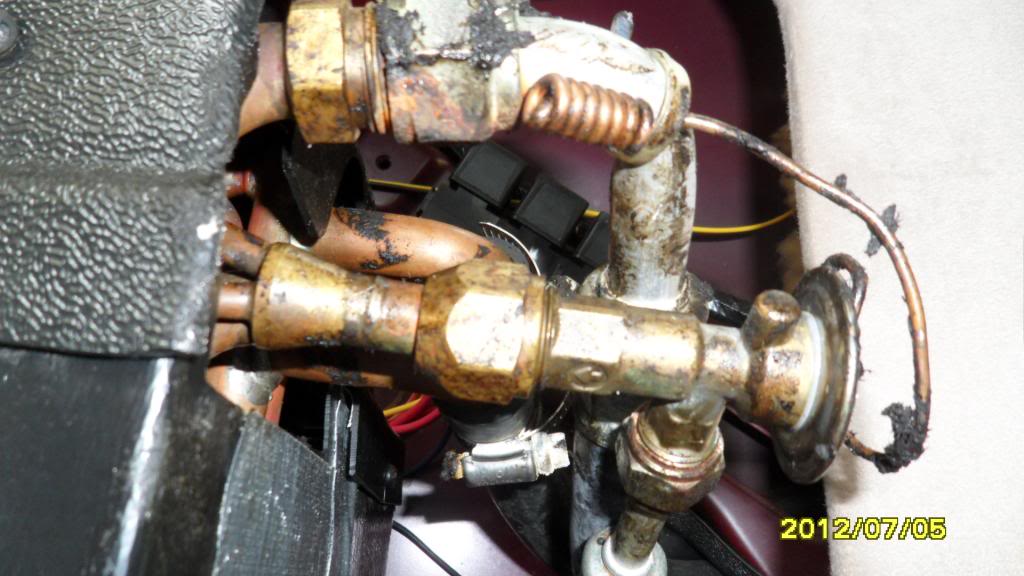
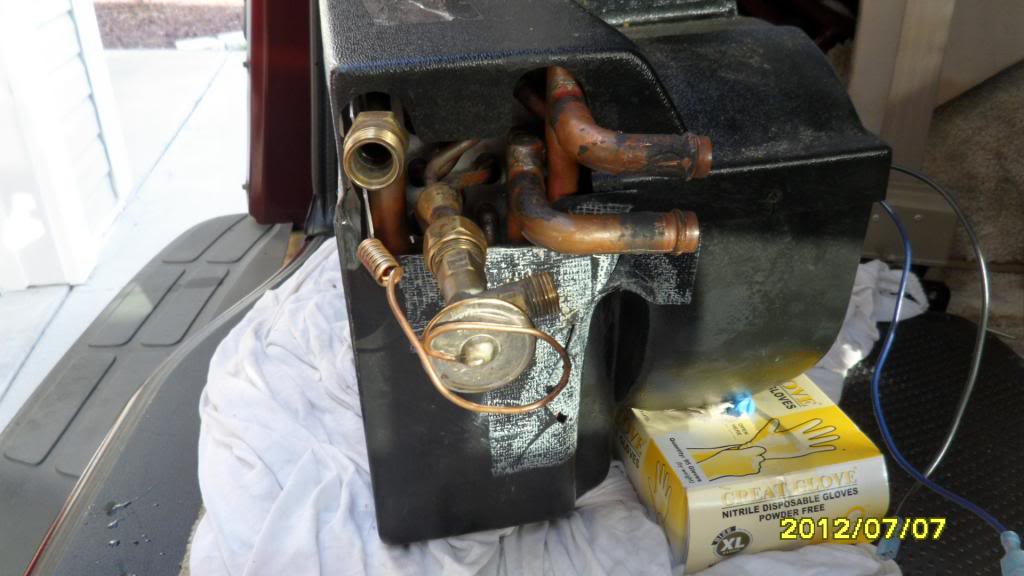
This is what your expansion valve will look like after you have cleaned it up. You might want to use some Brake Kleen or similar product to clean the tar off the surface ......so you can check for 'code or part' numbers that may be stamped on the valve. This will help determine what valve the factory OR the conversion company used.
STEP 4: TAKE IT APART
Next.....Loosen the 2 A/C line fittings that connect the A/C hoses to the Evaporator core. USE A BACKUP WRENCH on the core fittings before you start this procedure. It will take exactly one second or less to ruin this evaporator core if you try to loosen that fitting withOUT the backup wrench.
Why they manufacture these with the softest copper in the world....I will never understand. Even with the backup wrench.....I had to ask a 280 pound ex-linebacker to unscrew mine......they were on that tight. I could not do it.....and I'm not a wimp by any means.
Next........Unscrew the brackets that hold the evaporator case to the floor and/or to the quarter panel. These should be very easy to spot. Then unscrew the plastic tubing that connects to the top of the case. These hoses route the air up the rear pillar to the roof distribution ducts. Once this is done.....you should be able to slide the entire A/C unit away from the wall.......and it should look like this.
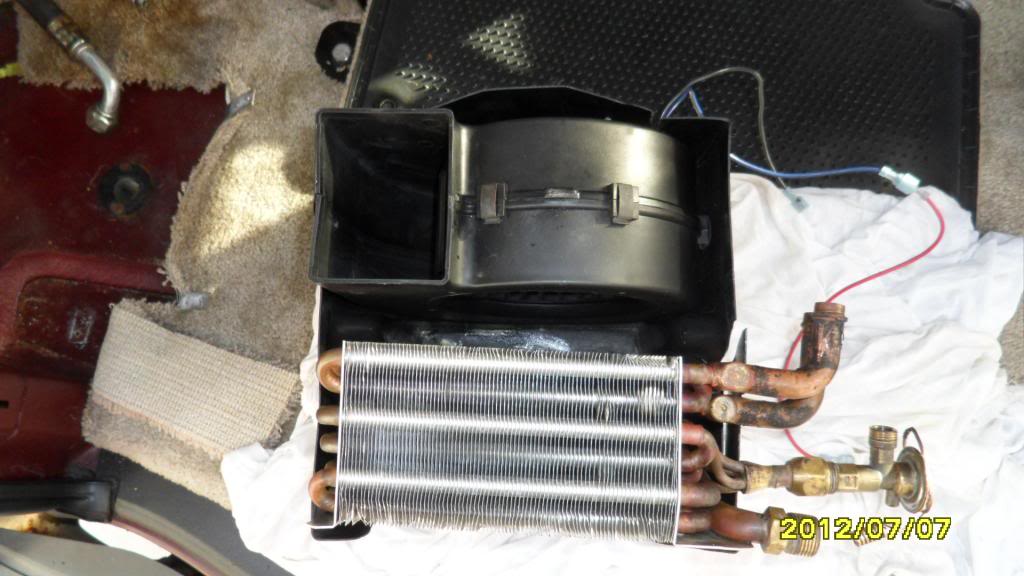
This is a side view of the assembly with the expansion valve still attached. Notice the blower motor housing at the right side of the assembly. The blower motor is housed inside there.

Once the blower motor and core assembly is out of the way......you should notice a hole in the floor for the evaporator drain. No doubt it will be filled with gunk from years of draining condensation off the core. Clean it out of the rubber drain hose attached to the bottom of the A/C evaporator case....and it wouldn't hurt to make sure the hole in the body is clean and clear too. Be gentle with this......it isn't the strongest drain hose by far.
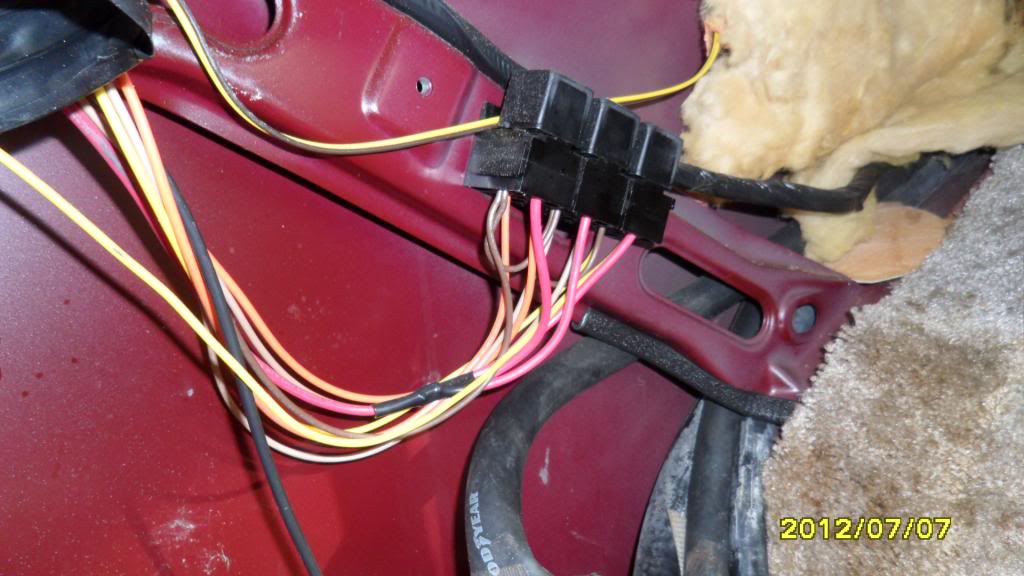
You probably wondered what those 3 black boxes were that were located above the A/C case with all those wires. One of them is the RELAY for the fan motor for the rear A/C unit. One of them is a RELAY for the rear stop and turn signals and one of them is a RELAY for another lighting circuit. Rear A/C blower motor relay failures are quite rare.....but if you do encounter one some day.......at least you'll now know where to find it.
Next.....the evaporator / heater core case is built in halves.....a top and a bottom. Unscrew the top half and set it aside. If you think you need to FLUSH the heater core....or the evaporator core.......go ahead and remove them from the lower housing.
It's probably a good idea to flush them both while you have everything apart. I did.....and seeing all the dirt and crap come out of both cores.....I was glad I did. A garden hose will do just fine on the heater core........some lacquer thinner or A/C flush and compressed air will be needed for the evaporator core.
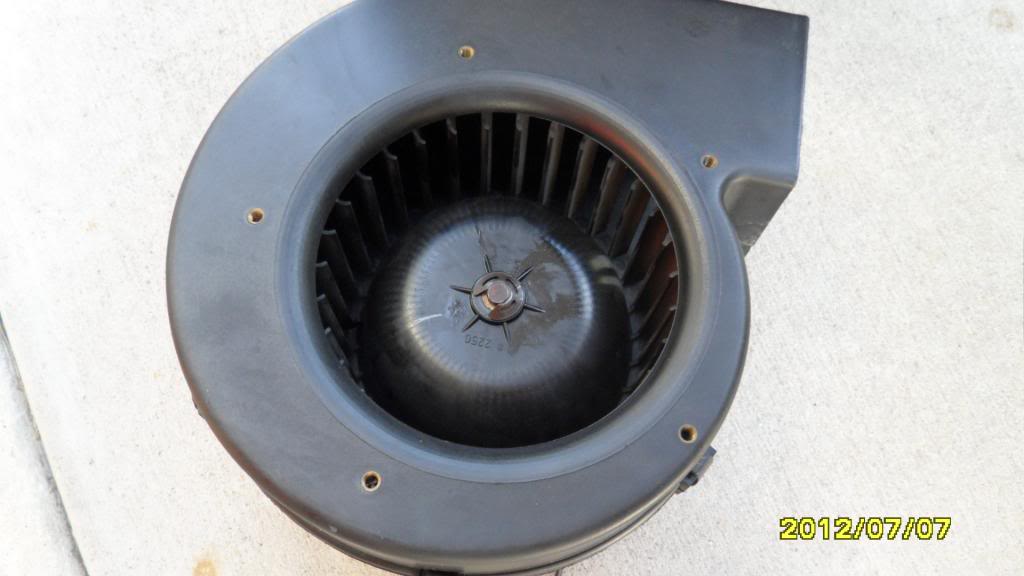
This is the blower fan motor and housing. It wasn't even bolted in the case......it just 'sat' in there on a rubber pad. I took mine apart to lube the motor bearings. You may or may not want to attempt this. If its not making noise running.....its not really necessary. If you are following this thread because your rear blower motor was defective.....go ahead and replace it now.
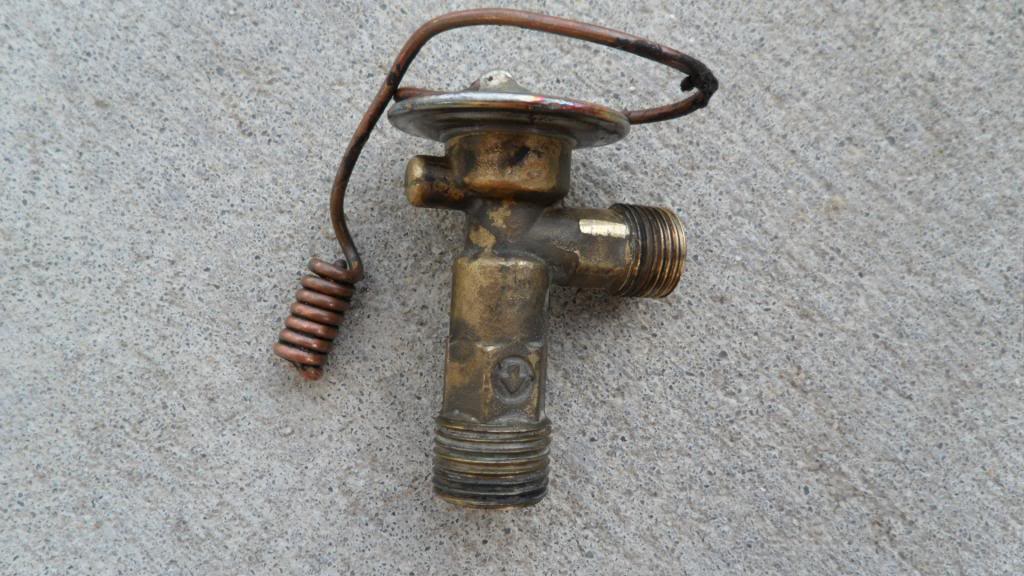
Here is a closeup of the expansion valve. Its a pretty simple mechanical device......allowing a high pressure warm liquid to enter its top section.....and then metering the liquid freon thru a very small opening into a low pressure evaporator. These valves generally will have markings on them as to company of manufacture.....date codes....model numbers....etc. If the valve was made in China.....like the 6 valves I went thru before I got the correct one......forget everything I just said.
If you look close here.....you can see several numbers. The 34-24 stamped in the top of the original valve....in my case refers to the model number from the original manufacturer ( Parker )......and the 1748A is a date code.....the 174th day of 1998.
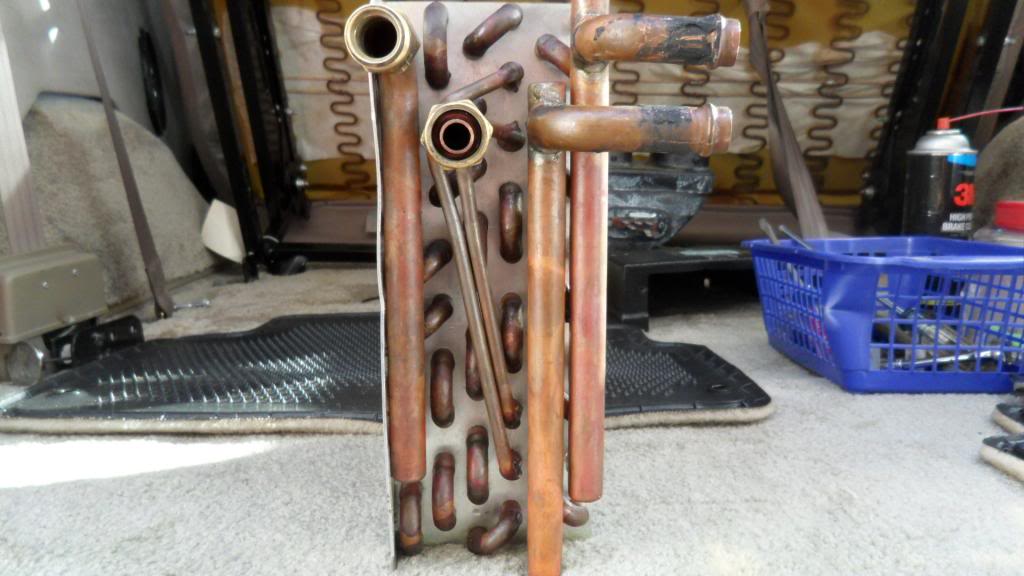
Here is a good side view of the combination core......after disassembly.
Most models of rear A/C units use a DUAL CORE HEATER / EVAPORATOR. Simply put......you have a 2 inch thick heater core AND a 2 inch thick evaporator combined together......resulting in a core that is about 4 inches thick.
The plastic case that holds everything together here was made out of the cheapest, thinnest plastic I ever saw. It was already cracking in spots and I was actually worried about the structural integrity of it holding the blower motor without vibration.
If yours is like this......the simplest easiest solution might be to get a fiberglass repair kit at your local parts store.....and make a couple patches for it. I wound up reinforcing the whole bottom section of mine.
STEP 5: PUT IT BACK TOGETHER
Next.......after the plastic case is all repaired and dry....go ahead and reinstall the blower motor in it......reinstall the heater/evap core in it......install the top half of the plastic case and secure it.......install the rubber evaporator drain hose back on.....( and don't forget to put some sealer around the drain hose running thru the body hole...(critters ya know )......and then mount the case assembly back and screw it securely in place. Don't forget to hook up the hoses to the duct at the rear pillar.
Next......... Attach the 2 heater hoses to the heater core and tighten securely. I waited until this point to install the new expansion valve........mainly because I thought it would be easier to align it up to the existing hoses.....and it was....big time. The A/C lines in the quarter panel....are not easily moved or able to be adjusted to whatever angle your expansion valve ends up.......so the thing to do is.........make your expansion valve line up with the A/C lines.
If you want to install the expansion valve on the evaporator core before you mount the case in its final position.......I would suggest to you that you leave the valve loose.......hook up the 2 A/C lines....tighten the case to the floor/body.....and then make the final tightening of the expansion valve to the hoses.
STEP 6: ALMOST FINISHED
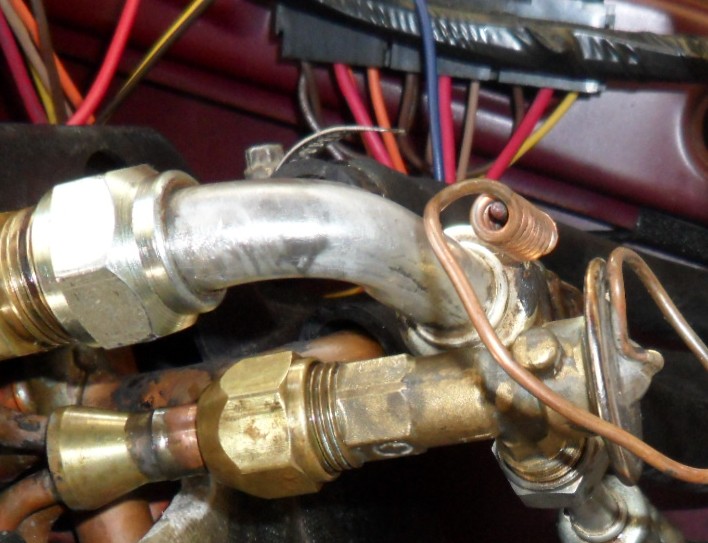
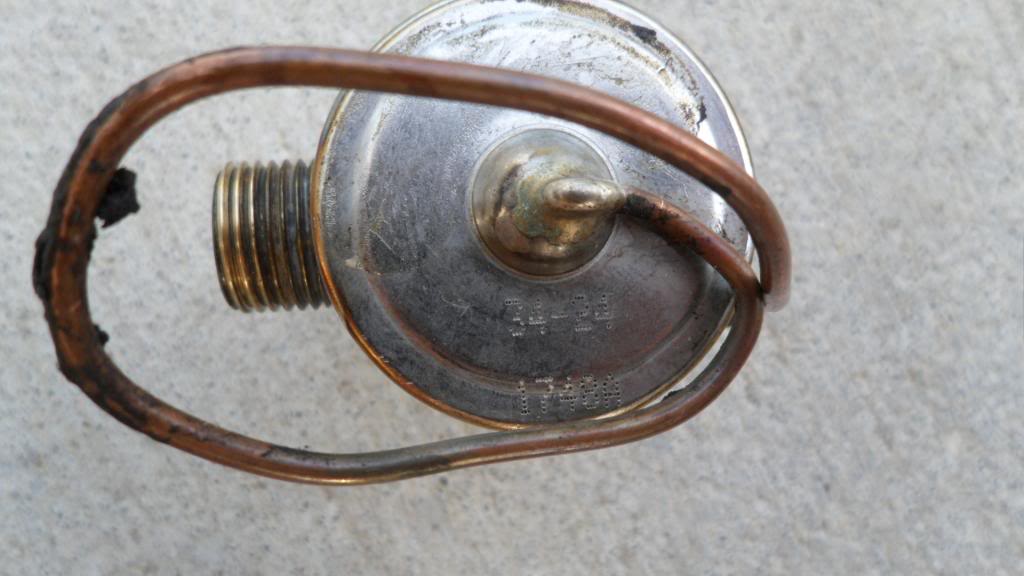
One last and critical step to do. You need to attach the SENSING BULB of the expansion valve to the OUTPUT line of the evaporator. In this picture.......the bulb is the curly-cue looking thing at the end of the thin copper line.....and the output line is the SILVER line at the top of the picture.
This bulb senses when the evaporator is full of freon.....(just prior to freezing up)....and will make the expansion valve shut off the flow of freon........so that the core can 'thaw out'. If you hook this bulb up correctly......this process will happen hundreds of times a day.....and all will be well in A/C land.
Locate a spot on the (silver) line where the entire sensing bulb will fit and adjust (bend gently) so that the bulb will be in parallel alignment with the line. Make sure the entire length of the bulb is in contact with the line.
Now.....secure the bulb to the hose with a plastic tie strap so that the bulb is at the 4 o'clock or 8 o'clock position on the line. (If the center of the silver line was 3 or 9 o'clock....mount the bulb slightly below the center of the line. If you want to secure it even better like I did.......use 2 tie straps.
Next.....completely cover this bulb....any metal parts of the output line from the evaporator....the entire expansion valve....with the exception of the thin tube going to the bulb......and the brass connection at the bottom of the expansion valve with CORK TAPE. You can find this at any refrigeration supply company. I am not sure if the home centers carry it or not. If you want to cover the thin line......its ok to do. It won't hurt or help anything. Put on 2 layers of the cork tape if you feel so inclined. Just make sure there are no gaps or holes or spaces where moisture from the valve or lines can leak out.
Doing this.....will assure you of no water dropping from the valve of the pipes onto your carpet or other trim.
STEP 7: FINISHING TOUCHES
At this point.....the new expansion valve (or blower motor) has been replaced....hooked up and covered with cork tape. Next would be to refill the radiator with the coolant you drained out earlier......and evacuate the A/C system. Because a vehicle with a rear A/C system has more component volume than a standard system.....it was recommended to me to do a substantial evacuation prior to recharging. Instead of the typical 20 minute vacuum......it would be better to do at least a 30 to 40 minute long vacuum (evacuation).
Once the system is charged and the engine is running.....go back and check the heater hose connections for any leaks......and check to see if the A/C line going to the top of the expansion valve is warm.....and the output line of the valve going into the evaporator is cold. If it is.....you have successfully repaired your problem....(as I did)
Once you are assured that there are no leaks back there........reinstall the trim panels in the reverse order you took them off......reattach the rear seat/sofa....and enjoy your ride.
Please NOTE: This rear A/C unit is an aftermarket assembly....not produced by GM. I have been told that Chevrolet-produced rear A/C units are located in the RH quarter panel area. The procedures for servicing those units should be very similar to the ones described herein.
THE PROBLEM: Rear A/C is not cooling. Front A/C cools fine with 40 degree output temperature.
THE DIAGNOSIS: Since there are no leaks in the system.....and since the input compressor line to the rear unit is warm to the touch and the output of the Expansion Valve is also warm......the Expansion Valve is defective. ( Expansion valve output into the Evaporator should always be icy cold.)
BEFORE WE BEGIN.....please read this DISCLAIMER
Proper service and repair procedures are vital to the safe, reliable operation of all motor vehicles as well as the personal safety of those performing the repairs. Standard safety procedures and precautions (including use of safety goggles and proper tools and equipment) should be followed at all times to eliminate the possibility of personal injury or improper service which could damage the vehicle or compromise its safety.
Although this material has been prepared with the intent to provide reliable information, no warranty (express or implied) is made as to its accuracy or completeness. Neither is any liability assumed for loss or damage resulting from reliance on this material. SPECIFICALLY, NO WARRANTY OF MERCHANTABILITY, FITNESS FOR A PARTICULAR PURPOSE OR ANY OTHER WARRANTY IS MADE OR TO BE IMPLIED WITH RESPECT TO THIS MATERIAL. In no event will I, jerryr be liable for any damages, direct or indirect, consequential or compensatory, arising out of the use of this material. THE INFORMATION, PRODUCTS, MATERIALS AND SERVICES MENTIONED AND/OR CONTAINED IN THIS PUBLICATION, INCLUDING WITHOUT LIMITATION, GRAPHICS, TEXT AND LINKS ARE PROVIDED ON AN "AS IS" BASIS WITH NO WARRANTY OF MERCHANTABILITY, FITNESS FOR A SPECIFIC USE OR REPRESENTATION OF ACCURACY.
STEP ONE: GAIN ACCESS TO THE UNIT
This particular van has a THIRD SEAT / SOFA BED assembly. You need to remove this unit before you can remove the left quarter plastic trim panel.
Trust me on this.....I tried to get the panel off without removing the seat and all you will do is break and crack it in more than one place.
Depending on your SECOND SEAT configuration.....you may be able to do what I did......and that is .......rather than remove the sofa bed assembly ( its too heavy for 1 person to yank and drag out of the van ).....after you get it all unbolted from the floor brackets.....you can just TIP IT FORWARD.....and then secure it with seat belts or ropes or cables....(depending on your level of fear it will come crashing down on you when you are laying there trying to get the evaporator case out.)
Here is a closeup of the INTAKE GRILL for the rear A/C unit. Behind this grill is the actual evaporator case assembly. This area should NEVER be blocked by groceries or baby seats or luggage or boxes of old issues of Popular Mechanics. If it is........expect the same result if you put a piece of plywood in place of your home A/C filter. Can you say........."Gee......its hot in here".
Here is a shot of the SEAT / SOFA BED unbolted from the floor mounting brackets and TIPPED forward. Don't forget to secure the seat from falling down rearward......( like I did on a quick trip to the corner store one night.) It WILL scare the bejesus out of you when it falls.....not to mention damage anything you've got laying back there like tools.....or the new parts you are going to put in. !
Once you have the SEAT / SOFA BED tipped up and secured.....you can start removing some smaller TRIM PIECES so that you can remove the large quarter trim panel. If it won't tip up out of the way.....find someone bigger than you to help you get it out of the van.
On this van.....the LR quarter window cup holder panel.....LR door weatherstrip.....the overhead storage compartment woodgrain trim panel.....the overhead storage compartment trim panel foundation panel......and the rear dome light / assist handle panel above the rear doors..........all need to be removed.
You can see the 3 wires for the dome light hanging down. Mark the color on the appropriate terminal before you unplug them.....and just tie them out of the way until reassembly. ( Depending on your conversion company....you may or may not have a light back here. )
When you have everything removed.....unscrew the bracket holding the quarter trim panel to the outside van wall. The only thing holding the panel in the van now is several dozen choice cuss words. ( It's REALLY in there tight.) Good Luck and I look forward to tomorrow.....picking up where we left off today. ( You will need some serious R & R if you do manage to get it out. ) Might as well call it a night now. Did I tell you to be VERY CAREFUL here ???
STEP 2: SURVEY THE BATTLEFIELD
Back for more I see ? I trust the cuss words worked. What you are looking at here is the entire REAR A/C unit.....all neatly packaged into this little black plastic case.
Take your time here........before you start flailing wrenches all around.....and survey the area and locate where everything and what everything is. Pay particular attention to the wiring to the fan motor and the resistor pack for the fan motor. Sometimes they are individually hooked up. Mark the color code down BEFORE you pull the connectors off. Notice the plumbing connections of the airflow hoses up to the roof.
Those aluminum fins you see are the evaporator coil. That grey stuff on the rear of the unit is DUCT TAPE someone put there years ago......probably to try to help seal the output air flow to the hoses that go up the rear pillar to the roof outlets.
The black stuff on the right hand side of the unit is officially called CORK TAPE.....as it is known to refrigeration techs. It's the asphalt-based tar-like insulation tape used to prevent ambient air from reaching the surface of the expansion valve. It's also got a lot of less civil names. ( Do this job on a hot day and you will see what I mean when you get it all over your hands.)
Our expansion valve we are changing is under all this black stuff. Removing it is going to be another fun activity. Whatever you do or however you decide to remove it.......just be very careful......so you wont damage a line or a fitting......which are under all that goop too.
This is a closeup of the A/C lines and the Heater hoses that connect to the dual core. If you are noticing that it looks like there are 4 hose connections going to this unit......you are very good. You are looking at two (2) heater hoses and two (2) A/C lines. More on this later.
STEP 3: GRAB YOUR TOOLS
OK men..........let's get to work. If your A/C system is charged......recover the freon in a suitable manner. Drain the radiator by about half......you don't have to empty the whole thing. (Don't worry.....just go ahead and do this. ) If you haven't already........remove the black insulation tape from around the expansion valve........and whatever else it is stuck too.
Next........remove the clamps holding the 2 heater hoses onto the core. Be VERY CAREFUL removing them. If yours are anything like mine......they are original from 1999 and are stuck on there like the jaws of a Louisiana hound dog on a fresh pork bone.
There is not a lot of slack in these hoses....so try not to damage and to save as much of the end of the heater hoses as you can. Don't go taking a razor blade and making a 2 inch slash in the hose so it will come off easier. On mine.....I was able to pull only about ONE INCH out of the quarter panel.....and that was IT !
Worst case scenario here.......if you cut off too much of the heater hoses.......is that you won't be able to pull those hoses out from their run inside the quarter panel and/or body panels and/or frame to connect back to the heater core. Then you might (WILL) be faced with replacing the entire lengths of heater hose under the frame up to the front engine connections at the heater control valve. On a happy note should this problem befall you........the hoses are standard OEM heater hose......and aren't anything esoteric to rear A/C equipped models.
Note: If you would have drained the radiator like I told you.......you wouldn't have to clean up those 2 quarts of coolant that came running out of those hoses you just took off......and could not stop. Liquid does flow downhill ya know.
This is what your expansion valve will look like after you have cleaned it up. You might want to use some Brake Kleen or similar product to clean the tar off the surface ......so you can check for 'code or part' numbers that may be stamped on the valve. This will help determine what valve the factory OR the conversion company used.
STEP 4: TAKE IT APART
Next.....Loosen the 2 A/C line fittings that connect the A/C hoses to the Evaporator core. USE A BACKUP WRENCH on the core fittings before you start this procedure. It will take exactly one second or less to ruin this evaporator core if you try to loosen that fitting withOUT the backup wrench.
Why they manufacture these with the softest copper in the world....I will never understand. Even with the backup wrench.....I had to ask a 280 pound ex-linebacker to unscrew mine......they were on that tight. I could not do it.....and I'm not a wimp by any means.
Next........Unscrew the brackets that hold the evaporator case to the floor and/or to the quarter panel. These should be very easy to spot. Then unscrew the plastic tubing that connects to the top of the case. These hoses route the air up the rear pillar to the roof distribution ducts. Once this is done.....you should be able to slide the entire A/C unit away from the wall.......and it should look like this.
This is a side view of the assembly with the expansion valve still attached. Notice the blower motor housing at the right side of the assembly. The blower motor is housed inside there.
Once the blower motor and core assembly is out of the way......you should notice a hole in the floor for the evaporator drain. No doubt it will be filled with gunk from years of draining condensation off the core. Clean it out of the rubber drain hose attached to the bottom of the A/C evaporator case....and it wouldn't hurt to make sure the hole in the body is clean and clear too. Be gentle with this......it isn't the strongest drain hose by far.
You probably wondered what those 3 black boxes were that were located above the A/C case with all those wires. One of them is the RELAY for the fan motor for the rear A/C unit. One of them is a RELAY for the rear stop and turn signals and one of them is a RELAY for another lighting circuit. Rear A/C blower motor relay failures are quite rare.....but if you do encounter one some day.......at least you'll now know where to find it.
Next.....the evaporator / heater core case is built in halves.....a top and a bottom. Unscrew the top half and set it aside. If you think you need to FLUSH the heater core....or the evaporator core.......go ahead and remove them from the lower housing.
It's probably a good idea to flush them both while you have everything apart. I did.....and seeing all the dirt and crap come out of both cores.....I was glad I did. A garden hose will do just fine on the heater core........some lacquer thinner or A/C flush and compressed air will be needed for the evaporator core.
This is the blower fan motor and housing. It wasn't even bolted in the case......it just 'sat' in there on a rubber pad. I took mine apart to lube the motor bearings. You may or may not want to attempt this. If its not making noise running.....its not really necessary. If you are following this thread because your rear blower motor was defective.....go ahead and replace it now.
Here is a closeup of the expansion valve. Its a pretty simple mechanical device......allowing a high pressure warm liquid to enter its top section.....and then metering the liquid freon thru a very small opening into a low pressure evaporator. These valves generally will have markings on them as to company of manufacture.....date codes....model numbers....etc. If the valve was made in China.....like the 6 valves I went thru before I got the correct one......forget everything I just said.
If you look close here.....you can see several numbers. The 34-24 stamped in the top of the original valve....in my case refers to the model number from the original manufacturer ( Parker )......and the 1748A is a date code.....the 174th day of 1998.
Here is a good side view of the combination core......after disassembly.
Most models of rear A/C units use a DUAL CORE HEATER / EVAPORATOR. Simply put......you have a 2 inch thick heater core AND a 2 inch thick evaporator combined together......resulting in a core that is about 4 inches thick.
The plastic case that holds everything together here was made out of the cheapest, thinnest plastic I ever saw. It was already cracking in spots and I was actually worried about the structural integrity of it holding the blower motor without vibration.
If yours is like this......the simplest easiest solution might be to get a fiberglass repair kit at your local parts store.....and make a couple patches for it. I wound up reinforcing the whole bottom section of mine.
STEP 5: PUT IT BACK TOGETHER
Next.......after the plastic case is all repaired and dry....go ahead and reinstall the blower motor in it......reinstall the heater/evap core in it......install the top half of the plastic case and secure it.......install the rubber evaporator drain hose back on.....( and don't forget to put some sealer around the drain hose running thru the body hole...(critters ya know )......and then mount the case assembly back and screw it securely in place. Don't forget to hook up the hoses to the duct at the rear pillar.
Next......... Attach the 2 heater hoses to the heater core and tighten securely. I waited until this point to install the new expansion valve........mainly because I thought it would be easier to align it up to the existing hoses.....and it was....big time. The A/C lines in the quarter panel....are not easily moved or able to be adjusted to whatever angle your expansion valve ends up.......so the thing to do is.........make your expansion valve line up with the A/C lines.
If you want to install the expansion valve on the evaporator core before you mount the case in its final position.......I would suggest to you that you leave the valve loose.......hook up the 2 A/C lines....tighten the case to the floor/body.....and then make the final tightening of the expansion valve to the hoses.
STEP 6: ALMOST FINISHED
One last and critical step to do. You need to attach the SENSING BULB of the expansion valve to the OUTPUT line of the evaporator. In this picture.......the bulb is the curly-cue looking thing at the end of the thin copper line.....and the output line is the SILVER line at the top of the picture.
This bulb senses when the evaporator is full of freon.....(just prior to freezing up)....and will make the expansion valve shut off the flow of freon........so that the core can 'thaw out'. If you hook this bulb up correctly......this process will happen hundreds of times a day.....and all will be well in A/C land.
Locate a spot on the (silver) line where the entire sensing bulb will fit and adjust (bend gently) so that the bulb will be in parallel alignment with the line. Make sure the entire length of the bulb is in contact with the line.
Now.....secure the bulb to the hose with a plastic tie strap so that the bulb is at the 4 o'clock or 8 o'clock position on the line. (If the center of the silver line was 3 or 9 o'clock....mount the bulb slightly below the center of the line. If you want to secure it even better like I did.......use 2 tie straps.
Next.....completely cover this bulb....any metal parts of the output line from the evaporator....the entire expansion valve....with the exception of the thin tube going to the bulb......and the brass connection at the bottom of the expansion valve with CORK TAPE. You can find this at any refrigeration supply company. I am not sure if the home centers carry it or not. If you want to cover the thin line......its ok to do. It won't hurt or help anything. Put on 2 layers of the cork tape if you feel so inclined. Just make sure there are no gaps or holes or spaces where moisture from the valve or lines can leak out.
Doing this.....will assure you of no water dropping from the valve of the pipes onto your carpet or other trim.
STEP 7: FINISHING TOUCHES
At this point.....the new expansion valve (or blower motor) has been replaced....hooked up and covered with cork tape. Next would be to refill the radiator with the coolant you drained out earlier......and evacuate the A/C system. Because a vehicle with a rear A/C system has more component volume than a standard system.....it was recommended to me to do a substantial evacuation prior to recharging. Instead of the typical 20 minute vacuum......it would be better to do at least a 30 to 40 minute long vacuum (evacuation).
Once the system is charged and the engine is running.....go back and check the heater hose connections for any leaks......and check to see if the A/C line going to the top of the expansion valve is warm.....and the output line of the valve going into the evaporator is cold. If it is.....you have successfully repaired your problem....(as I did)
Once you are assured that there are no leaks back there........reinstall the trim panels in the reverse order you took them off......reattach the rear seat/sofa....and enjoy your ride.

CF Beginner
Joined: May 2011
Posts: 2
Likes: 0
I found your VERY detailed post here while i was searching to find out what the 2 hoses are for in my left rear wheel well on my 2000 express 2500 van - i have no rear ac, but after seeing your article i can assume these 2 hoses are for an optional ac unit. mine are just joined together and have a red drain plug at the joint (for easy rad flush i guess).
thanks for solving a mystery for me!
thanks for solving a mystery for me!
Thread Starter
CF Beginner
Joined: Jul 2012
Posts: 19
Likes: 3
Thanks. Chances are tho.....if the factory thought enough to pre-install those hoses.........they also might have pre-installed the HEATER CONTROL VALVE as well. If this is the case.....you won't be able to use those rear hoses to flush the system....because the valve will ONLY be open with vacuum applied to it. My valve is located about center at the bottom of the firewall. I have heard of some near the left frame rail ....depending on model. If the hoses you have are A/C hoses....and you're sure you are never going to use them.......I'd start putting an ad together for Ebay. Those puppies are worth some serious moola.

CF Beginner
Joined: Oct 2014
Posts: 1
Likes: 0
Great info btw. I have a 2000 Safari conversion and could help notice our interior wall panels and trim are identical. Do you know how to remove them without damaging them?
Thanks in advance!
Mitch
Thanks in advance!
Mitch
Thread Starter
CF Beginner
Joined: Jul 2012
Posts: 19
Likes: 3
There is little risk of damaging any trim needing to be removed to gain access to the evap unit. Everything comes apart with a couple of screws after you take the seat out. You need to take the lower window trim off....that will help a lot to get more clearance. The hardest part is the LH plastic pillar covering. Just make sure you have everything loose that touches it and is located next to it.

CF Beginner
Joined: Jan 2011
Posts: 4
Likes: 0
I have a 2000 Express Van and recently the AC is just not cooling as it should be. Not just the Texas heat although it is getting seriously hot at this time. I noticed I could get the front AC vents to blow cool air while the rear were still blowing warm air. I tested the low pressure side which was around 45 and the high pressure side was only around 160. I am wondering if the expansion valve in the back AC system could case this lack of cooling. I am wondering if I should simply load a can of freon in the system to see if I can build up the high pressure side in case the lower high side is caused by something faulty in the rear AC. From what I understand is that the compressor should be still okay if the low pressure side is reading in range, but I have not found any charts out there that says if low pressure side is normal and high pressure side is low then these are the things you need to look at. I was thinking that the high pressure side should be closer to the 190 to 230 range (temps are around mid to high 90's with a high humidity in Houston). Also when you changed the expansion valve did you change out the dryer in the front since that seems to be what they always say as soon as you open the system change the dryer. Any suggestions or advice would be grate. Thank you
Trending Topics


CF Beginner
Joined: Dec 2018
Posts: 1
Likes: 0
You were right, Chevy OEM part will not fit my 2002 Regency express van. Does anyone know what part nine I should get to replace my parker expansion valve on 2002 Regency express van. Please help!

CF Beginner
Joined: Sep 2019
Posts: 1
Likes: 0
I am looking for that exact expansion valve for my Chevy gladiator. I�ve already ordered one off line to find that the thread doesn�t match. I�ve been searching all over the web to find the exact part. Can you share where you found yours?
much appreciated
Tuesday
much appreciated
Tuesday