When you click on links to various merchants on this site and make a purchase, this can result in this site earning a commission. Affiliate programs and affiliations include, but are not limited to, the eBay Partner Network.
Tracker1989-2004
This compact SUV proved itself to be a fine ecnomical vehicle, good for making its way along any type of surface. Platform: CAMI (Suzuki)
The V6 Tracker has an aluminum upper oil pan and a steel lower pan.
The upper oil pan is also referred to as the lower crankcase.
My engine is seeping oil at the interface of the upper and lower crankcase.
Both the Suzuki and Chevy manuals call for replacement of the O-rings when reinstalling the oil pan(s).
The problem is neither Suzuki nor Chevy sell the O-rings anymore.
The O-rings are only available as part of the lower engine gasket set.
The gasket set contains more parts than are required for just an oil pan installation.
I'll start the repair in earnest tomorrow (day one). Today I put the car on jack stands and drained the engine oil.
I removed the front wheels and unbolted the tie-rod ends.
This $20 tool from Harbor Freight is essential for separating the tie-rod from the steering knuckle..
The undamaged tie-rod comes loose in 30 seconds. A pickle fork will only lead to grief and regret.
I unbolted the half-shaft on the driver's side. Both the rack and pinion assembly and the 4WD differential have to be
removed to gain access to the oil pan(s).
I unbolted the front driveshaft from the back of the differential.
I removed the dipstick tube...
� drained the differential oil
The Suzuki manual says to remove the rack and pinion assembly first, but a contributor on the Suzuki forum removed
the differential first. I'll make my decision tomorrow. Either way I'm keeping a clean work area and sorting all the parts I remove.
I decided to remove the differential first. The day ended with mixed results.
I pried the front driveshaft away from the 4WD differential.
I was able to get the air pump hose disconnected with just my fingers.
I removed and degreased the center mount.
I unbolted the left and right mounts.
I bolted a wooden cradle to my floor jack.
But no matter what I tried I could not I could not get the passenger half-shaft to release from the differential. Last time this happened the hog-nose ring broke inside the differential.
Rather than have that happen again I decided to remove the snap ring from the wheel end of the half-shaft and pull the whole thing out as an assembly.
That actually worked.
The bad news is the snap ring was mangled. This has been an ongoing problem I thought I had fixed. This won't impeded the oil pan repair but it means I will have to order new parts before I can reinstall the differential.
Since one of those parts is going to be a new half-shaft, I had to beat the old one out of the differential. Of course half the hog-nose ring broke off inside the differential again. Luckily I was able to fish it out with a small retrieval magnet. My goal for tomorrow is to remove the rack and pinion assembly.
DAY TWOI spent the morning visiting 4x4 shops hoping someone had a solution to my snap ring problem. They didn't.
With the differential out of the car I had much better access to the rack and pinion assembly.
The steering column coupler came off easier than I expected.
Access to the banjo bolts was limited.
I spent $7 at Lowe's on two 100mm metric bolts.
I hung the rack and pinion on the long bolts so I could slide it away from the frame. At first $7 for two bolts seemed
like an extravagance, but I could not have removed that bottom banjo bolt without them.
I managed to catch all the power steering fluid in a pan.
The rack and pinion assembly is amazingly light.
Originally the lower oil pan used a gasket (one is included in the gasket set) but later engines switched to an RTV
seal. My engine uses RTV. I tried to separate the upper and lower oil pans with a box cutter. When that failed I
repeatedly thumped it with a dead-blow mallet.
I was surprised how few gentle taps it took to break the seal.
With the lower oil pan removed the oil pump pick-up tube is clearly visible. Tomorrow I will attempt to remove
the upper oil pan (aka the lower crankcase).
DAY THREE
I soaked the rim of the lower oil pan in xylene to soften up the old RTV silicone seal.
Xylene is slow acting but it softens the RTV to a point where it can be scraped off with a wooden popsicle stick
and toothpick. It does attack paint but it leaves the mating surface clean and smooth without damaging the metal.
The lower oil pan is held on with 10mm bolts except for two 10mm nuts and two very long 12mm bolts at the rear
I was able to position the lower oil pan such that I could get a 1/4"ratchet inside the pan in order to remove the
10mm bolt on the far side of the oil pump pick-up pipe.
The oil pan cannot be removed until the pick-up pipe is out of the way.
And finally the upper oil pan is out of the car.
With the oil pan out of the way you can look right up the piston skirts.
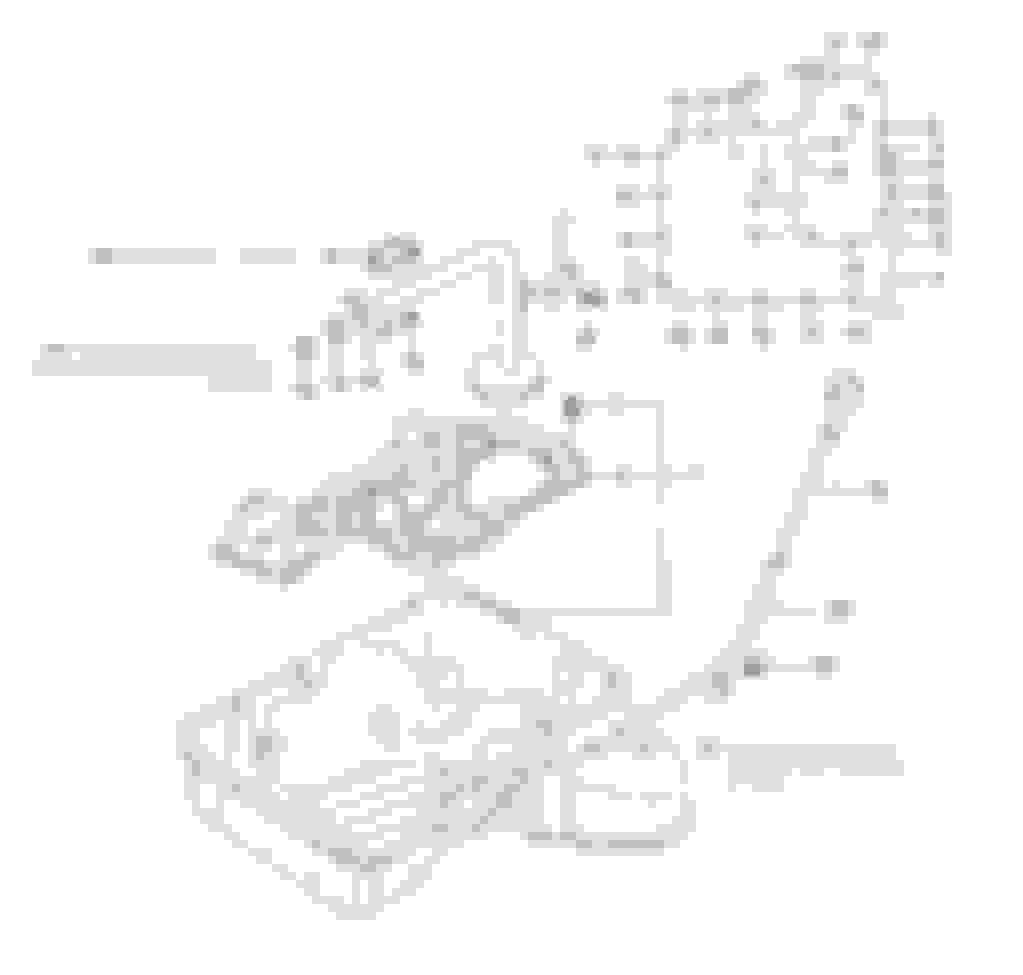
I think this oval cavity was the source of my oil leak. One, it's located exactly where oil was oozing out and two,
there was no evidence of leakage anywhere there was RTV.
Instead of RTV this cavity had an oval O-ring inside this oval channel.
The new O-ring is round and flexible. The old O-ring is flat and brittle. I don't know why they didn't put RTV around
the cavity but not doing so seems like it was a mistake. Tomorrow I will start prepping the engine for reassembly.
There is still a lot of RTV residue to clean off.
Both sides of oil pan's interior had a coating of burnt oil.
I had a contaminated can of parts cleaner left over from a carburetor rebuild.
It did a fair job of dissolving the oil film but it took a long time and a lot of elbow grease.
Next I cleaned mating surface on the bottom of the upper crankcase. The engine's been dripping oil for five days. This picture just made me realize why.
This is where the new oval O-ring goes.
The differential was caked with engine oil residue.
I taped off the openings and gave it a shot of engine degreaser.
how hard is it to hit "reply"? not trying to be harsh and i do appreciate people doing write-ups but the way youre doing it they would have to search for "V6 oil pan 001", "V6 oil pan 002", "V6 oil pan 003", "V6 oil pan 004" and so on and so on. theres no way to link them, if you click "reply" it will link them all together and not spread all over