Chevrolet Silverado 1999-2006: How to Replace Starter
Starting your Silverado's engine requires the use of two parts: the battery and the starter. So if your battery is fully charged and properly connected but your truck still won't start, it might be time to replace the starter.
This article applies to the Chevrolet Silverado GMT800 (1999-2006).
Each time you switch on the ignition in your truck, the battery supplies power to the electric starter, so it can turn the engine over and allow air as well as fuel to be sucked into the cylinders for combustion. The starter generally lasts longer than the battery, but when it does eventually fail, you'll be stuck wishing it had enough juice to bring your truck back to life one more time. Replacing the starter in your Silverado isn't a difficult job, and can be completed with just a few basic tools as well as a bit of your time. Take a look at the steps below to learn how it is done.

Materials Needed
- 8 and 13mm sockets
- Ratchet and extension
- Jack and jack stands (optional)
- Safety glasses and gloves (optional)
Step 1 – Jack up truck and disconnect battery
For this DIY job, jacking up your truck is optional because the starter can still be accessed without raising the vehicle. Place a floor jack under the center of the front crossmember. Lift the truck and place jack stands underneath the side rails to support it.
Pop the hood, and disconnect the negative battery cable (black). The starter and battery are directly linked, so the power supply must be cut off.

Pro Tip
Always test the battery and clean the connections before assuming a starter is bad. Oftentimes, the battery or corroded connections can be the actual problem as to why your truck won't start.
(Related Article: How to Jack Up Your Truck - ChevroletForum.com)
Step 2 – Remove the old starter
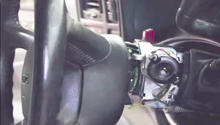
The starter is located underneath the engine on the front passenger's side. On V8 engines, there is a bell cover housing that must first be removed to access the starter. Once this housing is removed, use a 13mm socket with ratchet and extension to remove the two bolts holding the starter in place. Then, remove the smaller 10mm bolt that secures the solenoid terminal. Disconnect the battery connections leading to the starter. Pull down on the starter, and push it toward the front of the truck to dislodge as well as remove it.

Step 3 – Install the new starter
Remove the protective shroud from the old starter solenoid to attach it to the new starter. Slide in the new starter in the correct position underneath the engine, and fasten the 10mm solenoid bolt. Reconnect the starter's battery cables and secure it with the two 13mm mounting bolts. If you removed the bell housing, re-install it as well. Lastly, reconnect the negative battery terminal and switch on the ignition to ensure the engine starts.

Featured Video: How to Replace Starter
Related Discussion
- Starter Sluggish When Warm - ChevroletForum.com