

 Jul 22, 2015, 10:54 AM
Last edit by: IB Advertising
See related guides and technical advice from our community experts:
Browse all: Engine and Powertrain
- Chevrolet Silverado 1999-2006 GMT800 How to Replace Engine Air Filter
Step by step instructions for do-it-yourself repairs.
Browse all: Engine and Powertrain

cabin air filter change


CF Beginner
Joined: Dec 2006
Posts: 9
Likes: 0

CF Senior Member
Joined: Feb 2007
Posts: 339
Likes: 2
never having read the directions to this- I was ableto remove my sisters and inpect it. also on a 2003.
pretty simple.
the only thing- the round flat clip- has a notch in it- thats so you can use a coin or large screwdriverto turn it--- its like a plastic screw.
pretty simple.
the only thing- the round flat clip- has a notch in it- thats so you can use a coin or large screwdriverto turn it--- its like a plastic screw.

CF Beginner
Joined: Sep 2008
Posts: 1
Likes: 0

Banned
Joined: Jan 2008
Posts: 2,541
Likes: 14
[ol]Position the windshield wipers in the UP position, by keying the ignition OFF when the wiper reach the desired position.
Raise the hood.
Position aside the rear hood seal halfway to the center. Refer to Hood Rear Seal Replacement in Body Front End.
Remove the right recirculation grill. Refer to Air Inlet Grille Panel Replacement in Body Front End.
 [/ol]
[/ol]
Raise the hood.
Position aside the rear hood seal halfway to the center. Refer to Hood Rear Seal Replacement in Body Front End.
Remove the right recirculation grill. Refer to Air Inlet Grille Panel Replacement in Body Front End.
[/ol]
Impala Super Moderator
Joined: Jan 2008
Posts: 791
Likes: 0
From: Shelbyville, KY

Here is your starting point.
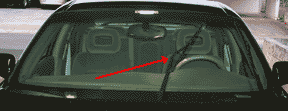
To gain access to the air inlet grill, you need to get the wiper blades out of the way. Turn your ignition key to ON and turn on your wipers. Turn off your ignition when the blades are in the up position.
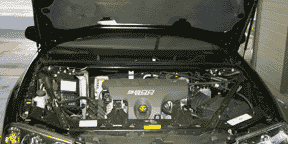
Pop your hood.
Before we start, take a good look at how everything is arranged. This is VERY IMPORTANT! You would hate to be finishing up and not remember exactly how everything fit back together. If you are really worried about this, get a cheap camera and take lots of photos. I have done this on occasion when I was working on my other car.

The filter is on the passenger side of the car. Here you can see the three retainers that hold the air inlet grille down. The center one is a nut type and the other two are the push in type.
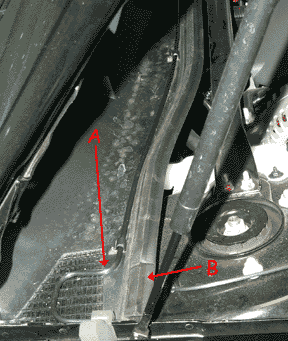
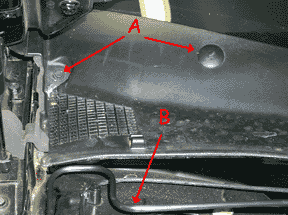
Here is a close up of the windshield washer pump hose (A) and the hood weatherstrip (B).
You can see that the hose goes under the hood panel bumper and the weatherstrip.
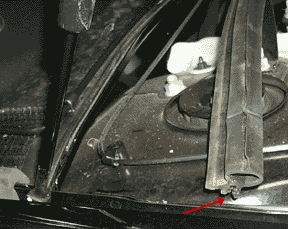
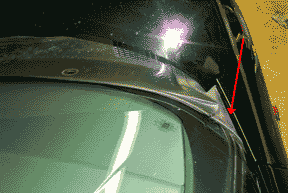
Pull off the weatherstrip. If you look at the arrow, you can see what holds the weatherstrip to the car. It is simply pushed on to the metal edge and no glue is used. The material is pretty strong, but exercise care not to tear it. A firm pull will ease the weatherstrip off.
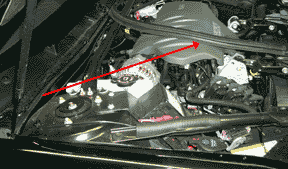
Peel the weatherstrip back halfway to the center. You can just leave it sitting on the engine.
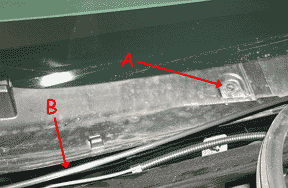
This is one of the clips holding the windshield wiper pump hose (A). You can also see how the hose goes under the hood panel bumper (B). Remember this because you have to put it back that way.
Unclip the hose and relocated it out of the way.
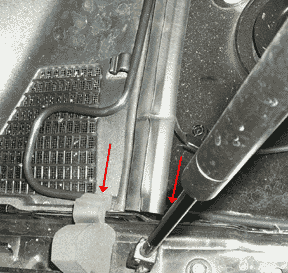
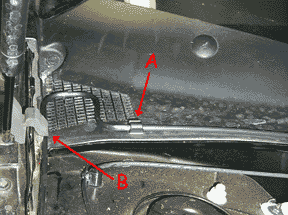
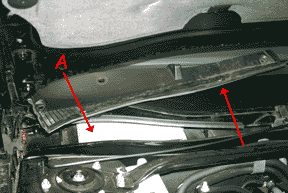
These are two of the retainers that have to come off (A). The one on the left is a push in style and the one on the right is the nut type. You can also see how the hose was relocated (B).
This is the retainer that is closer to the center of the car (A). It is the push in style. You can also see how the hose was moved (B) and another clip that holds the hose in place

Use a standard screwdriver to pry up the center button of the push in fastener. This fastener consists of two pieces: an outer sleeve and an inner pin. The outer sleeve goes into the hole through the two parts you want to hold together. Then the center pin is pushed into the sleeve. This causes the sleeve to expand, holding the two parts firmly together. So if you pull the center pin out, the sleeve can compress and you can remove it. Sometimes when you pull on the pin, it will come part way out and allows the sleeve to compress to a point where it comes out also. Other times you remove the pin totally and the sleeve stays in the hole. Just pop the sleeve out.
Work slowly and carefully. Because the pin is plastic, it will want to bend and not want to come out. Just reposition your screwdriver and work around the head of the pin. It doesn't take much force and you don't want to lose control of the screwdriver and scratch your paint. It will ease out. Remove both push in fasteners.

Unscrew the third fastener.

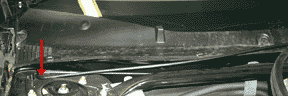
This is what it looks like after you remove the two passenger side fasteners.

This is what the fasteners look like. You can see a push in fastener with the inner pin pushed out (A) and with the pin pushed part way in (B). You can also see how the sleeve spreads apart.
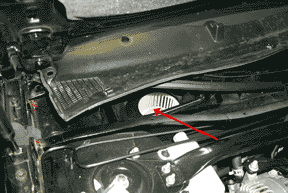
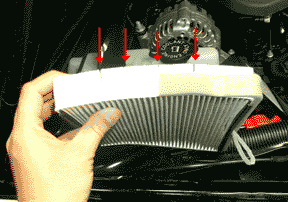
We can finally get access to the air filter. You do not have to remove the air inlet grille from the car. Just rotate it out of the way. You can see the filter (A).
Don recommends that you vacuum the area to remove collected debris and to wait until after the local vegitation stops dropping things because he found seeds and the crumbled remnants of leaves on his filter.
According to the manual, there is supposed to be an air deflector grille in this compartment. I didn't find one and Jay told me his 2000 LS didn't have one either. Looks like a mistake in the service manual.
Pull gently on the tab on the air filter and it comes right out. Here you can see the fan impeller.

This is the top of the air filter. The arrow indicates the tab you pull to get the filter out.

Bottom of the filter.
Here is something interesting. The edges of the filter are cut so the filter can bend. When you try and stick a new filter in, you'll see why the filter has to bend. It is the only way it will clear the opening.
Ok, stick the new filter in and rotate the air inlet grille back into place. I found that the grille would hang up on the corner of the hood. Gently push the rubber sheet under the hood and everything will fit back nicely. This isn't a really good photo of it, but take a look at your car before you attempt to remove the grille and you'll see how this works.

Make sure the hood panel bumper goes over the grille piece. Replace the fasteners. Align the holes and push in the sleeves then insert the pins. Screw on the other fastener. Reroute the windshield washer pump hose back under the hood panel bumper and clip it back into place. Reattach the hood weatherstrip. You can just push it back on.
And that's all folks!
 Cory sent these stock numbers for replacement air filters:
 [*]GM 10406026[*]AC Delco CF102[*]Purolator C25245[*]ATP GA-1[*]Fram CF8392 [/ul]
From Impala HQ..


CF Beginner
Joined: Oct 2013
Posts: 8
Likes: 0
If you want to change your cabin air filter by yourself is necessary to follow some steps. You can find this steps with suggestive pictures on this blog
Change pollen filter, cabin air filter, air conditioning filter or dust filter on Chevrolet Impala!
Also maybe when you change cabin air filter you want to change your engine oil and when you change chevrolet impala engine oil you need to locate and change oil filter. To do this follow this link How to locate oil filter and how to change engine oil on Chevrolet Impala
I will return with one article about location of fuel filter an how to change this soon!
I hope is usefull!
Thanks!

Thread
Thread Starter
Forum
Replies
Last Post
silverado 1500 2001
General Tech
0
Sep 14, 2014 7:41 PM
DeHartShadow
Impala
7
Oct 22, 2013 10:52 AM