

 Jul 22, 2015, 1:43 PM
Last edit by: IB Advertising
See related guides and technical advice from our community experts:
Browse all: Steering and Suspension
- Chevrolet Silverado 1999-2006 GMT800 How to Replace Power Steering Pump
Step by step instructions for do-it-yourself repairs
Browse all: Steering and Suspension

How to change a multifunction turn signal switch in a '95-'98 model

CF Beginner
Joined: Jan 2015
Posts: 1
Likes: 0
This was very helpful, I kept my Galaxy tablet with me and used this step by step. Thank you.
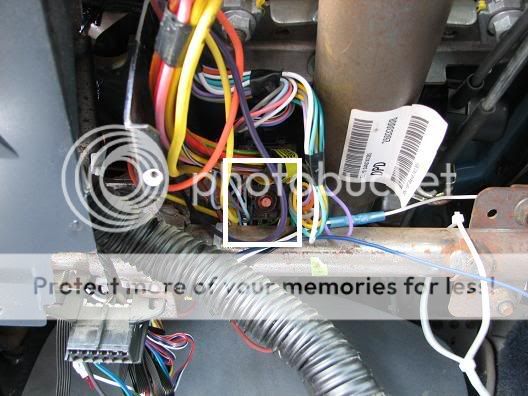
12. Now to disconnect the old unit. You may need to take the plastic wire tape off the bundle of wires going down the steering column into the dash so you can get the wires out. You can do this carefully with a pair of scissors. You will now need a 7mm socket or nut driver to undo the bolt holding the plug together (12-1). Once you have unbolted the plug, you can then precede to unplug the plug block (12-2). Now un-clip the two plug strips from both sides of the plug block (12-3). There is also a pair of wires (green and black) that go to the flasher unit that you will need to unplug. Just follow those two wires to the flasher and then un-clip the plug then unplug. All the wires coming from the turn signal unit should be free (12-4).
(12-1)
(12-2)
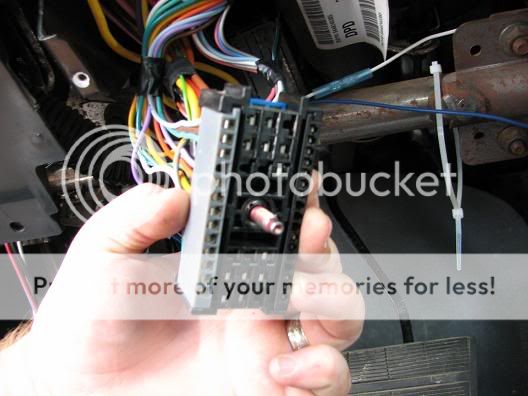
(12-3)
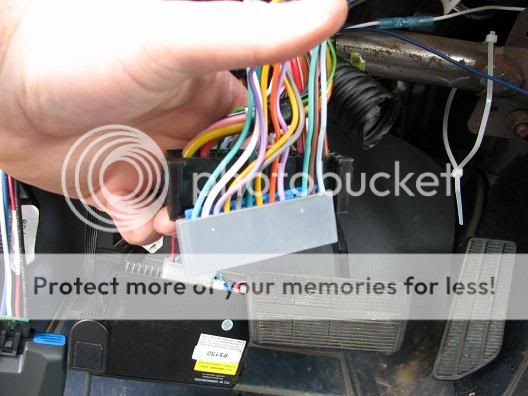
(12-4)
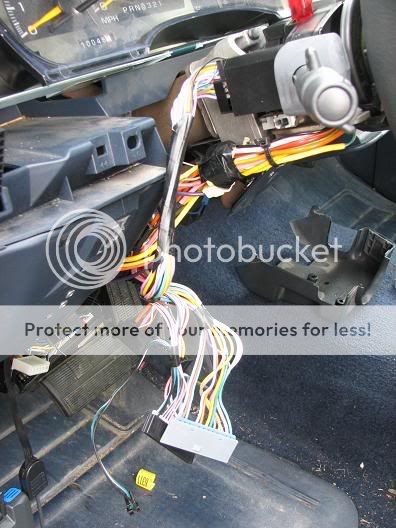
13. Now you can finally remove the old/broken unit. Use a letter "V" torx driver to remove the top bolt (13-1). Then using the same driver, you can unbolt the lower front bolt by inserting the driver between the steering wheel and the steering column (13-2). It is not necessary to remove the steering wheel to get the second bolt out, but if your model is somewhat different and you cannot get the torque driver through the opening then you may need to go ahead and remove the steering wheel. Once the unit is unbolted, just lift and the old/broken unit will come out.
(13-1)

(13-2)

14. To install the new unit, just go in the reverse order and put things back the way you took them off.
(12-1)
(12-2)
(12-3)
(12-4)
13. Now you can finally remove the old/broken unit. Use a letter "V" torx driver to remove the top bolt (13-1). Then using the same driver, you can unbolt the lower front bolt by inserting the driver between the steering wheel and the steering column (13-2). It is not necessary to remove the steering wheel to get the second bolt out, but if your model is somewhat different and you cannot get the torque driver through the opening then you may need to go ahead and remove the steering wheel. Once the unit is unbolted, just lift and the old/broken unit will come out.
(13-1)
(13-2)
14. To install the new unit, just go in the reverse order and put things back the way you took them off.

CF Beginner
Joined: Dec 2015
Posts: 1
Likes: 0
From: East texas
Ok, I'm VERY new to this vehicle and fixing anything on a vehicle that doesn't involve spark plugs, but due to recent events, I figured I'd save myself some money and learn how to do these things myself. So, question, do I have to take the airbag out? Is that essential? Also, the ignition, does that have to be removed as well? I'm only inquiring bc I saw a few YouTube videos that left that stuff alone and would appreciate the input ☺️


CF Beginner
Joined: May 2018
Posts: 1
Likes: 0
So I have a 96 Chevy Tahoe and the hazard switch is broke and all the gauges started acting up it was during the winter but now summers here and went to turn on the AC and the button doesn't turn on. So is it because of the hazard button which is screwing up all my all my gauges or should I just try a different control box.

CF Beginner
Joined: May 2018
Posts: 1
Likes: 0
(13-1)
[FONT=Verdana][ATTACH]15032[/AT
14. To install the new unit, just go in the reverse order and put things back the way you took them off.[/QUOTE]
Thank you very much for this post! I had no issues following this post and changing the multi function switch assembly today in our 1996 K2500 Suburban while the husband had to work. I was able to help get some things done so we can still head out for our camping trip on time tomorrow morning. Again Thanks for posting.
Samantha
Last edited by Samantha Zimmerman; May 24, 2018 at 8:33 PM.

CF Beginner
Joined: Jun 2019
Posts: 1
Likes: 0
12. Now to disconnect the old unit. You may need to take the plastic wire tape off the bundle of wires going down the steering column into the dash so you can get the wires out. You can do this carefully with a pair of scissors. You will now need a 7mm socket or nut driver to undo the bolt holding the plug together (12-1). Once you have unbolted the plug, you can then precede to unplug the plug block (12-2). Now un-clip the two plug strips from both sides of the plug block (12-3). There is also a pair of wires (green and black) that go to the flasher unit that you will need to unplug. Just follow those two wires to the flasher and then un-clip the plug then unplug. All the wires coming from the turn signal unit should be free (12-4).
(12-1)
Attachment 15028
(12-2)
Attachment 15029
(12-3)
Attachment 15030
(12-4)
Attachment 15031
13. Now you can finally remove the old/broken unit. Use a letter "V" torx driver to remove the top bolt (13-1). Then using the same driver, you can unbolt the lower front bolt by inserting the driver between the steering wheel and the steering column (13-2). It is not necessary to remove the steering wheel to get the second bolt out, but if your model is somewhat different and you cannot get the torque driver through the opening then you may need to go ahead and remove the steering wheel. Once the unit is unbolted, just lift and the old/broken unit will come out.
(13-1)
Attachment 15032
(13-2)
Attachment 15033
14. To install the new unit, just go in the reverse order and put things back the way you took them off.

CF Beginner
Joined: Apr 2026
Posts: 1
Likes: 0
[QUOTE=rbetancourt;147759]suburban shift lever repair[
.. couldn't do without a car.. crawled under it and shifted manually for a day then crawled under and securely attached a heavy curtain rod popped it thru the floor and between the bucket seat and console.. covered end with duct tape and put a **** **** on it.. my suburban suicide shifter hahahaha. I miss it now in new burb lol
.. couldn't do without a car.. crawled under it and shifted manually for a day then crawled under and securely attached a heavy curtain rod popped it thru the floor and between the bucket seat and console.. covered end with duct tape and put a **** **** on it.. my suburban suicide shifter hahahaha. I miss it now in new burb lol

Thread
Thread Starter
Forum
Replies
Last Post
Doug Williams
Monte Carlo & Lumina
1
Feb 22, 2012 10:16 PM
