When you click on links to various merchants on this site and make a purchase, this can result in this site earning a commission. Affiliate programs and affiliations include, but are not limited to, the eBay Partner Network.
Tahoe & Suburban DIY and Useful ThreadsThis section is for DIY writeups, FAQs, and other useful threads. If you would like something posted in here, please contact a moderator.
I purchased my suburban used… It came with the front CD/DVD stereo and a 2nd Row DVD Screen. If I remember correctly, the RPO for these are UQA (stereo with Bose amp) and U42 (2nd Row DVD Screen)
I have 6 children. They are tall. Row 3 children have often complained about not having a good view of the “In-Flight Entertainment” screen because the 2nd row center passenger is tall. So I realized that what I wanted was the 3rd row DVD screen (RPO: DNU)
The problem is that it is not an “add-on” option. You either got it from the factory (only included with the Sunroof option as it is the only harness available with the 3rd Row Video wiring. – At least it is the only one that I could find…) or you don’t get it at all. One last thing, My Suburban has the Titanium Interior, so I needed to find all of these parts in gray, to match.
So being an Engineer, I thought to myself… “Self, there has to be a way to do this, and make it look like it came from the factory!”
So Props to Brewboy for starting the conversation... And so to not hijack his thread, I thought I would write up what I did to add the 3rd row DVD Screen to my family's ride.
.
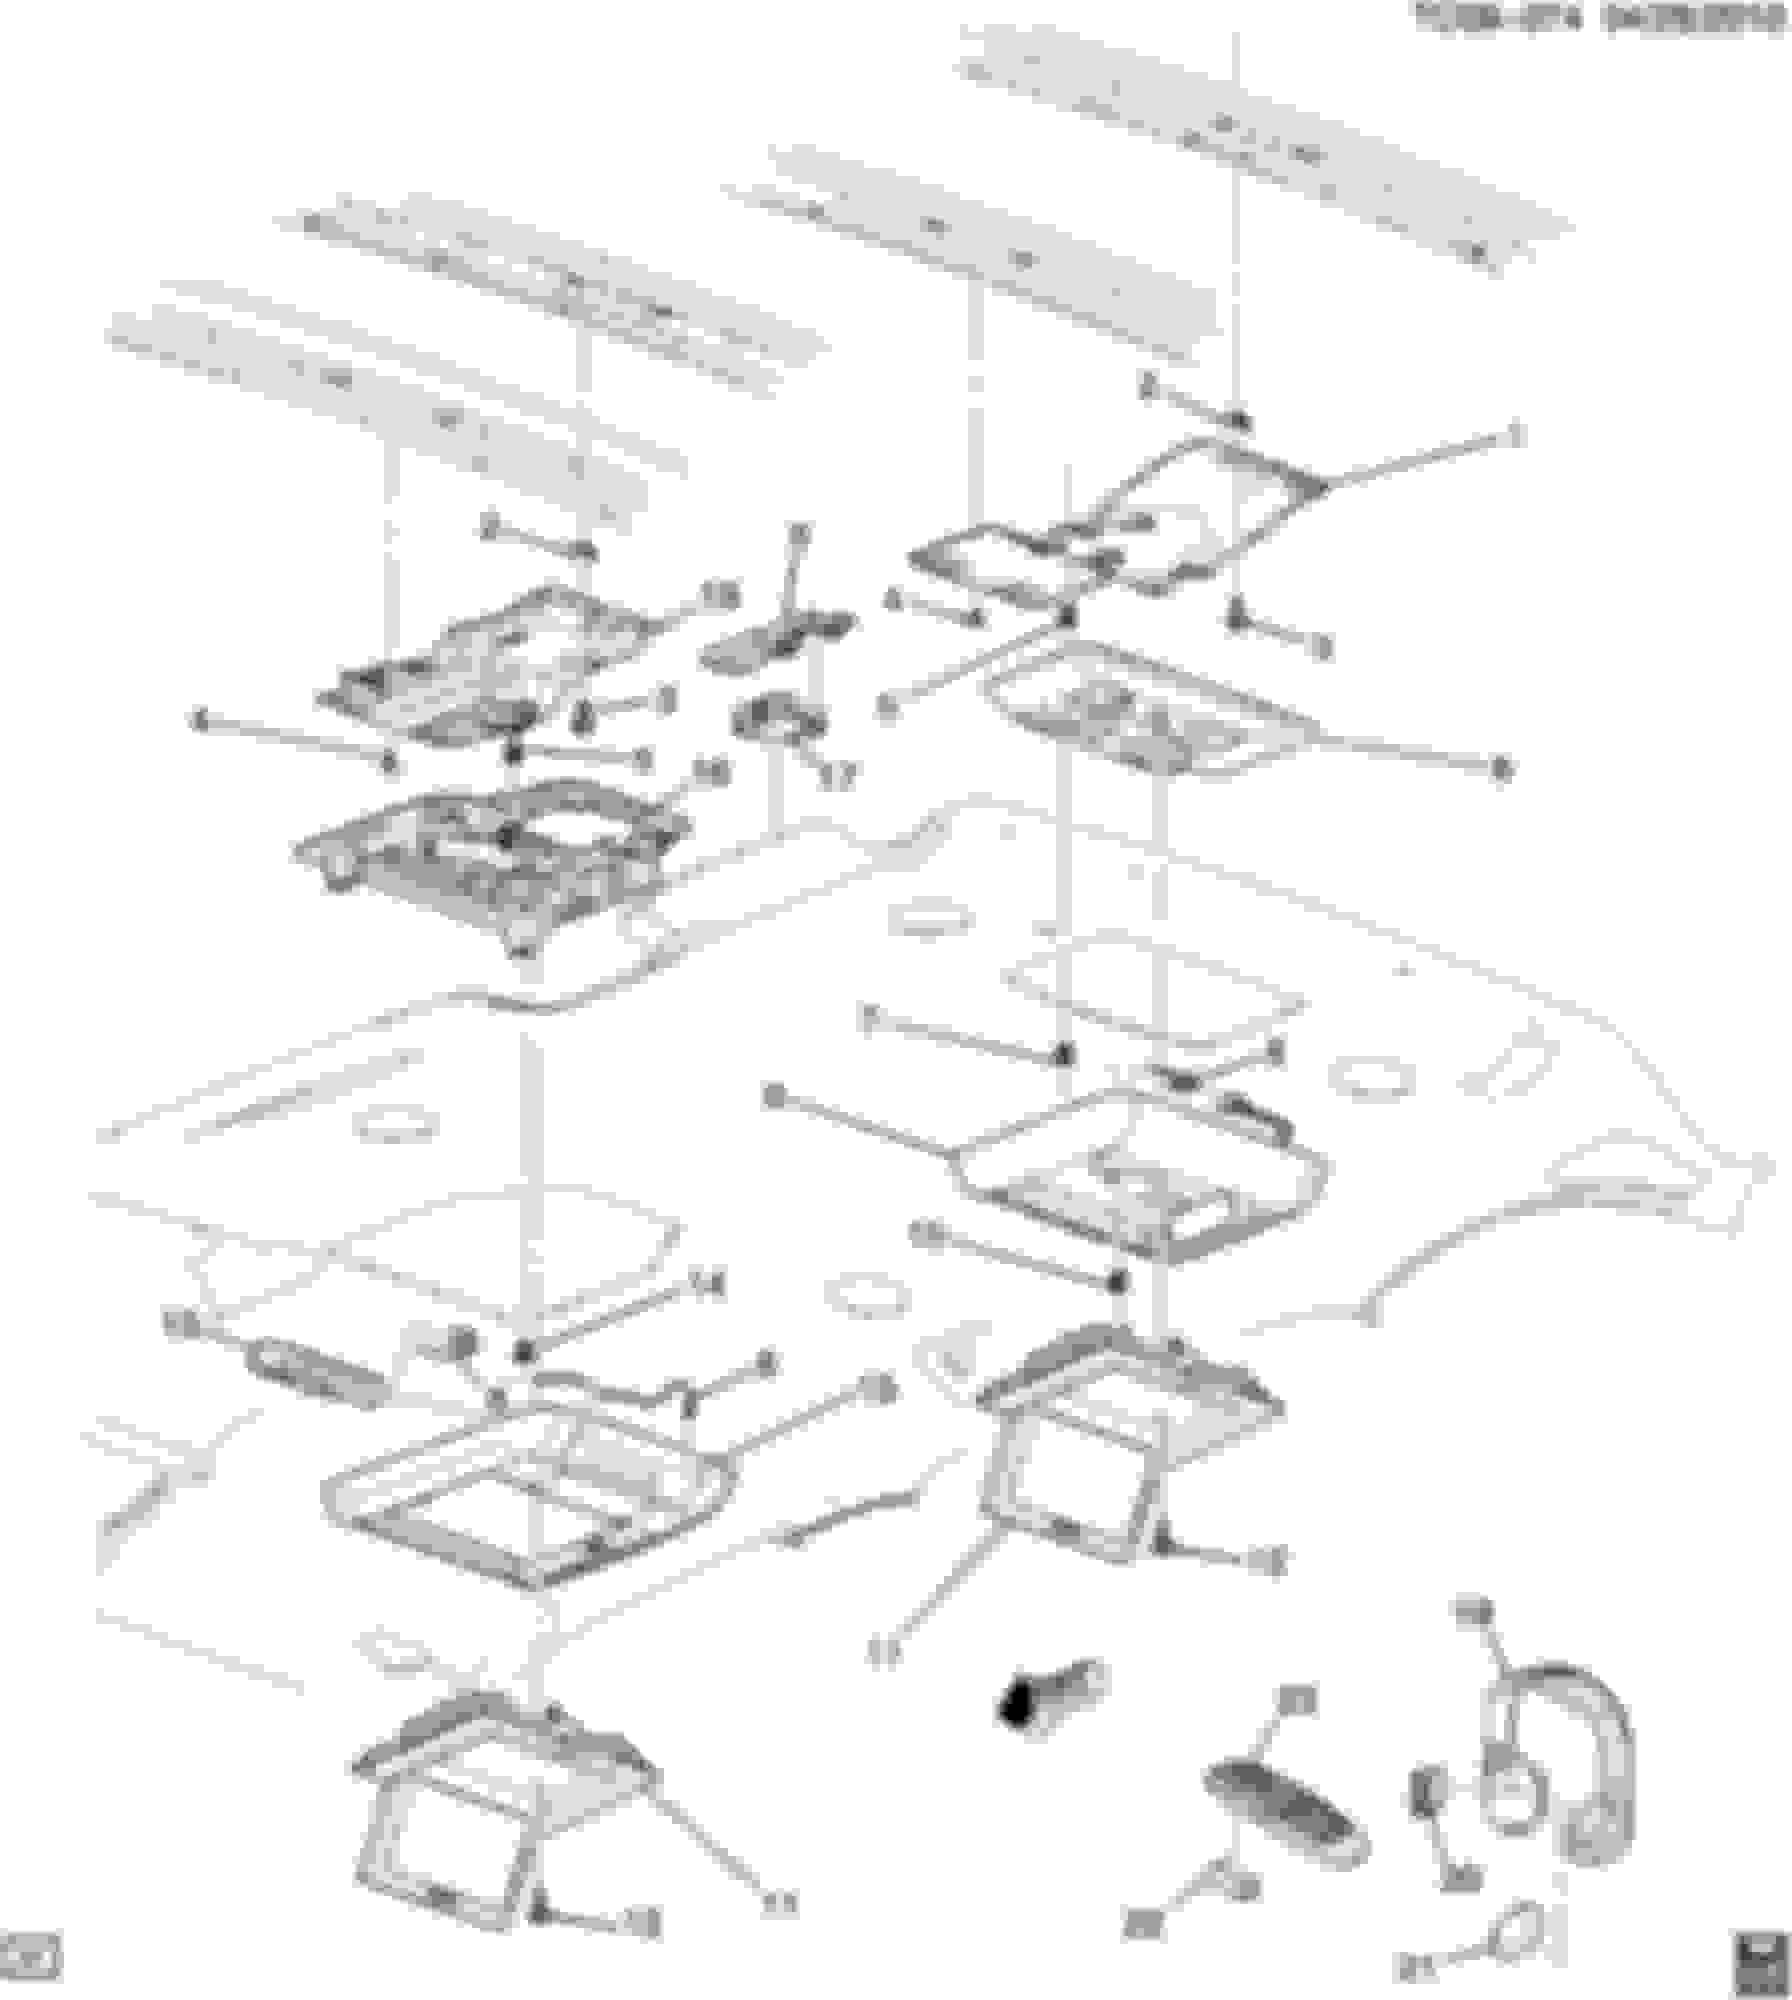
I pieced together the parts list with a lot of help from the following page: http://nemiga.com/cat_spares/epc/che...k/09/tc09-926/
I started shopping/trolling E-bay. and I think that I scored.
I bought the following Overhead DVD Screen Assembly / EBAY / PAID: $79.98 (included free shipping !!)
parts included:
20792277 - DISPLAY,VIDEO(GRAY)(ACDelco #20792277)
25995624 - RETAINER PLATE - REAR, W/ENTERTAINMENT SYSTEM - mounts to bracket above headliner
15881417 - ROOF CONSOLE - REAR, W/ENTERTAINMENT SYSTEM - mounts to retainer plate below headliner - color gray
I also bought a couple of factory clipnuts and the 10MM bolt that mates to them. -Side Note: I only bought 2 sets of fasteners, to do it completely correct, It takes 4 sets of fasteners
Misc. Fasteners / EBAY / PAID: $20.76 (included free shipping !!) .
11570136 – BOLT – used to attach Bracket to Roof frame cross rails
11570136 – BOLT – used to attach Bracket to Roof frame cross rails
11570097 – FENDER NUT – used to attach Bracket to Roof frame cross rails
11570097 – FENDER NUT – used to attach Bracket to Roof frame cross rails
Then thanks to Shawnvw I was able to find the "connector" I needed to fabricate a "Y-Cable" to make it all work.
"Y-Cable Harness fabrication parts:
Additional Hardware / General Motors Parts Online | Genuine GM Parts and Accessories / PAID: $38.55 ($17.04 for shipping - Connector and Roof Bracket combined)
89047355 – CONNECTOR – Description: 10-Way F Kaizen 0.64 Series (BK) / PAID: $2.87
CONNECTOR PINS / www.mouser.com / PAID: $6.87 ($4.99 for shipping)
SAIT-A03T-M064 – JST Automotive Connectors (Qty 25) ($1.88)
I purchased both the SAITS-A03T-M064 and the SAIT-A03T-M064 because I was not sure how different they were and they both were cheap. $1.88 for 25 pins.
the Pins that worked best for me in the connector were the SAIT-A03T-M064 The mouser order info reads like so for the SAIT pins:
306-SAIT-A03T-M064
MFG Part No:SAIT-A03T-M064
SAIT-A03T-M064
JST Automotive Connectors
US HTS:8536904000 ECCN:EAR99 COO:JP
15891469 – BRACKET – VIDEO DISPLAY(3RD ROW) – mounts to the metal internal cross rails / PAID: $19.77
I went back to Ebay to find an additional screen to steal the videoside Connector to make it all plug and play.
DONOR HARNESS (DVD DISPLAY,VIDEO) / EBAY / PAID: $68.76 (included free shipping !!)
I did this so that I could avoid the cost of buying a new Roof Harness and the "Signal Splitter" box
15948136 - DISPLAY,VIDEO(grey)(ACDelco #15948136) See FEE AVOIDENCE BELOW
22 Gauge automotive wiring / Bucket in garage / Free (…a lifetime of collecting random stuff…)
Solder
Wire loom
Heat shrink
OEM Parts that I did not use (after reading through Wiring Diagrams) that would make for Official OEM plug and play:
25780818 - SPLITTER,VIDEO PLYR SIG
FEE AVOIDANCE: ~$85.00 - online Gm part suppliers plus shipping…
25793753 - HARNESS, RF ACSRY WRG w/auto temp cntrl w/dual DVD (Cadillac; Chevrolet; GMC)
FEE AVOIDANCE: ~$185.00 - online Gm part suppliers plus shipping…
I spent some time going through the wiring diagrams for the UQS+Y91 with DNU rear video screen setup (07-08) and compared it with the 2009 DNU setup that utilized the video signal splitter connection...
…I decided NOT to purchase the signal splitter because after I mapped out the circuits, both with and without the signal splitter, I don't believe that there is any signal amplification that actually takes place. Essentially, the same wires go into the box and double the wire count comes out of the box. The only real change is that the input X1 side of the splitter has a 16 pin connector of which 9 are used (extra pin is a shielding/ground wire). On the output side of the signal splitter, the X2 (2nd row screen) and X3 (3rd row screen), each have send out only 7 signal wires that terminate into the 10 Pin Connector, which mates to the OEM (Panasonic) screen plug receptacle.
So, I built a plug and play “Y-Cable” which basically takes the U42 harness and splits the original 7 supply pins into two pair of output 10 Pin Connectors. (Carefully strip wire end. Then crimp a connector pin onto exposed wire. Crimp rear end of Connector Pin around wire insulation. Solder exposed wire to crimped Connector Pin. Slide the Connector pin into matching Connector plug position. Repeat for each Connector Plug. Next, splice in the donor video screen connector (Panasonic connector). Wrap the Video wires with aluminum foil tape to create the shielded cabling, and finally place harness inside of wire loom to protect it during travels/road vibration.)
I think my Y-Cable is equivalent to the Factory harness with the signal splitter in passing the DVD Screen signals and I saved a little over $200.00 in the process. Not to mention some serious time and effort in uninstalling the roof liner to route the replacement video/roof harness.
I went ahead and did the installation on Monday afternoon. It took about 3 hours to install.
1. Start by removing the head liner panel trees.
2. Next remove the Side Trim Panels at the seatbelts, behind the rear passenger doors.
3. Remove the front screen and shroud.
4. Remove the 3rd row rear reading lamp housing assembly. Tape off its plug end. It is not used anymore.
5. Install the front nut clip (should use two, I only used one...)
6. Install the rear nut clip (should use two, I only used one...)
7. Install the roof bracket push its black trees into place (temporary self-support)
8. Install front and rear 10mm bolts. (I had 2 total – should be 4 sets of nutclips and bolts)
9. Install the “Y-Cable” harness (Custom made, see above.)
10. Install 3rd row shroud
11. Install 3rd row display
12. Install 2nd row shroud
13. Install second row screen (attach Y-Cable harness to the original signal connector. Plug screen into Y-Cable signal connector.)
14. Re-install the Side Trim Panels at the seatbelts, behind the rear passenger doors.
15. Re-install roof liner push pins.
AND DONE.
pictures to follow...
I installed the black plastic support bracket into the metal roof bracket and then used the support bracket as a guide for cutting the roof liner.
first attempt at cutting the roof liner hole to attach the trim bezel
Finished cutting the Roof Liner
BE CAREFUL WITH THE RIGHT FRONT CORNER!!!!
I almost ended up slicing into the heater vent that is glued onto the top side of the roof liner. It was a near miss. you also need to CAREFULLY UNGLUE the existing wire harness that runs up there. It feeds the air temp sensor, and the reading lamps. I was working blindly and so I got lucky to not damage anything beyond repair