


 Jul 29, 2015, 12:18 PM
Last edit by: IB Advertising
See related guides and technical advice from our community experts:
Browse all: Powertrain Guides
- Chevrolet Silverado 2014-Present: How to Replace the Starter
Step by step instructions for do-it-yourself repairs
Browse all: Powertrain Guides

97 Tahoe Starter

Administrator
Joined: Apr 2008
Posts: 7,573
Likes: 48
From: Austin, Texas
General Information
GM Full-Size Trucks 1988-1998 Repair Information
The following is a general procedure for all trucks covered in this information, and may vary slightly depending on model and series.
[*]Disconnect the negative battery cable at the battery.[*]Raise and support the vehicle.[*]Disconnect and tag all wires at the solenoid terminal.[/ol]
Reinstall all nuts as soon as they are removed, since the thread sizes are different.
[*]Remove the front bracket from the starter and the mounting bolts. On engines with a solenoid heat shield, remove the front bracket upper bolt and detach the bracket from the starter.[/ol]
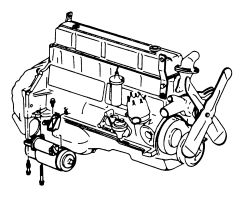 Fig. 1: Starter mounting location-4.8L engines[/align]
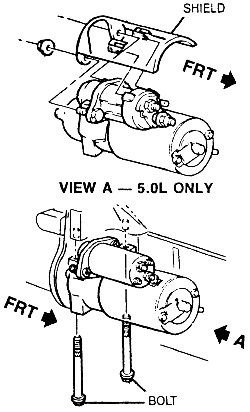 Fig. 2: Starter mounting location-4.3L and 5.0L engines[/align]
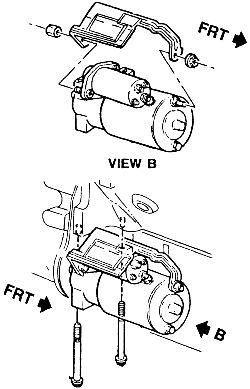 Fig. 3: Starter mounts-5.7L and 7.4L engines[/align][*]Remove the front bracket bolt or nut. Lower the starter, front end first, then remove the unit from the truck.[/ol]To install:
[*]Position the starter and tighten all bolts as follows:[/ol]
R/V Series:
[*]Thru-bolts: 40 ft. lbs. (54 Nm)[*]Bracket bolt: 30 ft. lbs. (41 Nm)[*]Nut (gas): 11 ft. lbs. (15 Nm)[*]Nut (diesel): 90 inch lbs. (10 Nm)[/ul]
C/K Series:
[*]Thru-bolts: 35 ft. lbs. (45 Nm)[*]Bracket bolt (diesel): 24 ft. lbs. (33 Nm)[*]Nut (diesel): 75 inch lbs. (8.5 Nm)[/ul]
[*]Reconnect all wires.[/ol]
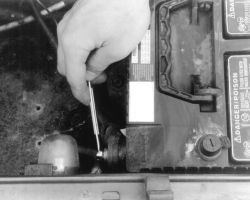 Fig. 4: Disconnect the negative battery cable[/align]
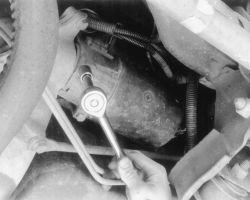 Fig. 5: Remove the starter retaining bolts[/align]
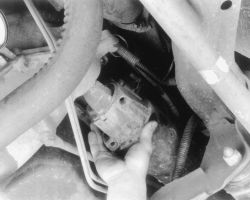 Fig. 6: Remove the starter from the vehicle[/align]SOLENOID REPLACEMENT
[*]Disconnect the negative battery cable.[*]Remove the screw and washer from the field strap terminal.[*]Remove the two solenoid-to-housing retaining screws and the motor terminal bolt.[*]Remove the solenoid by twisting the unit 90 degrees.[*]To replace the solenoid, reverse the above procedure. Make sure the return spring is on the plunger, and rotate the solenoid unit into place on the starter.[/ol]
GM Full-Size Trucks 1988-1998 Repair Information
The following is a general procedure for all trucks covered in this information, and may vary slightly depending on model and series.
[*]Disconnect the negative battery cable at the battery.[*]Raise and support the vehicle.[*]Disconnect and tag all wires at the solenoid terminal.[/ol]
Reinstall all nuts as soon as they are removed, since the thread sizes are different.
[*]Remove the front bracket from the starter and the mounting bolts. On engines with a solenoid heat shield, remove the front bracket upper bolt and detach the bracket from the starter.[/ol]
Fig. 1: Starter mounting location-4.8L engines[/align]Fig. 2: Starter mounting location-4.3L and 5.0L engines[/align]Fig. 3: Starter mounts-5.7L and 7.4L engines[/align][*]Remove the front bracket bolt or nut. Lower the starter, front end first, then remove the unit from the truck.[/ol]To install:[*]Position the starter and tighten all bolts as follows:[/ol]
R/V Series:
[*]Thru-bolts: 40 ft. lbs. (54 Nm)[*]Bracket bolt: 30 ft. lbs. (41 Nm)[*]Nut (gas): 11 ft. lbs. (15 Nm)[*]Nut (diesel): 90 inch lbs. (10 Nm)[/ul]
C/K Series:
[*]Thru-bolts: 35 ft. lbs. (45 Nm)[*]Bracket bolt (diesel): 24 ft. lbs. (33 Nm)[*]Nut (diesel): 75 inch lbs. (8.5 Nm)[/ul]
[*]Reconnect all wires.[/ol]
Fig. 4: Disconnect the negative battery cable[/align]Fig. 5: Remove the starter retaining bolts[/align]Fig. 6: Remove the starter from the vehicle[/align]SOLENOID REPLACEMENT[*]Disconnect the negative battery cable.[*]Remove the screw and washer from the field strap terminal.[*]Remove the two solenoid-to-housing retaining screws and the motor terminal bolt.[*]Remove the solenoid by twisting the unit 90 degrees.[*]To replace the solenoid, reverse the above procedure. Make sure the return spring is on the plunger, and rotate the solenoid unit into place on the starter.[/ol]


Thread
Thread Starter
Forum
Replies
Last Post
freedomfighter_87
General Tech
4
Dec 7, 2009 7:32 PM
freedomfighter_87
Beretta, Corsica, & pre-1995 Lumina
0
Dec 3, 2009 6:30 PM